
The window shows you the progress of the triggered actions. Some very complex computing processes that affect your computer capacity take place in the background. Open the preview window to view how the background processes are progressing.
The window shows jobs sent for output and their current states.
You can query the status of very time-consuming jobs (e.g. output via network) or jobs with a large data volume at any time.
•Active Jobs
The first job sent is marked active, the following ones are waiting.
•Finished Jobs
Only canceled jobs or ones that finished with error messages are shown. The job must be marked to find out the reason for the failure in "Status Message".
•Status messages
Details about the marked print job are displayed. The details can vary depending on your workflow (defined in the output parameter set).
•Print Next
Only applies to "Active Jobs". The priority of job number three and following can be changed to be printed after the active job. This job must be marked.
•Remove
A marked job can be deleted, an active one canceled.
A list of all the JDFs in the set hotfolder displays in the "JDF Jobs Status" grouping table if the JDF hotfolder is set in "File > Preferences > Import". The sorting and filter options in the grouping table (see Working with Grouping Tables for a general description) let you display the list in a clear structure and also save this display mode separately.
•Open
Opens finished jobs in the Signa Station.
•Delete
You can delete finished or faulty jobs.
•Close
The "JDF Jobs Status" window closes.
Prerequisite: The "JDF Import Rules Editor" option must be licensed.
The "Use Rules" option in "File > Preferences > JDF Import" must also be enabled.
The status message "...is disabled" displays at the top of the window if this is not the case. The defined rules are not applied in this case.
The JDF Import Rules Editor lets you define special rules for the import of JDF files. Important cases of application are, for example, different marks per binding type (e.g. collating marks only for perfect binding) or the "First Folding Sheet is Cover" function. You can define such cases of application best of all using special product part templates (see Example for Creating a Rule with the JDF Import Rules Editor for details).
The use of these rules lets you customize even more for JDF import. This minimizes user intervention. The use of the rules can make your data much more reliable when the "Prinect Signa Station Server" basic package is used. The applied rules (and also the press sheet-related subrules) are entered into the comment box of the product part so that you can follow why a rule was used.
You can define job (global) and press sheet-related rules.
The rules are managed in "rule groups" in the Rules Editor. A rule group consists of at least one "global" rule and can have any number of "press sheet-related rules as well.
The following window displays when you start the Editor from the menu using "Tools > JDF Import Rule Editor" or from the Preferences, "JDF Import" tab:

Note: Take note of the following basic principles when creating rules:
- As little rules as possible, just enough as is absolutely necessary.
- The rules in the Signa Station Server are not to act in a completely different way to those in the interactive Signa Station.
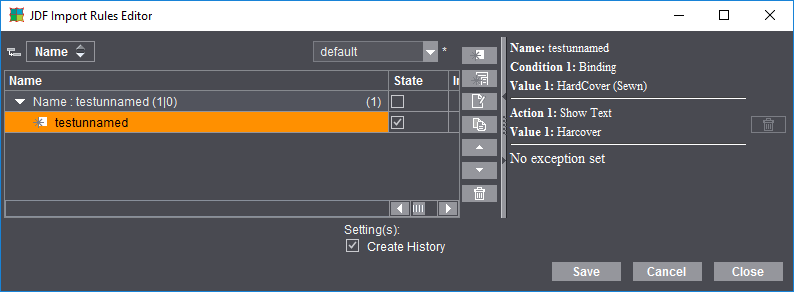
Layout of the window
The defined rules are found on the left of the window. The parameters display as tables; "Name" (name you assigned to the rule), "Status" (active/inactive), "Action" (HTML description of the rule functions) and "Info" (after import, shows which rules were used).
An overview of the conditions of the rules displays on the right.
You can enable the option for creating a record of the rules in the lower part of the window.
In this case, after a rule is applied during a JDF import, a history of the import displays on the right of the window.
Button Description

|
Create a job-related (global) rule. The "JDF Import Rules Editor" Assistant opens. You cannot turn a global rule into a press sheet-related rule. |

|
Create a press sheet-related rule that is then valid for specific presses, work styles or cutting dies. The "JDF Import Rules Editor" Assistant opens. You cannot turn a press sheet-related rule into a global rule. A press sheet-related rule always requires a global rule as its "basis". In other words, a global rule must be selected before you click this button to start the Assistant. |

|
The selected rule is edited. The "JDF Import Rules Editor" Assistant opens. |

|
The selected rule is copied. The "copy", with the rule name marked by "copy", is added to the end of the table. |

|
The selected rule moves up in the table. |

|
The selected rule moves down in the table. |

|
Trashcan button in the middle of the window: To delete the selected rule. |

"Save": Saves all changes and the rules in the editor.
"Cancel": Discards all changes in the editor.
"Close": Saves all changes and rules in the editor after you confirm the message that displays and closes the editor.
To create a rule
Double-click a rule in the left part of the window or click the "Create new rule" button. The Assistant described in the section below displays in both cases.
JDF Import Rules Editor Assistant
In the first window of the Assistant, you give a global or press sheet-related rule that you selected a name or edit it, if necessary. The second window lists the conditions that you can define accordingly for the rule. The conditions listed in the following screenshots can be set accordingly.
•"Note on job contains...": The respective MIS writes the job description into the job from where it is also available to the Prinect system. This can be any text. Using an appropriate rule, you can, for example, perform JDF import into Signa Station with a specific product part template. During analysis, the job description of the JDF is searched for each defined text in the rule. The condition is met if the defined text appears (anywhere) in the job description of the JDF.
•"Plausibility Check": If major parameters such as MarginLeft, MarginBottom etc. or even RelativeBox or AbsoluteBox are not specified in the JDF or the printable paper area is exceeded, an appropriate rule can run, for example, "Automatic Positioning" during JDF import.
Conditions when a global rule is to be used
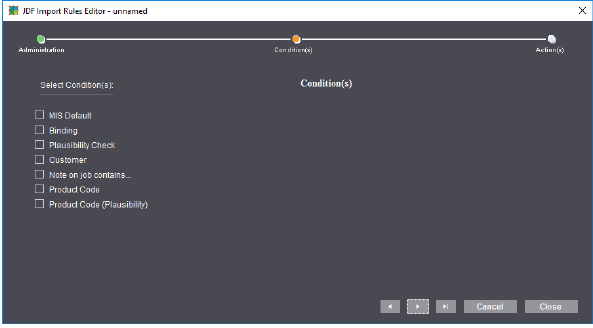
Conditions when a press sheet-related rule is to be used

A faulty rule can result if settings were made in "Actions" for one of the following actions and the resources or designations have changed since the time the rule was defined (e.g. by renaming the group):
•Product Part Template
•Plate Template (Default of Resource Group)
•Scheme (Default of Resource Group)
If the respective rule is activated, an error message will appear when you start Signa Station. A yellow warning triangle in the "Info" column indicates faulty rules when the JDF Import Rule Editor opens. The faulty rule then bears a red mark in the Assistant.
Example for Creating a Rule with the JDF Import Rules Editor
A simple rule will be created in the example below to explain the procedure: Different marks are to be used for perfect binding and wire-stitching during the JDF import.
This requires the following steps:
1.Define the product part templates that will be used during the import (see Defining the product part templates)
2.Create the import rules with the JDF Import Rules Editor (see Creating the Rules).
3.Enable the rules in the Rules Editor and, if necessary, in the Preferences
Defining the product part templates
In this case, setup of the appropriate product part templates is the key groundwork for creating rules in the JDF Import Rules Editor.
1.Create a suitable folder for these product part templates in "Resources > Product Part Templates", for example, "JDF-PP Templates".
2.Create a new product part template with the settings that will be used on booklets with perfect binding. Go to "Jobs & Resources > Resources > Product Part Templates" and select "New Product Part Template..." in the context-sensitive menu.
3.In the "Product Part" step, specify the name of the product part template (e.g. "PP Perfect Binding") and enter any page total (the actual page total will be determined later from the JDF; you only have to enter a value greater than zero in this box).
4.The settings in the "Master Pages" step can stay as they are in most cases (the actual page size will be determined later from the JDF; you can simply leave the default page size as it is).

Note: Special case for bleed and trim: If the JDF files from the MIS you used have no data regarding bleed and/or trim, you can specify the values for your shop in the product part template.
Caution: The values entered by the MIS are usually used if deviating values for bleed and trim are set in the JDF file!
5.Select "Perfect Binding" in the "Binding" step and set the correct values for your company (or the ones most frequently used) for perfect binding (e.g. "First Folding Sheet is Cover", "Pages in Cover" are "First", etc.).
6.In the "Marks" step, enable the marks wanted for perfect binding (e.g. collating marks) and set their parameters.
7.Leave the "Printing Plates" and "Folding Schemes" steps as they are. All the data on the selection of the plate template and the folding schemes are determined from the imposition parameters of the JDF file.

Note: This contrasts greatly to the product part templates that you would create for Web2Print automation.
8.Click "Save" and then "Close".
9.Create another new product part template named "PP Wirestitching" for the settings that will be used on booklets with wire stitching. Proceed as in "PP Perfect Binding", except that you select "Saddlestitching" in the "Binding Methods" tab and no collating marks in the "Marks" tab.
1.Open the JDF Import Rules Editor with this command in the "Tools" menu.
2.Start the Assistant by clicking the "Create new rule" button. The following dialog displays:


Note: The right part of the dialog is empty after a restart of Signa Station and when a rule is first created. The actions of the last rule are always used automatically if rules were already defined. This makes it simpler for you to create similar rules (= different condition but same or similar actions).
3.Give the rule a name, e.g. "Perfect Binding PP".
(4).Select a template if required. When you select a template, its conditions and actions are automatically used, but you can edit and extend them afterwards.
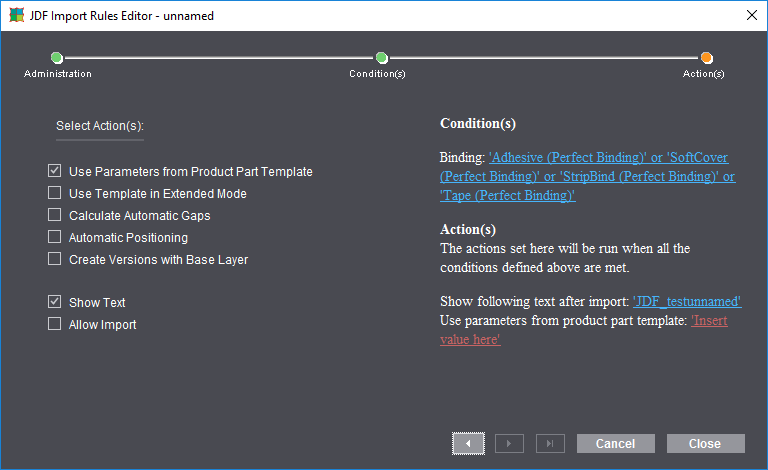
5.Go to the next tab, "Condition(s)", in the Assistant with the "Next" button.
6.Select "Binding" as a condition on the left of the window.
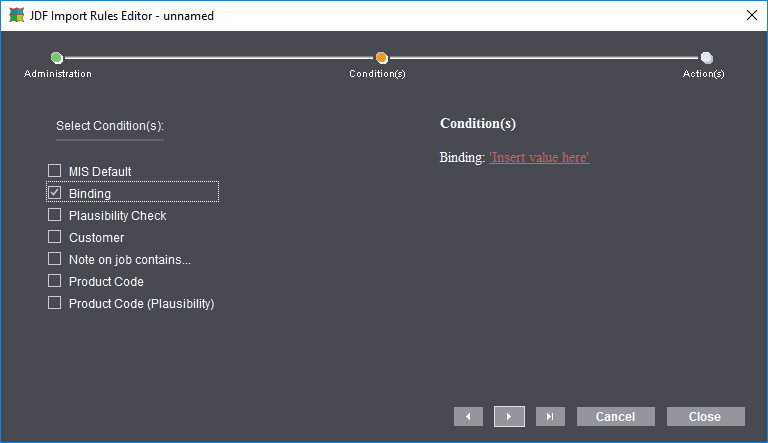
7.Click "Insert values here" in the window that displays on the right. The following dialog displays:
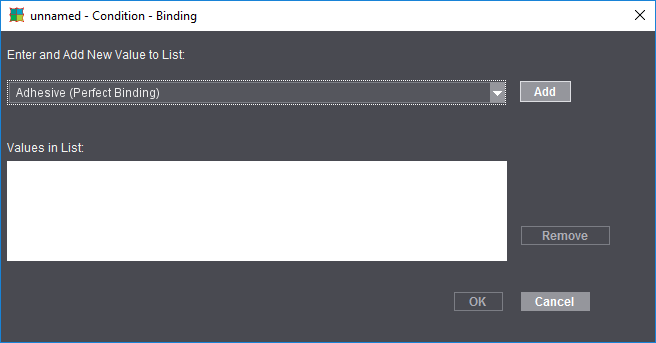
8.Select all binding types that have perfect binding in the list box and confirm your selection each time by clicking "Add". In the end, the dialog is something like this:
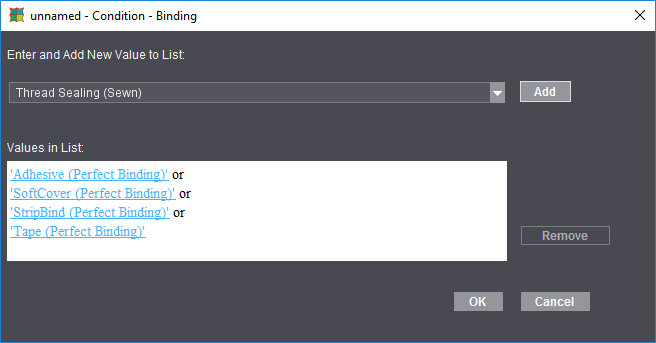

Note: The term "Adhesive" describes the attribute in the JDF.
9.Confirm the window by clicking "OK".
10.Go to the next tab, "Action(s)", in the Assistant with "Next" and enable "Use Parameters from Product Part Template" and "Show Text".
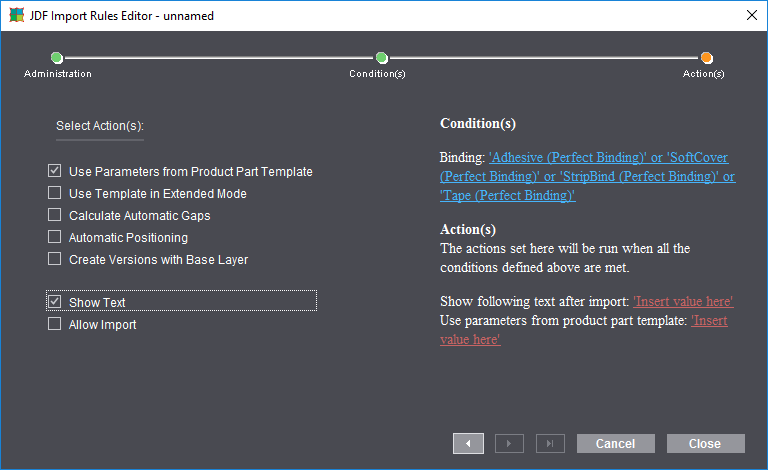
11.On the right of the window, click "Insert value here" next to "Show following text after import".
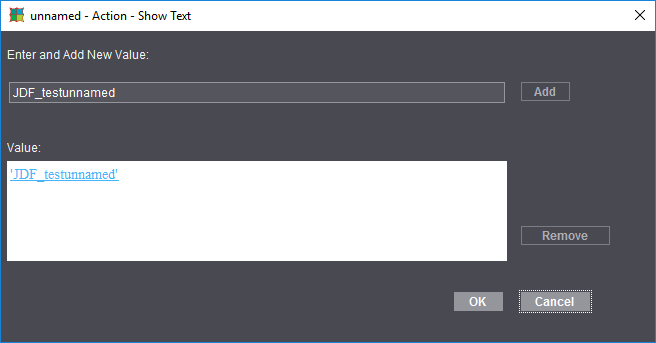
12.Enter the text you want and then click "Add".
13.Confirm the window by clicking "OK".
14.On the right of the window, click "Insert value here" next to "Use parameters from product part template".
15.Click the folder button and select the "PP Perfect Binding" product part template that you created for this.
16.Click "Add" if the value is not used automatically and confirm the window with "OK":
The result then looks like this:
17.Quit the Assistant by clicking "Close".

Note: The rule you created is defined only after you finish by saving your data in the "JDF Import Rules Editor" window.
The rule appears in the Rules Editor:
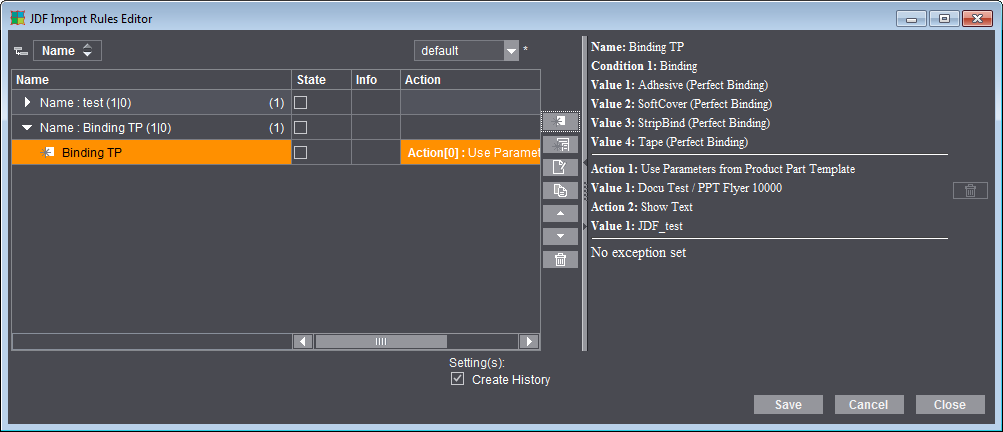
18.Save the rule by clicking "Save".
19.Create the rule for wire-stitching in the same way ("Binding Type" = "Saddlestitching", "Use Parameters from Product Part Template" = PP Wirestitching").
20.Enable the rules in the "State" column so that the rules will be applied the next time a JDF file is imported.

Note: The rules are applied only if their "state" is active and "Use Rules" is enabled in the Preferences in the "JDF Import" tab. A warning is issued in the caption bar of the Rules Editor if this is not set in the Preferences. If you use the Macintosh version of Signa Station, make sure that this function is enabled on the Prinect Signa Station Server!
This is where you check the tasks for automated processing of gang jobs with the Signa Station Server. This requires the "Gang & Sheet Optimizer" license in addition to the Signa Station Server.
In time-controlled automated processing, the set gang pool is scanned for certain criteria (e.g. paper, delivery date) and if paper utilization is satisfactory and production costs are low, the Signa Station Gang Server automatically creates a gang run form.
The defined tasks (5) are started either automatically at the set time or manually using the "Start" button (3).
The list shows all the defined tasks that are stored in the active resource group (4). Using the folder button (1), you can select a different task setup group from the resources, if needed. After the group is changed, you must save this change so that the parameters of the new group will be applied.
In the "Status" column, you can see whether a planned task is currently being processed, waiting to be started, disabled or was started manually. A warning appears in the status column if the filter assigned to the task is no longer available. The tooltip of the warning icon gives you more detailed information about the problem and how to remedy it.
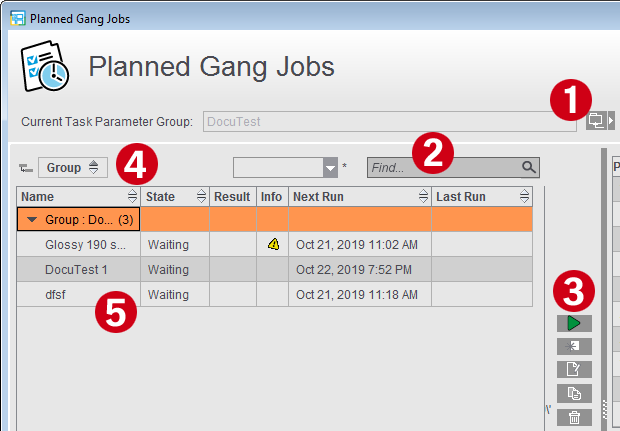
Using the search box (2), you can confine the tasks displayed to those whose name is found in the text entered.
These buttons (3) let you create a new task, manually start a selected task, open a task for editing, duplicate or delete a task. Changes are applied only after you save them to the resources.
If an output parameter set is locked in the resources, you can modify the parameters in the "Planned Gang Jobs" dialog or delete it from the list but the changes will not be applied to the resources.
Normally, new tasks are created or existing tasks are edited centrally with the Task Parameter Editor in the resources.
When you are creating a new parameter set, you must first select the resource group where the new task data will be stored. You will see a warning if this is not the active group in "Planned Gang Jobs". The new parameter set then does not display in the "Planned Gang Jobs" dialog.

Note: The data for job number and name as well as the product codes are always set in the product part in "Create Prinect Job" but it is also possible to set them directly in the gang task.
More details can be found in Create Prinect Job.
You can find details about the settings in Ganging Optimization Task Editor.

Note: To prevent unwanted changes to the task data, you can lock tasks or groups and protect the locking/unlocking of resources with a password.
You will find details about the currently selected task on the right. Below that, attributes for the last runs are listed in a table. For example, you can view the date of the run, the gang pool used and the results of ganging optimization. If the run is successful, an icon for opening the PDF report displays.
A warning or error icon also displays if there were issues when the gang job was being created. The icons also display if the gang job folder was empty or the result rejected because of bad rating. Click one of the icons to display the error message.
When sorting In the overview, you can now sort by the "Result" column. In this way, you can quickly identify if there is information on the gang jobs or if gang jobs were not executed:
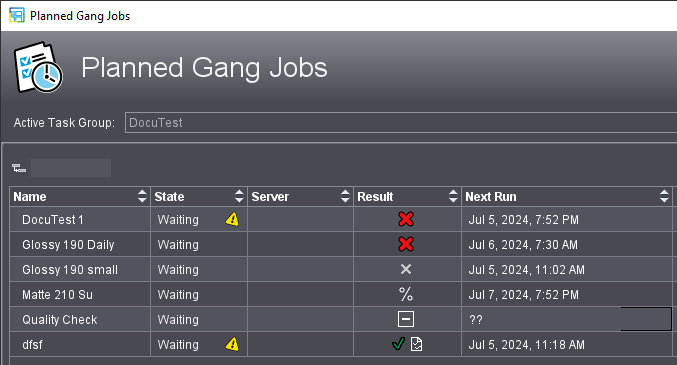
|
|
An error occurred during task processing (for example, no suitable folding sheet was found). |
|
|
There are no jobs whose target dates are before the set deadline. |
|
|
There was a certain number of possible jobs to be placed. However, the result was discarded due to set criteria. |
|
|
Successful output, but the report is no longer available or has been moved. |
|
|
Successful output, the report is available and can be opened by clicking the icon. |
|
|
The task has just become active and is "waiting" to be processed. |
|
Empty box |
The task has been newly created and has not yet been executed. |

Note on "Target Date" column: Only when you have the gang run form is it clear which processing steps are needed to process all the products on a sheet. Target date and press date can differ from each other accordingly. If the press date is defined, this date displays instead of the target date.

Note on the "Job Section" column: In the case of calendars and similar products that pass through the gatherer, it must be ensured that the sequence of the product parts can be assigned unambiguously and at an early stage. For this purpose, the position of the product part in the finished overall product is displayed in the "Job Section" column. This column is also displayed in the "Optimization" and "Results" steps, in the list view and in the HTML report.
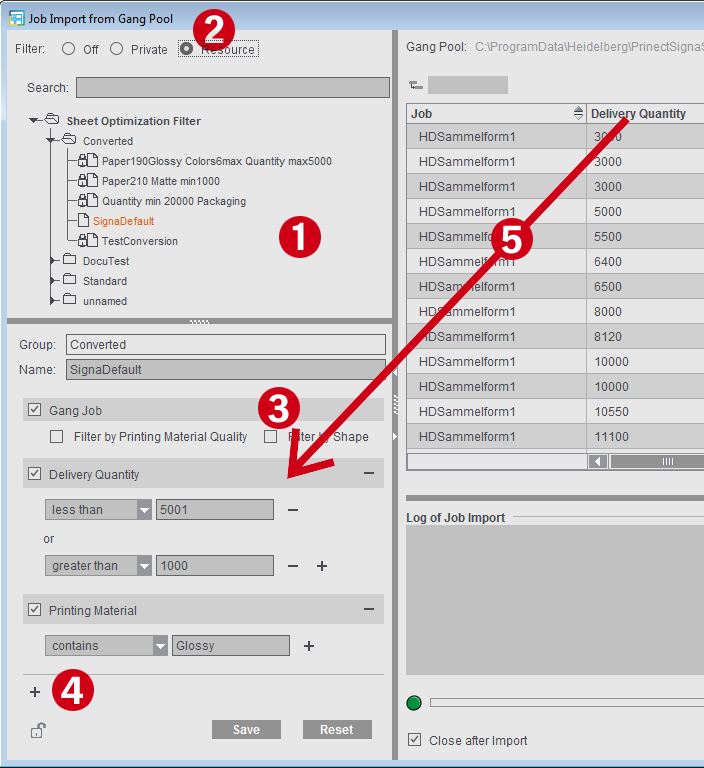
It is possible to view the gang pool (pool for gang jobs) at an early stage. You can create a gang job if there are enough jobs in the pool. The "Job Import from Gang Pool" window can stay open the whole time to monitor incoming jobs. All changes in the folder display automatically.
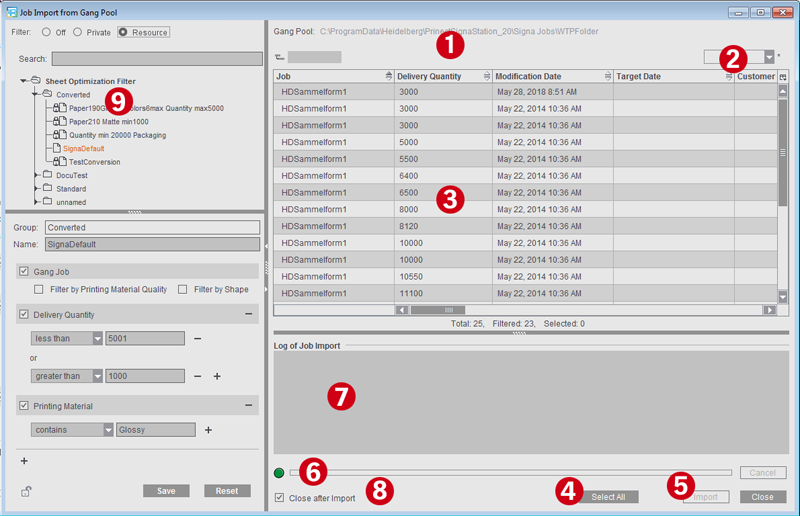
The dialog is basically divided into four sections that you can resize to suit your needs:
•List of the defined filters
•List of the filtered jobs that can be imported
•Filter definitions for the selected filter
•Log of the last job import
1.Display of the selected folder for gang jobs (the folder set in "Preferences > Ganging Optimization" or, if different, the folder set in the current job in the "Product Part" step).
If no gang job is currently open, you can select a different gang pool in the list box if you have defined several gang pools in the Preferences. The icon preceding the name of the gang pool indicates if monitoring is enabled, that is if file system changes are displayed automatically. See also Working with multiple gang pools.
2.List box for saved table settings or option for saving the columns currently shown. See Customizing the Column Set.
3.Display of the jobs in the pool with automatic and dynamic matching of the folder.
4.Selects all jobs that display in the folder.
5.Imports the gang parts to the gang job.
(See also What is the impact of the import procedure on the sort order of the input list?)
6.Progress bar for import of the jobs.
7.Error-free and faulty jobs display after the import.
8.Closes the window automatically after import.
9.Section for selecting and defining filters for the job list view.
If filtering is active, only the jobs matching the currently selected filter display in the list. For more details on the filter section, see Filters.

Note: To prevent unwanted changes to the filters, you can lock the filters and protect the locking/unlocking of resources with a password.
What is the impact of the import procedure on the sort order of the input list?
During gang job optimization, the order of individual jobs in the input list is taken into account. In principle, the individual jobs are transferred to the input list in the order in which they are selected in the "Job Import from Gang Pool" dialog.
Exception: Job parts belonging to the same job are sorted together in the order of the numbering in the "Job part" column. However, this only applies to one import process.
If further import processes are carried out, the selected individual jobs are added to the end of the input list.
Example: The gang pool contains jobs A, B, and C, each having 5 job parts.
During the first import, the jobs are clicked in the list in the following order: B5, B2, B1, A1, C5, A2, C1
The individual jobs are listed in the input table as follows: B1, B2, B5, A1, A2, C1, C5
Jobs B4 and B3 are clicked during the second import. The jobs are added at the end of the list: B1, B2, B5, A1, A2, C1, C5, B3, B4
If no gang job is currently open, you can create a gang job directly from the dialog by clicking on "Create Gang Job" (right below the log). A new job is created with "Ganging Optimization" already selected as product part. The "Job Import from Gang Pool" window remains open in the background.
You can customize the table view of the folding sheets/assembly blocks or customer jobs in the "Job Import from Gang Pool" window, i.e. you can hide columns or change the order of columns.
To do so, choose "Customize" in the list box using the context-sensitive menu and disable the columns you do not wish to see, or show them again if necessary. Using the buttons to the left, you can move the items up or down and to the top or bottom.
You can save this custom setting and, when required, load it again using the list box.
You can select filters in the left part of the Filters window (1) to confine the view to the possibly large number of individual jobs and to give the "Job Import from Gang Pool" window a clearer structure.
When filtering is enabled (2), the list of the gang parts is confined to the criteria of the currently selected filter, letting you immediately check the impact of the filters. When you disable filtering, all the jobs of the gang job pool display again.
•Filters "Off": The list of jobs is not filtered, all pending jobs display.
•"Private": This is where a filter can be created that is available only to the user concerned and is not available as a public filter in a resource group.
•"Resource": New filters are saved to a resource group and are available to all users who are working with these resources. Modifications to the resources impact the "Job Import from Gang Pool" window directly. Likewise, changes made to the filters in this dialog are saved directly to the resources.
If a product part template with filter is used for the gang job, for example, the window opens automatically, displaying the "Resource" setting and the filter of the product part template.
You can add additional filter criteria by clicking the plus sign (4) below the last filter criterion: The "Filter Rules" window opens where you can select one or more filter criteria and add them to the filter.
When you create a new filter, the criteria "Gang Job > Filter by Printing Material Quality" or "Filter by Shape" are available by default but not active (3).
As an alternative, you can also drag-and-drop columns from the table to the filter criteria section (5).
You can confine the number of filters shown using the search box. Only those filters whose names contain the search text display.

Note: In automatic ganging optimization via the Signa Station Gang Server, these filters are needed for controlling the tasks, for example, to single out all the jobs for a certain paper grade and use them for the optimization run (see Planned Gang Jobs ).
You can find details about the settings in Filter Editor.
Detach/Include Graphic View...
To display the graphic view better on your screen, you can detach the window from the normal view. The graphic view then appears as a separate window, giving you a bigger display or making it possible for you to work with two monitors. For more functions, see Mouse and Keyboard Shortcuts in Graphic Window.
You can use this function to study existing folding schemes or ones you created yourself in a three-dimensional animated graphic. A three-dimensional graphic is computed based on the rules created in the Folding Scheme Editor, showing you the fold direction and what the pages look like when folded.
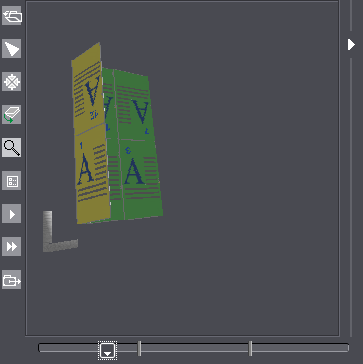
Button functions:

|
Opens an existing folding scheme. |

|
Deselects the other tools. |

|
Resets a rotated folding sheet to the way it originally was. |

|
Rotates and moves the animation. Click the animated graphic while holding down the mouse button and move the mouse pointer. To move the animation, hold down the alternative mouse button (PC: right mouse button, Macintosh: command key + mouse button). |

|
Zoom up graphic is set by default. A "+" appears in the magnifying glass. Hold down the "Alt" key to zoom down. A "-" appears in the magnifying glass. |

|
Colored presentation of the single components in the animated graphic (e.g. front and back). Page numbers can be shown or hidden. |

|
Starts the automatic animation. |

|
Starts the automatic, endless animation. |

|
Saves the animation as an animated gif file. |

|
Slider below the animated graphic for manual start. Click the slider while holding down the mouse button and move the mouse pointer to the right. |
Additional animations (via context menus)
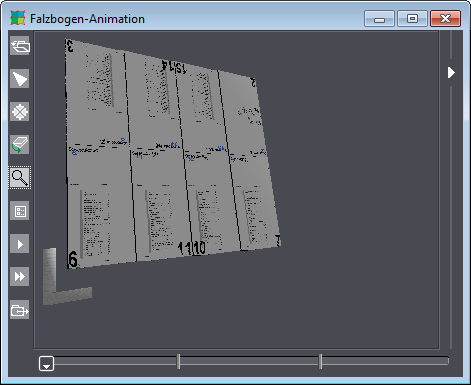
Folding Sheet Animation with Data Pages
In the graphic window in the "Folding Sheet/Assembly Block" tab, you also have the option of reviewing the folding sheet animation with the pages of the active job placed on it when you display the context-sensitive menu and select "Open Folding Sheet Animation" (only jobs in the "Imposition" work mode). The functions are described in the previous section.
3D Collating Mark Visualization
In the Browser window, you can view the collating marks of your active product part when you select the product part, display the context-sensitive menu and select "3D Collating Mark Visualization" there.
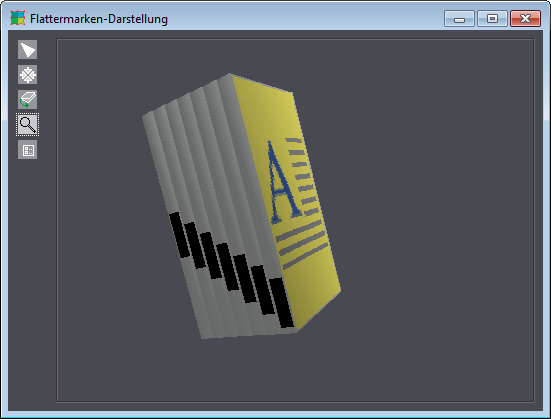
Button functions:

|
Deselects the other tools. |

|
Resets a rotated folding sheet to the way it originally was. |

|
Rotates and moves the animation. Click the animated graphic while holding down the mouse button and move the mouse pointer. To move the animation, hold down the alternative mouse button (PC: right mouse button, Macintosh: command key + mouse button). |

|
Zoom up graphic is set by default. A "+" appears in the magnifying glass. Hold down the "Alt" key to zoom down. A "-" appears in the magnifying glass. |

|
Colored presentation of the single components in the animated graphic (e.g. front and back). Page numbers can be shown or hidden. |
3D Reader's Spread Visualization with Data Pages
In the Browser window, you can view the reader's spread of your active product part when you select the product part, display the context-sensitive menu and select "3D Reader's Spread Visualization" there. Click the page margins to scroll through the pages.

Note: The function is available only in the "Imposition" or "Automatic Imposition" work modes.
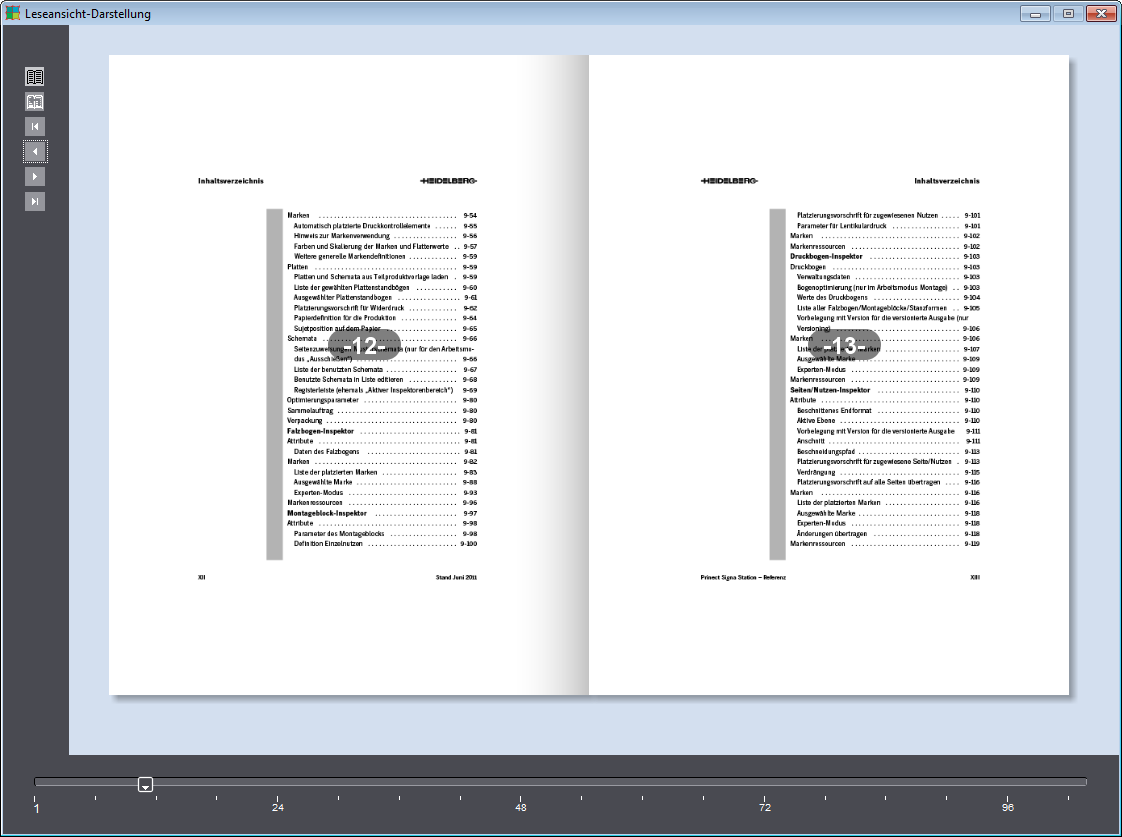
With the buttons to the left, you can access the following functions:

|
Show/hide the page number |

|
Animation on/off |

|
Go to the first page |

|
Scroll back one page |

|
Scroll forward one page |

|
Go to the last page |
There is a slider at the window bottom with a scale showing the page numbers in steps of 25%. You can directly access pages with the slider.

Note: At present, the 3D reader's spread is only available for products that can be viewed as a booklet. Fold-outs or similar are not supported.


