Job List
The job list shows all the jobs available in the Prinect Manager provided they are not hidden by search or filter conditions (see Filters and recycle bin). You can organize jobs into job groups. For example, you can create a separate group for each customer. You define job groups when creating a job. Furthermore, you can group the job list view by column headers (see Grouping function).
The job list view provides you with the following functions for configuration of the job list and for looking for certain jobs:
This lets you group items in the job list by column headers. These groups then display as folders. You can create multi-level groups, with each group creating another level lower down in the structure. You will find more information about the grouping function at the following point: Structured view.
You can confine the number of columns shown in the job list. To do this, you can select a predefined "column set" in the list box or you can use "Customize" to customize which columns will display in the list. You can save the columns you selected as a custom column set with "Save as". You will find more information about this at the following point: Define a custom column set .
The search function lets you search the job list for jobs. This function applies to the jobs that can be seen in the job list. This means that the jobs may not be hidden by filter settings. See also Search Function in the Job List.
Note: Besides this search function you can also open a Find dialog with special search functions using "Ctrl + F" (see Advanced Search). A search function continues to be available as well in the "Job" view. See Search function in the "Job" view.
The columns in the job list show various details about the properties of each job and its processing status.
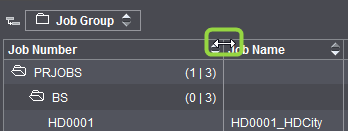
Customize column width
You can change the width of the column headers by positioning the mouse pointer to one of the splitter bars between the columns until the mouse pointer changes into a double arrow. Now click the left mouse button, hold it down and drag in the direction you want. The column width changes accordingly.
If necessary, you can use the horizontal scroll bars below the table to view a part of the table that you could not see.
"Workflow Status" column
The column only has icons and these will be described in more detail.
In the "Workflow Status" column, an icon lets you follow how far a job has progressed in its processing cycle.
Various icons indicate the different processes in the workflow. Processes that are used in the job are highlighted by a color icon. A gray icon indicates a process that is not available in the job concerned.
The icon displays a blue dot with a white checkmark if a process is finished. The icon displays a green dot with a white checkmark if the process is finished and the workflow status is set to "completed".
Examples:
|
Icon |
Name |
Explanation |
|---|---|---|
|
|
not used |
A process is not used (grayed) and skipped |
|
|
active |
A process is running. |
|
|
run through |
The process is completed. |
|
|
done |
The process is finished (workflow status was set to "completed") |
Right-click on top of the job list to open a context menu. When a job is marked at the same time, the functions in the context menu refer to this marked job. This means that many of the functions affect this job only.
The context menu contains the following commands:
|
Job list context menu |
|
|---|---|
|
New > Job |
Use this command to create a new job. |
|
New > Job from Template |
This command is available only if a job is marked. This command lets you create a job using the currently marked job as a template. In other words, the new job uses the job settings of the template job (see "Create new Job based on selected Job" Window). |
|
Open |
This command is available only if a job is marked. This command opens the marked job. You can also double-click the job or use the shortcut Ctrl+O instead of this command. |
|
Open Job Ticket |
This command is available only if a job is marked and a job ticket is assigned to the job. This command opens the job ticket of the job. |
|
Open with > Open Job |
This command is available only if a job is marked. This command opens the job. |
|
Open with > Job evaluation |
This command opens the marked job, showing a job evaluation. |
|
Open with > Job overview |
This command opens the marked job, showing a job overview. |
|
Cut |
Use this command to cut the marked job items and copy them to the clipboard. |
|
Copy |
Use this command to copy the marked job items to the clipboard. |
|
Paste |
Use this command to open the "Paste Job" dialog and paste a job in the clipboard to the currently marked position (see also "Paste Job" Window). |
|
Import |
Use this command to import a job that was exported from a (different) Prinect Manager. The "Import Job" dialog opens when you select this command. |
|
Replace by Import |
Use this command to replace an existing marked job by importing a job that was exported beforehand from a (different) Prinect Manager. The "Import Job" dialog opens when you select this command. |
|
Export |
Use this command to export a job. The "Export Job" dialog opens when you select this command. |
|
Archive |
This command archives the selected job. |
|
Retrieve |
Use this command to retrieve an archived job to the job list. |
|
Browse |
This command opens a browse dialog where you can open job data in the file system (see also "Browse" button). |
|
Add Files |
This command lets you add document files to the marked job (see also "Add Files" Window button). |
|
Submit to Ganging |
This command submits the marked job to a "gang job pool" (see also Gang jobs). Gang jobs are used to impose several print jobs jointly and, consequently, utilize the sheet layouts optimally by mixing pages from different jobs and placing them in such a way that the jobs can be produced with a minimum of waste. Gang jobs play a key role especially in a "Web-to-Print" workflow. The following conditions are applicable when you submit to ganging: •All sheets are submitted if there are sheets with assigned pages in the job. Nothing is submitted if no page is assigned. •The pages of page lists are submitted if there are page lists with assigned pages instead of sheets. All the pages of the job are submitted if there are no page lists with assigned pages. Nothing is done if the job has no pages. |
|
Lock |
This command excludes the marked job from all processing operations. You cannot edit a job in a "locked" state and no processing steps are possible. You can only delete a locked job. The job is released when you select "Lock" again. You can recognize a job locked by a user by the "user with lock" icon in the "Job ID" column and by the checkmark in front of "Lock" in the context menu. Only the lock icon displays if a job is locked by the system (e.g. when exporting a job) and not by the user. |
|
Mark as Canceled |
This command tags the marked job as "canceled". The "canceled" job state is equivalent to the "finished" state and is needed for a Web-to-Print workflow (see also 'Set Jobs to 'Canceled' ' Window). |
|
Mark as finished |
This command tags the marked job as "finished". The "Set Jobs to 'Finished' " dialog opens for this (see also "Set Jobs to Finished" Window). |
|
Priority |
Select the priority (High, Normal or Low) the job will have during processing. |
|
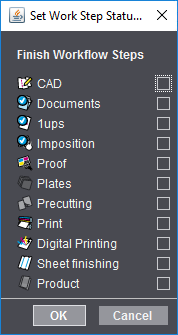
Set Work Step Status |
This menu command invokes the "Set Work Step Status" dialog. See Set Work Step Status. When the "Completed" status is enabled for a step, the icon of the element concerned has a green checkmark in the "Workflow Status" column, indicating that it is "completed". |
|
Manual Labor |
This command opens the "Manual Labor" window (see "Manual Labor" Window). This command lets you add "Manual Labor" as an attribute to a job. This means that a note is made in the shop floor data collection that manual labor (away from the automated Prinect workflow) was done on this job. |
|
Due Date |
This command lets you subsequently set a due date for a marked job. The "Choose Date" window opens for this. This is where you can enter a date (day and time) by which the job is to be finished (see also "Choose Date" Window). The data that you enter in this window display in the "Due Date" column. |
|
Start |
This command starts a suspended job (see also "New Job" button). |
|
Stop |
This command stops the marked job(s). If you marked a group, all the jobs within this group and its subgroups stop (see "New Job" button). |
|
Delete |
This command irrevocably deletes a marked job. The "Delete Jobs" dialog opens for this (see also "Delete Jobs" Window). |
|
Put in Recycle Bin |
This command moves a marked job to the recycle bin. You can either retrieve it from the recycle bin or delete it irrevocably. You can only put stopped, finished jobs in the recycle bin. A suitable message is issued if this is not the case. You can set a job to "finished" using "Mark as Finished" in the context menu. |
|
Rename |
Use this command to rename a job. The "Rename Job" dialog opens for this (see also "Rename Job" Window). |
|
Find |
This command opens the "Find Job" window (see Search Function in the Job List). This is where you can look for a certain job using various criteria and open it right away if desired. |
|
Refresh |
Use this button to refresh the job list. |
|
Collapse All |
Use this command to hide all open lower levels of all job folders. In other words, the folders are "collapsed". Hit the "arrow to the left" key if you just want to hide the lower levels of a marked job folder. |
|
Expand All |
Use this command to show all lower levels of all job folders. In other words, the folders are "expanded". Hit the "arrow to the right" key if you just want to show the lower levels of a marked job folder. |

Note: Some menu items have shortcuts listed beside them. You can invoke these menu items directly with the related shortcuts. See Keyboard Shortcuts.
Using this command in the context menu, you can set "Completed" as the status for each step in the highlighted job.