
With its components – the Prinect Prepress Manager, the Prinect Pressroom Manager and the Prinect Postpress Manager – the Prinect Prepress Manager represents the Prinect Workflow variant with the highest integration level. The Prinect Integration Manager offers complete integration of the entire production with its underlying workflows in prepress, the pressroom and in postpress.
The following press connection options are available:
•Connecting a Prinect Press Center Press
•Connecting a Prinect CP2000 Center Press
•Synchronization of the PDC configuration with the press
•Connection of Finishing Machines
•Offline Connection of a Press
Note: If you did not purchase a Prinect Integration Manager but instead purchased only a Prinect Pressroom Manager for example, you will not be able to connect all of the machines listed. You can check which machines (interfaces) you have licensed via the Prinect License Manager.
Depending on your Prinect workflow, you also have to set up the following configuration so that the jobs actually "arrive" at the machines:
•Workflow with a Management Information System
Management Information System (JDF) PPF Work-flow.
•"Pure" PPF workflow
With the Device Assistant, you set up all the devices (prepress, press, postpress) you want to the Prinect system to offer. Depending on the device classes (e.g. sheet-fed press, digital press or trimmer), the Device Assistant guides you through different steps.
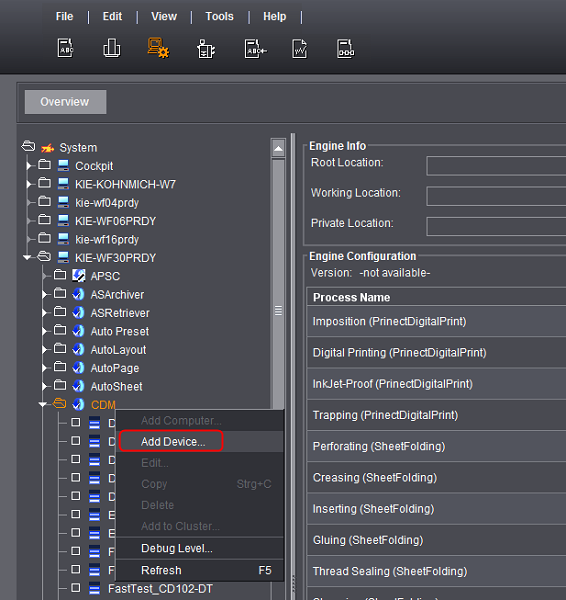
Proceed as follows to start the Device Assistant:
1.Start the Prinect Cockpit.
2.Go to "Administration > System" and select the computer on which the Prinect Manager was installed.
3.Highlight the engine "CDM".
4.Select "Add Device" in the context menu:
The "Device assistant" opens. You run through several steps here, depending on your device type:

Device name
(1) This is where you specify the name of the device you want to set up. e.g. "XL105-10P".
DeviceID
(2) This is where you assign a unique ID to the device.
•The "Device ID" must contain only the characters [a-z], [A-Z], [0-9].
•If the device ID has already been assigned, a corresponding message appears and you have to enter a new one.
•The device ID serves for unique assignment of the machine in your Prinect workflow. The device ID must be checked against the Management Information System (MIS).
(3) The table provides a fast overview of the devices that can be set up.
The available device classes depend on the license.
|
Device class |
Explanation |
|---|---|
|
Prepress, miscellaneous |
Used for all possible prepress workplaces (DTP, for example). |
|
Digital printing |
Used for connection of Heidelberg digital presses. (e.g. Heidelberg Versafire) |
|
Sheet-fed press |
Used for offline connections of presses (e.g. GTO). |
|
Printing miscellaneous |
Used to record activities outside the press (e.g. mixing ink). |
|
Cutter |
Used for cutting press sheets (e.g. Polar 137). |
|
Folding machine |
Used for folding press sheets (e.g. Stahlfolder KH 78). |
|
Saddlestitcher |
Used to gather folded sheets and then to stitch them with staples. Finally, three-knife trimming is performed (e.g. ST 450). |
|
Collator |
Used to gather folded or plain press sheets, for example, for calendar production. |
|
Perfect binder |
Used for perfect binding of books (e.g. Eurobind 1300). |
|
Three-knife trimmer |
As a rule, not a stand-alone machine but part of a saddlestitcher. A three-knife trimmer trims three sides of a block or brochure. |
|
Thread-sewing |
Used for thread-sewing books. |
|
Case making |
Used for producing book covers. |
|
Book production line |
Used for producing books, with several steps running in succession to produce the finished book. |
|
Die-cutter |
Used for die-cutting press sheets (e.g. Polar 106). |
|
Folder-gluer |
Used for producing folding cartons (e.g. Diana X 115). |
|
Postpress miscellaneous |
Used for recording manual workstations, for example. |
Connection
(4) Different types of connection are available, varying according to the device class.
•Direct connection of the machine
Only for devices that can be connected online. This connection type offers optimum integration. Job data are directly sent to the machine, and the machine sends back information such as machine status, job status and production data.
Finishing machines that can be connected online are connected using "Data Terminal with machine direct" or "Data Terminal with JDF Machine”.
•Data Terminal
For all machines and manual workstations that cannot be connected online. The operator enters machine production data on Data Terminal installed on a dedicated computer.
•Data terminal with counter box
For all machines that cannot be connected online and that transmit their production counters to the Data Terminal via a counter box. In this case you do not need to manually enter the quantity produced on the Data Terminal. You can connect up to 12 machines per counter box.
•Data Terminal with machine direct
For machines that can be connected online with an integrated Data Terminal (e.g. Stahlfolder TH/KH or Polar cutter). Like with "Direct connection of the machine", job data are sent directly to the machine, and the machine sends back information such as job status and machine status. Manual production data can also be reported back via the integrated Data Terminal.
•Data Terminal with JDF Machine
For third-party machines that can be connected online and that have an integrated JDF/JMF-based interface.
•Machine offline
Available for device classes "Cutter" and "Sheet-fed press". This connection type is intended for machines for which only presetting data are generated and which do not return any feedback. This option is intended, for example, for older Heidelberg presses that cannot be connected online.
This is where you can define whether only the available operations or also the planned operations (via the scheduler) are displayed on the press/Data Terminal (5).
•Show only workable operations.
Only the operations for which the preceding operation has begun or is complete are displayed on the press/Data Terminal during job selection.
This means that only the operations that can currently be processed are displayed to the operator on the press/Data Terminal.
•Show workable and scheduled operations.
The operations for which the preceding operation has begun or is complete and additionally the operations that were planned in the scheduler or the operations list are displayed on the press/Data Terminal during job selection. This means that the operations to be processed at a later time are also displayed to the operator on the press/Data Terminal.
This option is only available for Data Terminal devices (6).
Various time recording modes are available for recording production times via a Data Terminal. The time recording mode defines how the production times are recorded. A time recording mode must be assigned to each Data Terminal device.
The time recording mode was previously assigned when activating a device on the Data Terminal. This local assignment has now been replaced by a central assignment. The time recording mode is now defined when you define a Data Terminal device using the CDM (Central Device Manager).
Start stop absolute quantity
•The operation is started via an operation (PDC message) directly after loading
•The real time is recorded
•The specified quantities are added.
•Several users can log in to a device at the same time
•The quantity to be entered depends on the device type
Select this time recording mode if you wish to record the production times in "real time" when processing a job. This means that you record the start messages.
Example:
•Start "Setup"
•Start "Folding" > Stop "Setup"
•Finish job > Stop "Folding"
Time
•Is not available on devices with counter box
•Only one user at a time can be logged in to a device
•Only the total time of an activity is recorded
•An assistant cannot log in
•The start of the operation must be set manually. This means that the operation has to be started manually after loading.
•The quantity to be entered depends on the device type
Select this time recording mode if you only wish to record the duration of an activity when processing a job. This means that only the total time of an activity is recorded. This is only done once you have completed the activity. For example, you set up the machine and process the job. Only after that do you capture the required overall time for the setup (for example, 15 minutes) and the overall time for good production (for example, 120 minutes).
Option "Book Unscheduled Only to Jobs"
This option (7) is only available for Data Terminal devices. If you activate this option, only the "Jobs" column with the unplanned jobs is displayed. You can activate this option for workplaces that you do not wish to plan in the scheduler.
If you activate this option, these machines are displayed in a different color in the Scheduler. This is sensible if you wish to contract out jobs to external companies but nevertheless wish to include them in your planning.
•Operator (9)
The operator is always selected by default and cannot be deselected.
•Assistant
An assistant may also work at the press next to the operator. As a rule, the assistant has restricted permissions. You specify these yourself in Assigning operations and Assigning user groups.
•Multiple operator
The multiple operator may work on several machines simultaneously. This is often the case with finishing machines. The multiple operator can start jobs on several machines and report operations.
It is not possible for a multi user to switch to another function and still be logged in as a multi user at another machine. The multi user must first log out of all machines.
When a multiple operator logs out for a break, all machines where he/she logged in will notice this. When he/she logs in again, this only applies to the respective machine.
Standard values from the Master Data Store are entered here (10), depending on the selected device class. The standard values entered here are used as a template for calculating production times in a newly created operation. The calculated production times are then taken into account when scheduling the operation in the scheduler. In a Prinect workflow with a Management Information System (MIS), the production times are provided by MIS.
The "Performance parameters" are also important for the Planning Assistant. If no MIS data are available, these values are used to calculate how long an operation will take. For details about the Planning Assistant see Planning Assistant.
•Maximum Production Speed
The speed entered in this box is used in Analyze Point for calculation of the speed index. See Speed Index.
Additional general device configuration for device class "Sheet-fed press"
The following dialog is available only if you connect a device of the "Sheet-fed press" class with "Direct connection of the press" as the connection type.
For all other device classes, see as of Assigning operation groups.
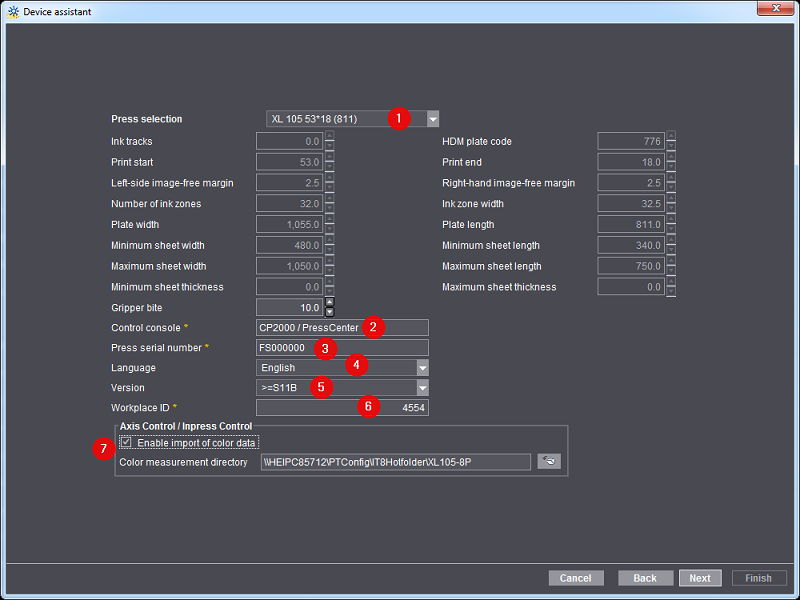
Press Selection
Select the exact type here, depending on the press you want to connect (1).
Control console
Select the control station of your press in the "Control console" section (2).
Press serial number
You can read the press serial number (3) at the control station or directly at your press. It is required for the following functions:
•For importing inking characteristic curves automatically from the press to the Prinect Integration Manager/Prinect Pressroom Manager. The prerequisite is at least Prinect Integration Manager/Prinect Pressroom Manager 11.0 and Prinect Press Center S11A.
•So that Analyze Point can evaluate the color data.
Language
The operations (PDC messages) are displayed on the control station of the press in the language selected here (4).
Version
The Version (5) describes the version of the respective press control station.
Workplace ID
This is the unique ID for the workplace (6) in your Prinect workflow. The number must have no more than 6 characters and be made up solely of figures.
You must also specify this "Workplace ID" on the control station of your press later when configuring the data storage.
Axis Control/Inpress Control/Inspection Control
You need this option (7) only for a connected color measuring system (except Image Control). When you enable the option "Enable import of color data", the generated color data is written to the color data folder specified here. The directory "[Prinect Manager server name]\PTConfig\IT8Hotfolder\[device name]" is always defined by default.
You then have to configure the color data export on the control station of the press. Refer to:
•for Axis Control at the Prinect CP2000 Center: Configuring color data export on the Prinect Press Center
•for Axis Control at the Prinect Press Center: Configuring color data export on the Prinect Press Center
•for Inpress Control at the Prinect Press Center: How do I establish a connection to Prinect Inpress Control?
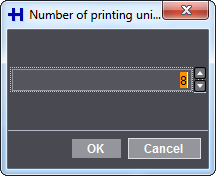
Number of printing units
In the next step, you define the details of your press. Enter the number of printing units here. This also includes coating unit, dryer and other units.
Configuring printing units
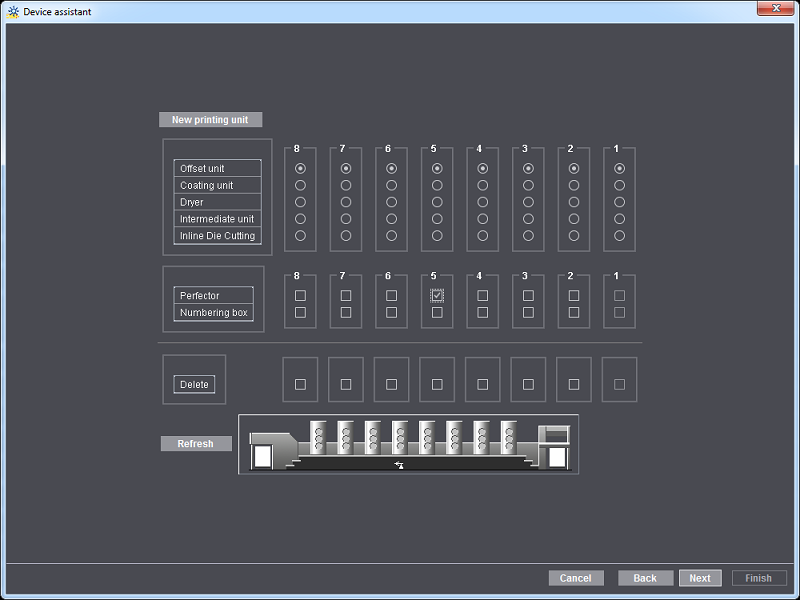
In the dialog window shown above, you configure your press by assigning functions to the respective printing units. For example, specify a perfector of your press in the respective printing unit.

In an operation group (cost type group), single operations (PDC messages) are combined to a group. This gives you a clearer structure for the subsequent manual shop floor data collection on the machine.
Here you define the operation groups available for shop floor data collection at the device you have set up. With the arrow buttons, you can add operation groups (add to the "assigned" list) or remove operation groups (add to the "available" list).
Refer to Action Groups (Cost Groups) how to set up more operation groups.
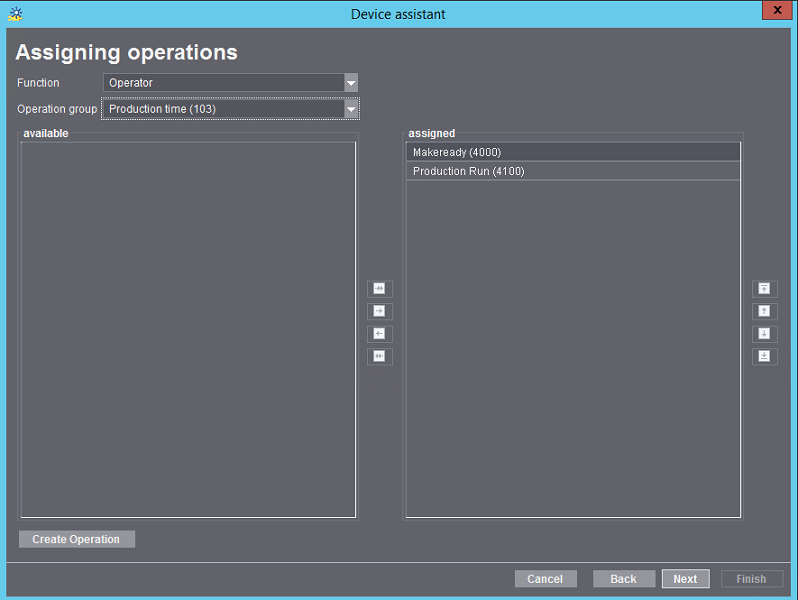
In this dialog window, you assign individual operations (PDC messages) to the operation groups (cost type groups) you selected beforehand. This assignment is necessary for each of the selected roles (operator, assistant or multiple operator).
With the arrow buttons, you can add operations (add to the "assigned" list) or remove operations (add to the "available" list).
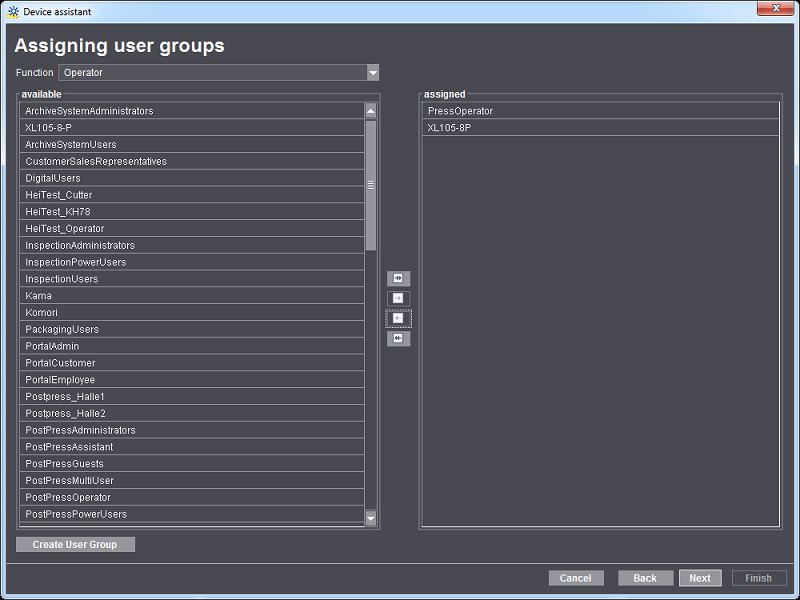
Every user defined in the Prinect Server must be allocated to a user group. The user group defines which user can log on to the machine and in which function.
At least the "*Operator" user group is assigned to the operator. For example, "PostpressOperator".
The "*Assistant" user group must be assigned to the assistant. For example, "PostPressAssistant".
The "*MultiUser" user group must be assigned to the multiple operator. For example, "PostPressMultiUser".
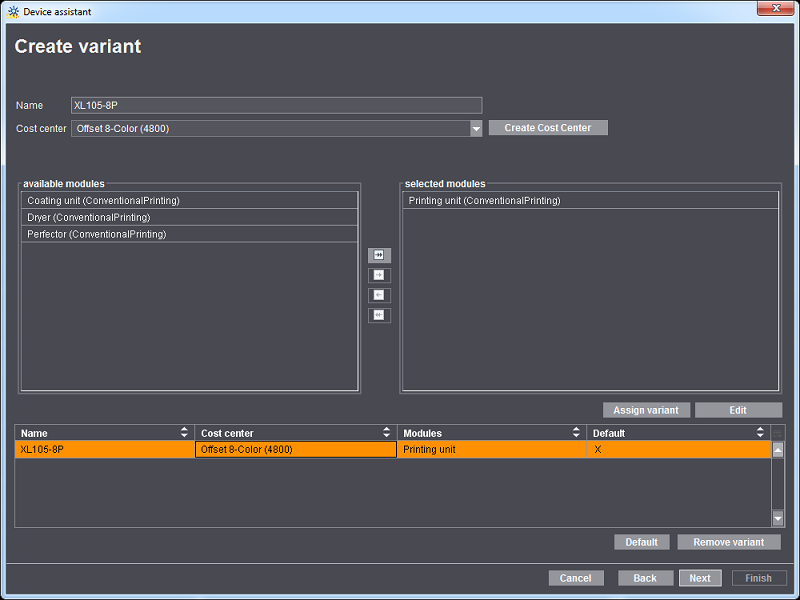
A variant is understood to mean a press configuration comprising individual modules. Depending on the previously selected device class, different modules are available for assembling a variant.
A job generally consists of several operations. In order that an operation can be processed by a machine, at least one module is required in all cases. For example, the "Printing unit" module is required for a printing press. So that it can also process jobs involving print enhancement (varnish), this press also requires the "Coating unit" module. If you combine both modules, you obtain a variant.
In the case of the saddlestitcher, for example:
•Variant_1 consists only of the "Gathering" module.
•Variant_2 consists of the "Stitching" module and the "Three-knife trimmer" module.
•Variant_3 consists of the modules "Gathering", "Stitching" and "Three-knife trimmer".
Different variants are required in finishing, in particular depending on the type of job to be processed.
•For the exact calculation of the actual production costs.
In practice, it is possible that a press is optionally operated with additional expensive modules and that a different hourly rate must be used for this. This must then be taken into account in the subsequent calculation.
•For a customer-specific report evaluation
Different variants are required if, for example, the customer wishes to generate statistics for a saddlestitcher in which the modules (variants) used are listed for every job and the different cost rates are to be taken into account. Or the customer would like separate statistics for the "Gathering" variant and separate statistics for the "Stitching and Three-knife trimming" variant.
How is the cost center assigned to a press or an operation?
Assignment to a cost center can be done by means of two attributes in the Management Information System:
•DeviceID
The assignment to the cost center occurs exclusively via the DeviceID of the press. You must perform the mapping "DeviceID -> cost center job costing" in the Management Information System. With this procedure, all times of this press are booked to the previously "mapped" cost center in the Management Information System. Independently of the defined variants. In this case, it therefore does not make any sense to define additional variants or costs centers.
•Variants
A cost center must be assigned to every variant. The transfer of the variant name to the Management Information System must be configured to take the different cost rates of the single variants into account. The implementation is realized by means of the "HDM:ModuleSetName=" attribute in the JMF. The "ModulSetName" corresponds exactly to the variant name that the operator assigned for a device when creating a variant. The attribute describes the variant that was used to start the operation. For example, "saddlestitcher with stitching and three-knife trimmer". This information can be used, for example, to define another operation with a different cost rate.
A summary of the device parameters is then displayed. Here you can check again whether the device has been configured correctly. If you would like to make changes, use the "Back" button to return to the corresponding dialog window.

With this option (1) enabled, the machine operator receives the MIS job ticket and additional job-related information.
The extended job ticket contains an overview of previous and subsequent operations and their status. When Scheduler is enabled, you also see the checkpoints of the operation.
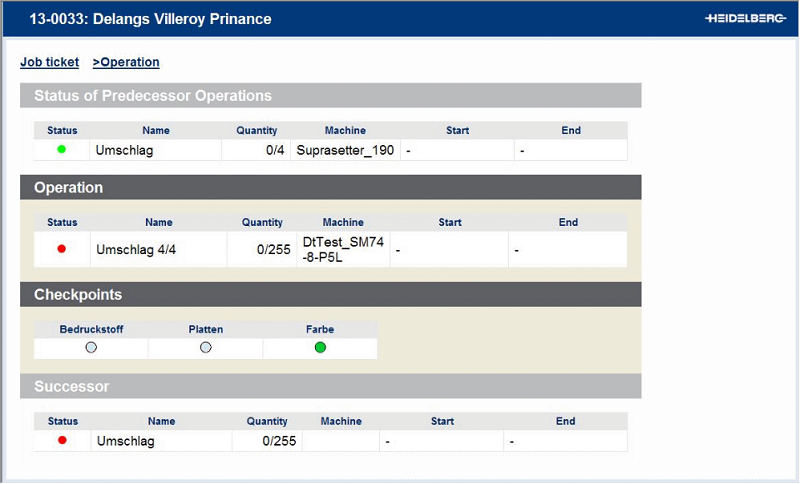
The following presses support the extended job ticket:
|
Machine class |
Connection type |
Machine version |
|---|---|---|
|
Sheet-fed press |
Direct connection of the machine |
CP2000 V47 and higher |
|
Folding machine |
Direct connection of the machine |
|
|
Saddlestitcher |
Direct connection of the machine |
|
|
Folder-gluer |
Direct connection of the machine |
|
|
Perfect binder |
Direct connection of the machine |
|
|
All others |
Data Terminal |
|
During production, the printed sheets are laid on pallets for further processing (for example, cutting, folding or external processes). To make sure that these pallets can always be uniquely identified, pallet sheets are attached to the pallets.
By enabling the option (1), the machine operator can print a pallet sheet with the operation (PDC message) "Print Pallet Sheet". To do so, this operation must be assigned to the user. You can check this in the Summary (2).
Also specify the printer on which the pallet sheet is to be printed (3). Ideally, it should be as near to the device as possible. PDF export is also possible.
For more details on the pallet sheet, see Creating a plate set sheet.