
What's New?
In this chapter, we would like to highlight to you briefly the main enhancements and changes in the current Prinect Signa Station. The blue links will lead you directly to more details on the topics.
What's New in Prinect Signa Station 2019
The licensing model has been simplified: The "Prinect Signa Station 52" and "Prinect Signa Station 145+" licensing options have been dropped. As a result, only the two variables, "Prinect Signa Station 75" (max. 75 format) and "Prinect Signa Station 106+" (now the option without a size restriction) now exist.
Existing licenses were transferred accordingly: "Prinect Signa Station 52" licenses have become "Prinect Signa Station 75" and "Prinect Signa Station 145+" licenses have become "Prinect Signa Station 106+".
In addition, there is also the license for the "Label Pro" option.
In an upgrade, the license configuration of the predecessor version is applied automatically. There is no license request. In this case, the basic version is applied as it is and all available additional options that have at least a floating license are also enabled. In the case of licensing conflicts, these license options may have to be disabled again.
More details can be found in Licensing .
•"Only One Press Sheet" option
In the "Sheet Optimization Setup" dialog (invoke with the "Advanced Settings" button), you can set in the "General" tab that exactly one (good) press sheet is to be generated during optimization. After you save your data, gang parts that are not placed are returned automatically to the pool for gang jobs.
See Only One Press Sheet
•A different default folder for job import to a gang job can be set for a specific job in the "Product Part" step. The default folder, however, can no longer be changed in the "Job Import from Gang Pool" window. The setting is saved in the job. This means that when the job opens again the setting defined is kept even if the preferences have changed in the meantime.
More details can be found in Default for Gang Pool
•The execution times for automated ganging have become more flexible (selection of single days in the week, several execution times per day).
•The "Planned Tasks" were enhanced by the option of entering two product codes for rating. You can use these to define product codes based on which the gang jobs will either be automatically processed further by the Prinect Cockpit ("green" rating) or stopped for manual correction ("yellow" rating).
See Planned Gang Jobs for more information about these items.
•You can now set the kind of sheet optimization (previously Multiple Sheet Optimization) you want directly below the "Ganging Optimization" work mode.
•In the input list for sheet optimization, you can now also edit the grain direction for gang parts with a double click.
More details can be found in Input List for Sheet Optimization (grouping table)
•In the input list for sheet optimization, in the "Results" step and in the optimization reports, additional information and icons were introduced that provide you at a glance with information about the state of the gang parts.
You can find a description of the meaning of the icons in: Input List for Sheet Optimization (grouping table).
•The "Target Date" column in the "Job Import from Gang Pool" window shows either the set target date or, if available, the date for printing.
More details can be found in Job Import from Gang Pool
•The Product Code Editor was revised to make operation easier and for future setups of the product codes. The functionality was also applied for editing the "Product Code" filter criterion in "Job Import from Gang Pool".
Note: The dialog for creating a product code filter is invoked from the Product Part Template Editor in the "Product Part" step. In the open job, the product code filter displays for your information only if at least one filter criterion is defined.
More details can be found in Product Code Editor
•In the "Product Part" workflow step, you can set a product part template group for the product code search that is different to the one set in the Preferences. In the set group, the gang parts in the ganging workflow are looked for by product code (only with "Sheet Optimization without Layout Default").
•The defaults for the costs in "Sheet Optimization Setup" were adapted:
·"Cost" (tab) > Print Preparation (global)": 50 (previously 250)
·"Cost" (tab) > Print Preparation (per separation)": 50 (previously 0)
·"General" (tab) > Quantity as Multiple of": 1 (previously 100)
·When "Max. No. Articles" is enabled in the "General" tab: 10 (previously 1000000)
•The "Target Date" shows not only the day but also the time in hours:minutes if it is not 00:00 hrs (in the input list in the "Optimization" step, in the "Results" step, in the optimization report and in the "Assembly Block" list view.
•You can now also set the time when you set the deadline. If no time is specified, the time is set to 23:59:59 of the set day. See Edit Deadline .
•As early as in the product part template or in the "Schemes" step, you can specify which folding sheets are intended for ganging. You can use this marking to submit these folding sheets automatically to ganging.
See Parameters for Ganging Optimization
•New option, "Label Pro", for editing labels. Label Pro can be licensed together with Packaging Pro or separately.
See Licensing for more details or separate "Help Packaging Pro/Label Pro" (invoke with the ? menu).
•New functions in the "Packaging" step if "Label Pro" is licensed: create a CAD file with Label Pro, save as a CAD file and save the CAD file in the tool pool.
See Cutting Die File and Main Settings.
•In the "Packaging" work mode, the assigned PDF files also display in the article table in the "Article" step.
•New tab, "Packaging", in the Preferences for a clearer overview of the preferences for the Packaging mode.
•In the "Packaging" tab, you also set a CAM/CNC machine and the folder where the CAM files will be stored. Using the functions in Label Pro, you can send the layout of a cutting die to a CAM/CNC machine to produce small batches and prototypes. You can find details about Label Pro in its Online Help.
See Packaging.
In the case of version clusters in the JDF workflow where several product parts are needed (e.g. because of a different number of pages, different folding sheets), the various product parts are created automatically during the import. The press sheets are created in the cluster based on the data from the JDF. It is no longer necessary to manually create the deviating product parts for the other versions as was the case up to now.
•New tab, "Ganging Optimization", in the Preferences
This is where you now set the default templates for sheet optimization (previously in "Resources"), the default product part template for the product code search (previously in "Import") and the default folder for the gang parts that will be imported to a gang job. The default for the product code search refers in this case only to sheet optimization. For JDF import, you can select a different default in the "JDF Import" tab.
See Ganging Optimization.
•New tab, "Packaging", in the Preferences
The "Packaging" tab was introduced in the Preferences to make handling of the default easier with the licensed Packaging Pro and/or Label Pro option. The setting for the default folder for CAD files was moved here from the "Paths" tab, the setting for the cutting line type from the "Defaults" tab. Likewise, the defaults for marks relating to the packaging mode are now set in this tab.
See Packaging.
•New editor for "Paper (Printing Material)" resource
With Prinect Signa Station, you can also create or edit a MDS paper resource (including selection of a feed direction). An editor especially for this is now available analog to the Printing Material Editor in the Prinect Cockpit.
See Paper (Printing Material) - MDS Editor.
•New default resources for digital printing
For Labelfire and Primefire, the following resources are now available in their "Standard" group:
Digital presses:
·Labelfire 340
·Primefire 106
Output parameter sets:
·Labelfire 340 (JDF)
·Primefire 106 (JDF)
Plate Templates:
·Labelfire 340
·Primefire 106
•New folding schemes for Heidelberg Stahlfolder TH/KH-82-P, TX96 with Pallet Feeder PFX folding machines
The 27 new folding schemes (L*, S*) follow a set naming scheme and are designed mainly for use of the above-named folding machines with a PFX feeder.
Optimization of the User Interface

|
•Quick selection via the folder buttons is now available not only for resources but also for resource groups. |
•Selection of folding sheets and pages in the graphic window:
The folding sheet is selected when you click a page first, another click selects the page itself. You can toggle between the two possible selections with each further click. Hold down the Ctrl key when you click if you want multiple selection.
•The behavior of duplicated assembly blocks has been revised to the effect that a change to one duplicate (size, 1up copies) is mapped immediately to the other duplicates if this makes sense.
The parameters in "Position X" and "Position Y" are applicable only for the selected block and also the various margins ("Left Margin", ...) refer only to the active assembly block. The reason for this is that some MIS systems define the position of the various duplicates on the sheet by assigning different margins and, for that reason, different margins must be possible.
•"Subject Position on Paper" in the "Plates" step
To position the subject centered horizontally, up to now you had to disable automatic positioning and enter a value of "0" for the "left" offset. Now you can select "Center Subject Vertically" or "Center Subject Horizontally" to place the subject automatically centered. An input of "0" for the "left" offset now places the subject exactly on the left margin as to be expected.
As of version 2019, jobs from predecessor versions where horizontal centering was set with "Left offset = 0" open automatically with "Center Subject Horizontally" enabled.
•Use smallest suitable paper for the Intent workflow: When determining the production paper, a paper quality for production is sent via the Intent JDF (e.g. Web Shop) that determines the selection of the real paper for layout generation from the MDS. Up to now, the largest paper that still fitted on the plate was used.
In the Intent workflow, the smallest possible paper of suitable quality is now picked from such available papers to keep waste at a low level. In this process, attention is paid to the fact that neither the subject nor the related marks are outside the paper. In addition, the subject and related marks and the marks with a paper reference may not overlap.
If no suitable paper is found, the largest possible paper is used as before.
•The display time for tooltips was upped from 4 seconds to 10 seconds.
New features in the list view
•"Transfer Table Setup (of All Tables) to Server"
The column setup of the list view can now be sent from each Prinect Signa Station to the Prinect Signa Station server and Prinect Signa Station Gang Server and no longer must be set directly on the server. You can send the table setup of one specific list view or you can send the table setups of all list views at one go to the server.
See Context-sensitive menu on items in the table (all lists)
•Additional "Rating" column in the press sheet list view
If the press sheets were generated using sheet optimization, then quality criteria are applied to the generated press sheets. These produce a rating that results in one of the three traffic light colors (green, yellow, red) and the extent to which the state is achieved in percent. This rating already displays in the "Results" workflow step and in the HTML report on optimization. You can now also show the values in an additional column in the press sheet list view.
The "Rating" column is automatically hidden if the column is in the table setup but the open job is not a sheet optimization one. If the table setup opens in such a case, the column is tagged by a * indicating that it is not relevant for the current work mode.
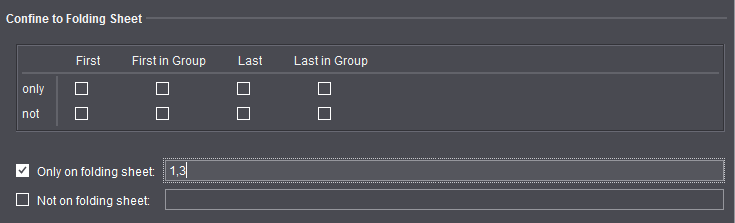
•Confine automatically placed print control marks to certain folding sheets
When you define automatically placed print control marks like cut marks, you can define that these are to be output only on certain folding sheets or that certain folding sheets are to be excluded. With folding sheet labels, you can also make a general selection through the group in addition to specifying the folding sheets directly.
See Sheet Label Parameters 1 and 2 and Confine to Folding Sheet.
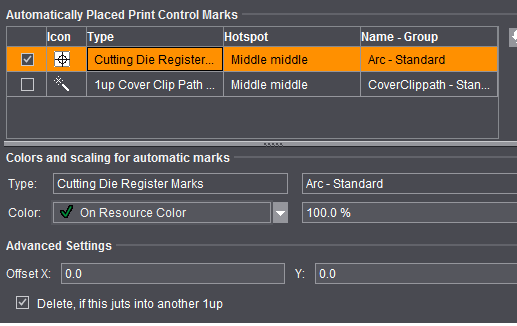
•New automatic mark, "Cutting Die Register Marks"
In the "Marks" step, automatic "cutting die register marks" can be added to the corners of each cutting die (with offset). The positions of these marks are sent to the cutter that "punches" the cutting die (especially for CAM/CNC machines).
Refer also to "Mark Type".
•New default marks: "NelaPlateControl" and "NelaPlateControlDetails"
A particular structure for a Data Matrix mark was agreed upon with Nela for the interaction with Nela plate logistic systems so that the mark to be imaged on the plate contains all the necessary information, for example, to be correctly assigned to the plate stacker. The new "NelaPlateControl" mark in the "Standard" group is equivalent to the SF-NELA-Prinect barcode definition. The "NelaPlateControlDetails" mark shows the content of the "NelaPlateControl" mark in plain text.
See also Standard Marks.
•Position fold lay mark also on opposite surface
To date, the fold lay mark was positioned always as set for the fold lay mark defined in the scheme (generally the back). The new "Position additional lay mark on opposite surface" option lets you place an additional fold lay mark on the opposite surface (generally the front).
See also Fold Lay Mark.
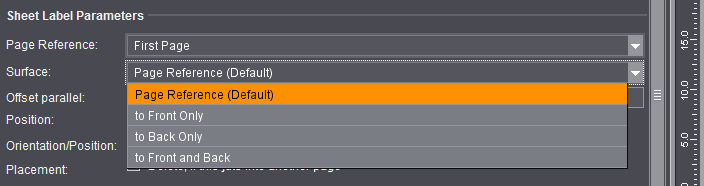
•Set surfaces for folding sheet label
You can now also directly set the surface on which the folding sheet/assembly block label will be placed in addition to doing this through the page reference. You can select between four different settings in "Marks > Sheet Label Parameters > Surface". The only option to date ("Placement > to Front and Back") has been dropped as a result because this is one of the possible options in "Surface".
•Set orientation of the folding sheet label in steps of 90°
Up to now, the folding sheet label could be output rotated only by 180°. When you select "Center" as the position, you can now set rotation either by 90°, 180° or 270° in "Orientation".
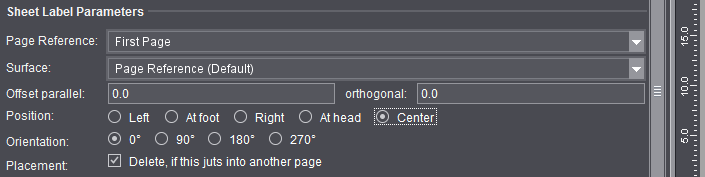
•An additional feature, "Move to Page Center", was introduced for the folding sheet label to be able to place it automatically centered to the page in the spine. The folding sheet label can be automatically placed centered to the page in the spine if this option is enabled and the right page reference and hotspot of the mark are selected.
See Sheet Label Parameters 1 and 2 for more information about these items.
•Color Control Mark (with AutoClip to subject) - new parameter: Bottom/Top Margin
A margin with paper white around the color control mark is needed so that Inpress Control and Image Control can measure these strips properly. To date, color control marks with AutoClip are placed directly onto the side and, as a result, there is no such margin. In the Color Control Bar Editor, two additional boxes are now available in "Color Control Mark (with AutoClip)": "Bottom Margin" and "Top Margin". This margin is included when looking for free space on the paper, with the result that the color control bar is no longer positioned directly on the side.
See Additional Attributes for Color Control Marks
•Barcode marks freely scalable by selecting "User-defined" as the "Module Width"
•New tool, "Barcode object", in the Marks Editor
This lets you create Marks Editor marks to which barcodes can be inserted as graphic objects. The settings that are possible are equivalent to those in the Barcode Editor. In addition, you can define the starting point (bottom left corner of the barcode) on the canvas analog to the other graphic objects. You can create ASIR marks with this function without "IDAutomation" as the font.
See Graphic Area
•New setting for text marks: "Mark Height"
Select between "Default" (previous performance with margin), "Compact" (smaller clip path) and "Very compact" (smallest possible height, descenders are cut off).
See Creating a Text Mark
New features with placeholders
•$[PressID]
The new placeholder, $[PressID], is not replaced by Prinect Signa Station but in the workflow by the Prinect Cockpit. It is replaced by the press ID.
•$[SurfaceCharacter], $[PlateSizeX], $[PlateSizeY]
A particular structure for a Data Matrix mark was agreed upon with Nela for the interaction with Nela plate logistic systems so that the mark to be imaged on the plate can transport all necessary information. The new placeholder, $[SurfaceCharacter], is replaced by front surfaces ("F) and back surfaces ("B). The $[PlateSizeX] and $[PlateSizeY] placeholders are replaced by the plate size.
•$[PressSheetGangPartOneUpCount], $[PressSheetCopiesOfGangPartOneUp], $[GangPartOneUpCount], $[CopiesOfGangPartOneUp]
For gang jobs, the information about how many gang parts are on the sheet and how many copies per gang part are on the sheet is important for finishing. The new placeholders now make the required information available.
•$[PrintDate]
Only when you have the gang run form is it clear which processing steps are needed to process all the products on this sheet. The print date results counted back from the target dates.
•$[LastFoldingSheetMarker]
Identifies the last folding sheet of the source job
•$[JobCounter]
Names the job in the AutoGang environment (replaced by Prinect Integration Manager).
•$[DocumentCreationDate], $[DocumentModificationDate]
Using this, the modification and/or creation date of the PDF document can be output in a page-related text mark, for example, to be able to detect the various versions of correction PDFs of the same name during proofing.
See List of implemented placeholders for text marks by groups for a description of the new placeholders.
•"$[QuantityPerSheetRegion]" (Delivery quantity per folding sheet)
This placeholder displays the delivery quantity, divided by the number of copies placed on the sheet. It can be used in all modes (group of placeholders that are always replaced by Prinect Signa Station). If division of the delivery quantity by the number of copies does not give you an integer, the result will be rounded up to the next higher digit. Example: Delivery quantity = 1215, folding sheet X as double 1up on the press sheet, mark set for folding sheet X: 1215/2 = 608 (rounded up)
Background: If the last step of the surface is produced on different machines and not all of the available sheets are to be processed, the mark tells you when the desired delivery quantity is reached.
See also Group: Replacer in Prinect Signa Station.
•$[color all-c] and $[color all-a] placeholders are not replaced only during the output but already during editing. As a result, details can display in the graphic view, in the list view and and in the report.
See also Group: Replacer in Workflow.
Using these placeholders, you can generate marks that output the colors used in the job or on the press sheet as text.
This is pure text replacement. For that reason, for a correct replacement of the color placeholders in the report, it is especially important in the Prinect Cockpit workflow that the colors are already known in Signa Station at the time of output. In other words, that the content is assigned.
The $[color] and $[ColorCode] placeholders continue to be not replaced in the graphic view, in the list view and in the report because these generally overprint during the replacement of all colors. These placeholders are designed for use on the plate.
•Formats for layer placeholders
Placeholders showing layer-specific data, like the name of the assigned PDF document, to date always showed the data of the last active layer (generally the desired layer in versioned jobs). The new format makes it possible to replace the data for the layer specified in the placeholder.
•Formats for unit-specific placeholders
Placeholders that are unit-specific, in other words where the unit set in the Preferences plays a part, to date were always output in the unit set by default. It is now possible to show this in a unit that deviates from the Preferences.
•Formatting of date placeholders
You can set the date and time in very different ways. This can be done through formatting because it is pointless to provide a separate placeholder for each possible notation. To format a date placeholder, the introductory formatting character, the colon, is followed by "@" and after that the date format is set.
See Formats for placeholders for information about the formats.
The Online Help is launched via a URL link on a Heidelberg WEB server. If a computer does not have direct access to the Internet, the Help feature is routed through the PMC to the Internet. Online Help is no longer installed locally. This reduces the data volume during updates and you always have the latest Help contents.
What's New in Prinect Signa Station 2018
Design Optimizations in the User Interface
After a new basic user interface with a dark background was introduced in version 2017, further enhancements regarding readability and clarity have now been implemented.
More details can be found in The Heidelberg User Interface.
The "Barcode Generator" license option is no longer a separate license but is part of the basic functionality.
See Licensing for a further description of licenses.
•Direct output to the MetaDimension RIP is no longer supported as of Version 2019 because the MetaDimension workflow has been discontinued. Instead the Prinect Renderer has been made available to make direct output from Prinect Signa Station still possible (see Output Parameter Set Editor and Workflow: Prinect Renderer (via JDF)).
The output parameter set must be modified once if jobs from earlier versions that were configured for output to MetaDimension are to be output again.
•Preferences for output are grouped in a tab:
In the Preferences, all the settings for output were grouped in a separate tab, "Output", for a better overview.
This is where you will now find the enhanced "Proof Attributes" table (previously in the "Processes" tab) with setting options for the various profile lines (color, width, type) and the "Default Screen Angles for RIPs" table.
See Output.
•In the Output Parameter Set Editor, a separate tab, "Report", was added for the report settings. This is where you will find the settings for the "Report Output Folder" (previously in the "Finishing" tab) and additional setting options for XML reports. See ’Report’ for details.
•The introduction of the "Ganging Optimization" work mode combines the "Gang Job" and "Sheet Optimization" operations and you will find all workflows resulting from this in the workflow bar in the "Product Part" step.
See Ganging Optimization for a description.
•The separate single sheet optimization was dropped. Jobs from predecessor versions that were created with single sheet optimization can be opened and, if necessary, converted with Prinect Signa Station Version 2019. You can decide whether you want to open the job as a Montage job without single sheet optimization or as a new optimization job with multiple sheet optimization.
·In the first case, the old layout stays as it is, a new optimization cannot be run.
·Optimization must be rerun when converting to a new optimization job with multiple sheet optimization. During conversion, it is assumed that it is a Montage job with single sheet optimization and one product part. Any other product parts are ignored. The converted assembly blocks are added to the input list of multiple sheet optimization in the priority set in the single sheet optimization job.
•Changed behavior in the alignment of placed blocks on the cut lines. See Alignment of placed blocks on the cut lines.
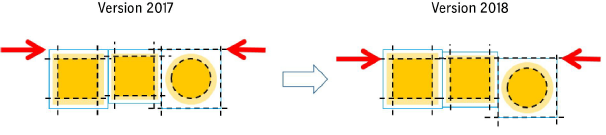

Note: If less 1ups can be placed on the sheet as a result of the new process, then utilization of the sheet has higher priority and the old alignment is used.
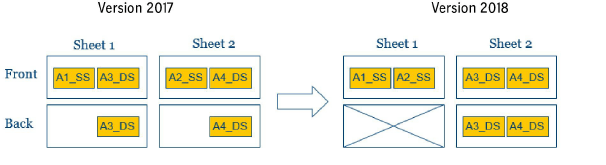
•Inclusion of double-sided and single-sided 1ups
Up to now, the question of whether 1ups were double-sided or single-sided was ignored during optimization. This resulted in a few double-sided 1ups being scattered on the press sheets, in turn requiring a whole plate set for the back.
(see also Single-sided and double-sided 1ups).
•Optimization with "Include Separations" gives you only press sheets where the placed documents of a press sheet do not have more colors in total than available printing units. The report not only supplies the usual details but also a table listing the separations used (see Include Separations).
•Relative or absolute input possible for the deadline for optimization. See Edit Deadline .
Additional functions in the "Input List for Sheet Optimization"
•Enable/disable gang parts
In the "Optimization" step, the "Input List for Sheet Optimization" has an additional column (1) where you can disable gang parts from optimization and enable them again.
•After optimization, the "State" column (2) shows whether a gang part of the gang job was placed on a press sheet or disabled, whether single 1ups were removed or whether the gang part was not placed because it was on a press sheet that was deleted because of poor utilization of the sheet.
•The "Process Order" (3) indicates the order in which the gang parts will be processed during optimization. If the column is active, you can change the order using the arrow buttons (4).
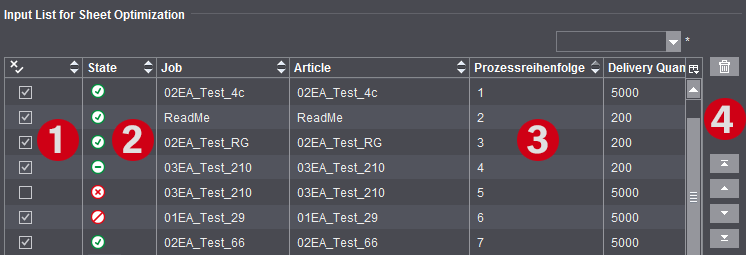
See also Input List for Sheet Optimization (grouping table).
Interaction with the Prinect Business Manager
•Write colors for the Prinect Business Manager to the output JDF
When the Prinect Business Manager generates a ganging optimization XML and a layout is created for this by the Prinect Signa Station Gang Server, then there are generally still no content documents available. The number of plates per surface is needed so that the Prinect Business Manager can plan the number of plates per press sheet,
In the ganging optimization job, you can define the colors for the front and back for each gang part:
·The colors are taken from the PDF if there is a PDF.
·The colors are evaluated as set in the job if there is no PDF.
·The job is only for scheduling in the Prinect Business Manager. A new job is created if content documents are assigned subsequently.
Mixes where gang parts already have an assigned PDF and gang parts whose colors are defined only in the XML are possible and written accordingly to the JDF.
The sheet optimization setup was enhanced by a number of settings and displays in the job in several groups for a better overview. You will now find the following groups directly in the "Optimization" step:
•"Geometry Data" (margins)
•"Cost Data" (print preparation in general and per separation, cost per 1000 sheets)
•"Global Control" (slider "less plates" <> "less sheets")
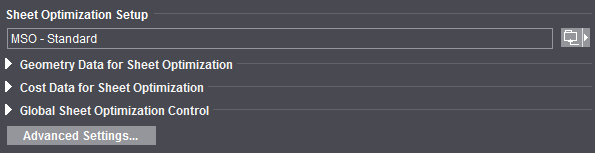
In the "Preferences" in "User Interface", you can set whether the groups will display either closed or open by default. This is where you can also set whether one or more groups will be fully hidden.
The "Advanced Settings" button lets you invoke all additional settings like the ones also available in the "Sheet Optimization Setup Editor" for creating templates.
In "Advanced Settings" you can now also define rating criteria that make sure that press sheets with unsatisfactory utilization of the sheet are highlighted. Not only that, you can also set that such press sheets are removed again from the gang job. The rating displays both in "Results" and in the HTML report. Jobs that are no longer placed in the gang job because of this automatic deletion of press sheets are highlighted accordingly in the "State" column. (for details, see "Rating" Tab).
You can find an in-depth explanation of the settings possible in the sheet optimization setup in Sheet Optimization Setup.
In version 2017, the automatic calculation of gang run forms was implemented in conjunction with the Prinect Business Manager for label printing with sheetfed offset. The Prinect Signa Station Gang Server calculates optimal gang run forms for a number of labels specified by the Prinect Business Manager and sends these to the Prinect Business Manager. The Prinect Business Manager can then use this as the basis for scheduling production for a gang job.
In version 2018, the functionality of scheduling various tasks that then automatically create ganging optimization layouts was integrated into Prinect Signa Station. These time-controlled tasks are processed accordingly by the Prinect Signa Station Gang Server. In this process, the set gang pool is scanned for certain criteria (e.g. paper, delivery date) and if paper utilization is satisfactory and production costs are low, the Prinect Signa Station Gang Server automatically creates a gang run form.
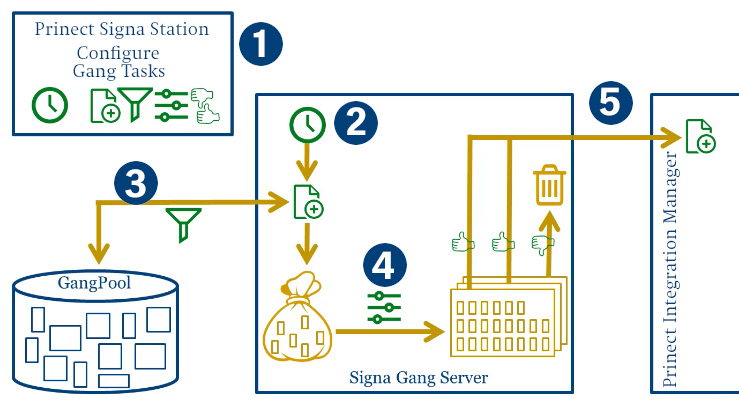
The following sections must be configured for scheduling of the automatic workflow (1):
•Define timing
•Define rules for assigning names to the jobs
•Define filter rules for scanning the gang pool
•Define settings for processing ("Ganging Optimization" product part template with settings for printing material, plates and criteria for assessing the results and any output parameters)
See also Gang Tasks Configuration.
Automatic workflow:
•Depending on the timing, a job starts and is named by the naming rules. (2)
•The gang pool is scanned based on the filter criteria. (3)
•In the job, processing of the gathered gang parts then runs based on the set data. (4)
•The resulting sheets are assessed sheet for sheet and all sheets considered good are submitted to the Prinect Integration Manager. (5)
•As a result, a new job in the Prinect Integration Manager is created by Prinect Signa Station.
If required, you can manually trigger the control even before the set period.
The filters are defined in the "Job Import from Gang Pool" dialog (see Job Import from Gang Pool) and the rating criteria (utilization of the area on the sheet) in the sheet optimization setup (see Sheet Optimization Setup). The tasks are created in the "Planned Gang Jobs" dialog (can be invoked in the "Tools" menu, see Planned Gang Jobs ). Timing and naming are defined in this process and the product part template to be used and the desired filter are linked to the task.
•The "Barcode Generator" is no longer a separate license option. The functionality is now part of the basic version. Details about the functionality are found in Barcode Editor .
•Refresh of marks not set:
When a print job is reloaded, the set marks are compared with the current resources. Up to now, marks that are filed in the job but not set were not refreshed (e.g. "Automatically placed print control marks" that were not enabled). If you enable an automatic print control mark that is not yet set in the "Marks" step, a check is run as of this version to see whether there is a more current version of this mark in the resources pool. You can then decide whether you will use the more recent version from the resources pool.
•New option, "Invert Search Direction on Back with Perfecting", for "Color Control Mark (with AutoPositioning)": The color control bar is placed on the same position on front and back, something that is necessary for presses with a perfector and internal color measuring system. Existing color control bars with AutoPositioning are not changed (the option must be enabled if required). The option is enabled by default when new color control bars are created.
•Invert Print Order of Marks
This option lets you invert the default print order of marks to print the page-related marks, for example, over all other marks.
This is set up in the Preferences.
•New placeholders in the "Replacement in Prinect Prepress Manager & Prinergy" group
Feedback of the current date, e.g. for "GangJobID" made up of fixed text and placeholders:
·$[DateYear]: Year (four digits) 2016...2099
·$[DateMonth]: Month (two digits) 1...12
·$[DateDayInMonth]: Day in month (two digits) 1...31
·$[DateWeek]: Calendar week (two digits) 1...52
·$[DateDayInWeek]: Day in week 1...7, Monday = 1
Placeholders especially for the "Ganging Optimization" work mode:
·$[JobPartTemplateName]: This is replaced in the gang job by the product part template used.
If the placeholder is set related to the folding sheet or page, it is replaced by the product part template used for the gang part. If the placeholder is set related to the press sheet, it is replaced by the product part template used for the gang job.
·$[Productcode]: This is replaced by the product code of the gang part in the gang job.
See also List of implemented placeholders for text marks by groups.
•Print quality control strip for checking the print image with regard to nozzles that have failed on inkjet digital presses (see Print Quality Control Strip).
A Print Quality Control Strip Editor is available for creating the strip. More details can be found in Print Quality Control Strip Editor .
•New parameter for automatically set folding sheet cuts and precutting marks
Precutting marks may jut into another page when these marks are used for CAD assembly blocks (e.g. if the CAD assembly block does not have a shape). In this case, the precutting marks were not set up to now. Nevertheless, precutting marks are wanted for precutting assembly blocks. "Delete, if this juts into another page" was introduced in the placement for folding sheet cuts and precutting marks in "Imposition" and "Montage" to be able to control what happens, allowing you to select whether these marks will be removed or not.
•Automatically placed print control marks: New print control mark "Page Label" analog to the folding sheet label (see Page Label ("Imposition" Mode) / 1up Label ("Montage" Mode))
A new default mark, "PageLabel", is available in the "Standard" group for the page label (placeholder: $[PagePositionName]-$[DocumentPageNumber]).
•New mark attribute: "Clip Mark Vertically to Subject"; the old option "Clip Mark to Subject" only affected the horizontal direction. You can now set whether you want the marks to be clipped horizontally and/or vertically (see "Clip Mark Horizontally/Vertically to Subject").
•Filter function for a better overview when selecting placeholders:
In the "Insert placeholder" dialog, you can type in a filter criterion in the search box to the right above the table. Then only placeholders in which the search text appears in the name or in the placeholder (string) display (see Insert placeholder ).
•To be able to use the standard SheetLabel mark efficiently in label printing as well, it is a pure text mark as of Prinect Signa Station Version 2019. This can confine the size to the text. This means especially that the mark can also be smaller if the text to be replaced is appropriately short.
•Replacement of the special placeholders in gang jobs by universal placeholders irrespective of the work mode (see List of implemented placeholders for text marks by groups)
•Layer presetting for quota jobs
You can define different types of layers for presetting:
·Common layers that are to be the same for all versions of a quota job.
·Layers that are assigned uniquely to a specific version by a placeholder.
·Layers that are shared by all versions of a specific page length to allow quota jobs with products of a different page length.
More details can be found in Layer Presetting.
•For versioned jobs, you can display the "Version Name" and "Version Description" columns in the list of press sheets and folding sheets. See Table setup (context-sensitive menu on the header).
•Default for the margins of new assembly blocks can be selected either as '0' or the default bleed value
(see Preset margins of new assembly blocks with bleed value)
•The default product part templates included in the shipment were renewed for Version 2019. The following default product part templates now exist:
|
Name of Product Part Template |
Description |
|---|---|
|
1up-bleed |
1up template with bleed of 3 mm |
|
1up-CAD |
1up template with bleed of 3 mm and additional margin of 5 mm |
|
1up-nobleed |
1up template with bleed of 0 mm |
|
A3-TwoUp (Readers Spread) |
Reader's Spread Template |
|
AutoExpand-Cover-F16-F8-F4-Sorting |
Template with cover, F16, F8, F4 automatic sorting ON |
|
Book-104Pages |
Imposition template with 104 Pages! Applied schemes: 6 x 8up and 1 x 4up (2 copies) |
|
DoubleWeb-56Pages |
Template for a double-width web press |
|
Montage |
Template with normal and CAD 1ups |
|
Nested-Foldingssheet |
Template for nesting of folding sheets |
|
Packaging |
Packaging template |
|
Flyer-8Pages |
Template with 8 pages (flyer)! 4up, accordion fold, 2 copies |
•"ResourceInfo" in the product part templates
New product part templates have an additionally generated "ResourceInfo". This is much faster to read and needs less memory than the full product part template. The ResourceInfo is used, for example, when looking for the product code to speed up this search.
Product part templates of older Prinect Signa Station versions do not have this ResourceInfo. Older product part templates are supplemented by the ResourceInfo to be able to speed up the product code search for them as well. In this process, the product part template itself is not regenerated but only the ResourceInfo of the resource is added to it.
The ResourceInfo is added automatically to the resources every time a version changes and when the workspace changes. The ResourceInfo is added only to those product part templates that do not have one so far.
As an alternative, you can add the ResourceInfo to existing product part templates with the "Resource Refresh Assistant". The search runs after the Assistant starts. A check is also run on product part templates to see whether they have the ResourceInfo. If this is not the case, these product part templates are also tagged as needing a refresh. After the refresh, all the refreshed product part templates contain the ResourceInfo.
•You can show the template of a press with details, for example, about the position of grippers and suction cups in the graphic view. See also Show Press Template.
•When "Accordion Fold" is selected as the pagination and the "Automatic Gaps" function used, now no gaps are set for directly abutting pages.
•A "shape pool" was introduced for packaging jobs. Shapes and their IDs are stored in this pool. This lets Prinect Signa Station find the geometry data of a shape and use it in the job even if only the ID of the shape is specified in the XML data.
The shape pool includes the full substructure below the set "CAD Files" path in "Preferences > Paths". All CF2 files are scanned for the shape ID wanted. The first 1up geometry found is used.