
This shows the current trimmed size of the selected page or 1up. You cannot change this data.
The position of the selected page refers to the bottom left corner of the folding sheet.
Width/Height
In folding sheets, the values are the same as the data of the master page, in assembly blocks as the data of the 1up definition. They show the trimmed size.
Orientation
The setting is taken from the defined master page or from the 1up definition.
This is where you can select a layer to make a change to it, if wished. The selected layer is shown in the graphic window. You can create the layers in the "Job" step in the "Administrative Data" tab. A maximum of 12 layers can be used.
You will find more details about working with several layers in Number of layers.
This box displays the value for the selected page, and you can change it if required. Generally, you don't need to change this value because it was calculated correctly on the basis of the master page. Positive values move the trim away from the page, negative values move it in towards the page.
The bleed specified in the master pages refers to all the pages in the product part (see also the Master Pages step).
Note: The option for setting a bleed is not applicable with packaging 1ups (with CAD) (is set via Packaging Pro).
The automated mechanism is enabled by default. We recommend that you disable this automatic mechanism in special cases only.
The automated mechanism checks the bleeds on all pages and/or 1ups. Bleeds that jut into an adjacent sheet or block are corrected accordingly (bleed is reduced).
In the first of the two screenshots below, you can see that the bleed of the right 1up juts clearly into the left 1up. This is not wanted and the automated mechanism, when enabled, corrects this. The result is shown in the second screenshot.
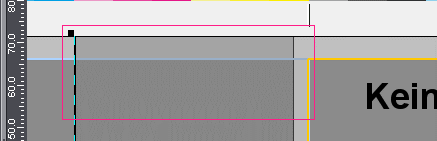
Before automated mechanism
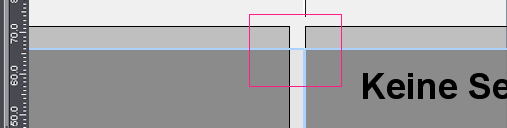
After automated mechanism
All pages/1ups with same index
The changes you made to a page/1up are applied to all other pages/1ups with the same page number or content (1up).
Include back
You can confine your changes just to the front if you disable this function.
Can only be used in the "Packaging" mode.
More details can be found in the "Packaging" chapter, 1up Inspector.
Placement rule for assigned page/1up
You can find a description of this in Placement rule for assigned pages.
Additional functions for the Page/1up Inspector
The Page/1up Inspector has a "Measure tool" button on the right of the text boxes for "Offset X/Y" in the "By user (view options) > Offset > Custom" option.


This tool lets you define an exact visual offset for a selected page/1up in the graphic window > "Folding Sheet/Assembly Block/Cutting Die" tab.
·Click the selected page/1up you wish to move while holding down the command + Shift keys.
·Holding down the mouse button, now create a square that defines the offset in X and Y direction (the opposite edge defines the new position).
·The measure tool button is enabled when you release the mouse button and then the two keys.
·Now click the button to apply the data of the square you created to the boxes and trigger the offset.
Only one page may be selected with this function.

Note: This function is a very useful one especially in the packaging mode to match the 1up to the cutting die. In the punch outline of the 1up, select a certain feature (e.g. intersection of two lines) and use the measure tool on the corresponding feature of the CFF2 outline (magenta-colored line). The 1up is positioned exactly to the CFF2 punch outline if you follow the procedure described above.
•Offset/scaling with the arrow keys
You can use offset or scaling accurately, with visual control in the graphic window, when you click the offset or scaling box with the mouse button and then use the arrow keys. Offset/scaling goes in the opposite direction if you hold down the Alt key at the same time.
•Scaling / orientation
Scaling and orientation of the contents are only applied to the scheme and not to the document. An advantage of this is that when you assign a new document to the scheme the pages are loaded to the scheme with defined settings.
Active
The creeping values currently applicable for a page are shown and a tick is set if creeping was enabled when you created the product part, In some cases, however, creeping must not be enabled (image runs over back margin). You then disable this option by removing the checkmark from the box (see also Creeping and Bottling).
Scaled creeping
A tick is set and the creeping values are shown if creeping and "Scaling" as the creeping mode were enabled when you created the product part. You can find more details about this topic in Creeping and Bottling.
The settings you defined for the selected page are applied to all pages in the product part.

Note: Please heed the "Restrict "Apply" functions in Page Inspector" option in "File > Preferences > Defaults > Several Switches". With this function, you can restrict the function to the selected folding sheet/assembly block/cutting die.
This is where you can position any marks for the selected page/1up. The width and height of the mark are shown in the "Expert Mode". In addition, you can define the clipping region of a mark (part that will be imaged) and/or imaging in the background. You can find more details about marks in the Working with Marks.
You can find a description of the list in Marks List
Automatically set cut marks that are shown in the list. The automatically set folding and collating marks refer to the folding sheet/assembly block and are listed in the Folding Sheet/Assembly Block Inspector > "Marks" tab. However, all the marks are displayed in the graphic window in the "Folding Sheet/Assembly Block" tab. For more details about setting marks, see Marks Resources .
The "Selected Mark" and "Expert Mode" sections are enabled when you select a mark in the list. These sections then show the data for the mark selected. The selected mark is highlighted by an orange square in the graphic window in the "Press Sheet" tab.
You can also change the order of the marks by clicking a mark in the Context-sensitive Menu.
Click the folder button on the right and add a mark from the resources in the "Choose Mark" dialog that then appears. You can also add marks by dragging and dropping them from the marks resources in the Browser window to the list. When you add folding and collating marks, they are shown in the list and in the graphic view because they were set in relation to the page/1up.

Note: Tiling marks always refer to the paper. For that reason, you can only set tiling marks with the Plate Template Editor or the Press Sheet Inspector.
You can delete the selected mark from the list by clicking the trashcan icon.
You can create or change marks as well using "Internal Resources > Marks" in the context-sensitive menu in the Browser window or in the "Marks Resources" tab in the Folding Sheet/Assembly Block Inspector, Press Sheet Inspector or Page/1up Inspector.
See Selected Mark for a description.
In addition to the above description, you can also select:
See Expert Mode for a description.
To all pages/1ups (same surface)
Click this button if you wish to apply all the inputs/changes you made in the "Marks" tab to all other pages/1ups in the product part.

Note: Please heed the "Restrict 'Apply' functions in Page Inspector" option in "File > Preferences > Defaults > Several Switches". With this function, you can restrict the function to the selected folding sheet/assembly block/cutting die.
To 1ups of same shape (same surface) ("Montage" and "Packaging" only)
Click this button if you wish to apply all the inputs/changes you made in the "Marks" tab to all other1ups of the same shape.
To pages/1ups with same index
Click this button if you wish to apply all the page/1up inputs/changes you made in the "Marks" tab to all other pages/1ups with the same page number or content (1up).
Examples:
In the "Imposition" mode, all pages numbered '1' are changed if you have copies. All the copies of a 1up are changed in the "Montage" mode.
To left/right pages
Can only be selected in the "Imposition" and "Automatic Imposition" work modes.
Click this button if you wish to apply all the inputs/changes you made for a selected page (either left or right) in the "Marks" tab to all other left or right pages.
Additionally in the "Packaging" mode: "... (same surface)"
The "Packaging" mode offers the additional buttons "To all 1ups (same surface)" and "To 1ups with same contour (same surface)". With these options, you can copy marks in relation to the surface, i.e. to the front or back only.
You can find a description of this in Marks Resources .