The handling of marks in Prinect Signa Station has been kept simple, making it easy to use them. You can use the following marks:
•Default marks included in the shipment (marks optimized for the Prinect workflow)
•Custom marks
•Modified marks
•Imported marks
•Dipco marks: Are installed as PDF files and can be copied to the resources using the Marks Import Assistant.
•All of the marks are located in the resources of Prinect Signa Station. Select "Jobs & Resources > Marks". More details can be found in Marks Resources .
•You can find marks that are already positioned in a job in "Internal Resources > Marks" in the Browser window. More details can be found in Internal Resources.
•You will find marks of the product part in the "Marks" tab of the various inspectors. More details can be found in Marks .
•In addition, each inspector has a "Marks Resources" tab from where you can position them. More details can be found in Marks Resources .
•You will find automatic marks in the workflow bar in the "Marks" step. More details can be found in Automatically Placed Print Control Marks.
You can position marks in three ways:
•Using the "Select mark from Resources for placement..." button when in the "Marks" tab in the Press Sheet Inspector, Folding Sheet Inspector or Page Inspector.
•By dragging-and-dropping them from the "Marks Resources" tab in the Press Sheet Inspector, Folding Sheet Inspector or Page Inspector to the graphic window.
•By dragging-and-dropping them from the Inspector windows > "Marks Resources > Internal Resources" to the graphic window.
Set marks are contained in the templates for jobs and product parts, and in jobs. You can set up marks in plate templates but they are not part of the resource.
How Do I Import or Update Marks?
To import third-party marks or update Dipco marks, use the Marks Import Assistant. More details can be found in Marks Import Assistant .
You select these with "Jobs & Resources > Marks".
This is where you will find the "Standard", "Report" and "PtR_Marks" groups that hold all the marks resources included in the shipment. Dipco marks are installed as a PDF but have to be imported as a resource. For details, see Marks Import Assistant .
You will find the most frequently used marks in "Standard". Marks in "PtR_Marks" are designed especially for the Prinect workflow. The "Report" marks are for creating HTML or PDF files from the list window. All the marks in these groups are write-protected and should be left as they are. To change the standard marks, you must copy and paste them to a folder you created. Only afterwards is the write protection removed.
More details about PtR_Marks can be found in the "Interaction with the Prinect Prepress Manager" chapter, Marks in the JDF Layout.
You can add other groups to these groups where you can create your own marks.
You cannot change the group name or delete the group. You also cannot modify or generate a mark or add another mark to this group. Leave the standard group as it is! The Standard group is write-protected.
When you click a mark, you can select in the context-sensitive menu:
•Edit Mark...
The Marks Editor of that mark displays so that you can view the mark. Changes are not possible, see also Editing Marks.
•Copy Mark
This copies the mark and adds it to other read-and-write groups for editing.
This is the group of marks for working with the Prinect Prepress Manager. Almost all of the PtR marks can also be used for Prinergy and quite a number of them generally. What was said about the standard marks is also applicable for this group. More details about PtR_Marks can be found in the Interaction with the Prinect Prepress Manager chapter, Marks in the JDF Layout.
You will find standard marks in this group. You can place these marks in the list window for output of HTML and/or PDF files.
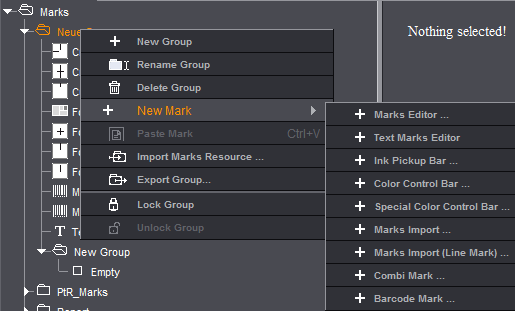
When you click the "Marks" resource, display the context-sensitive menu to create a "New Group" and give it a name.
Using the context-sensitive menu, you can rename or delete this group you created, add new marks to it or add copied resources from other groups. For more details, see New Mark .