Folding Sheet / Assembly Block / Cutting Die
The name of the tab changes depending on the work mode selected in the job!
|
Work Mode |
Display in the graphic window |
|---|---|
|
Imposition |
Folding Sheet |
|
Packaging |
Cutting Die |
|
Montage |
Assembly Block |
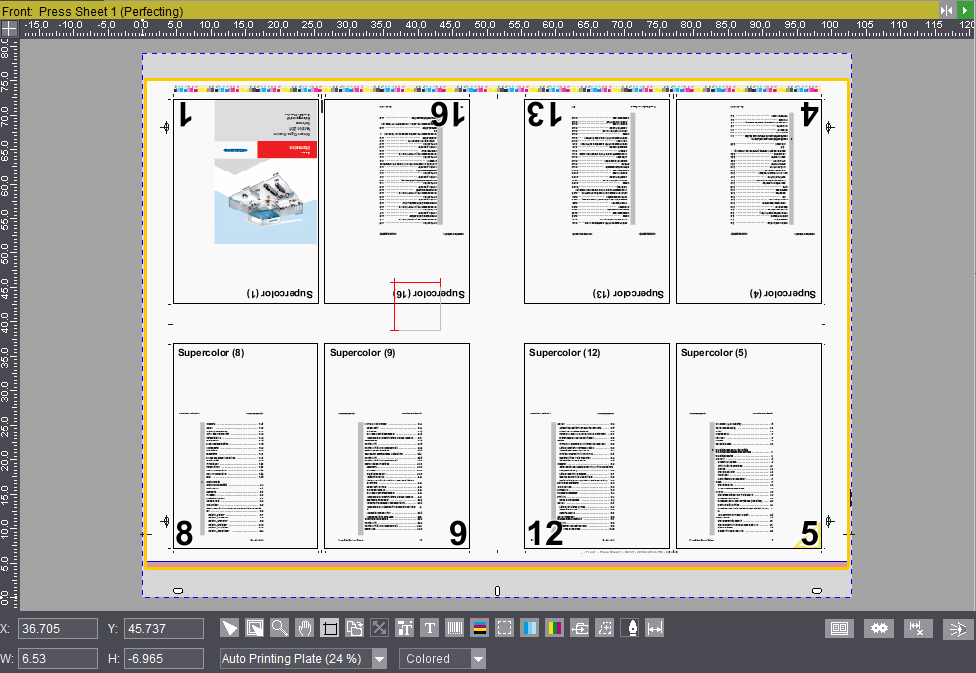
In the "Folding Sheet/Assembly Block/Cutting Die" tab, you will see a diagram of the first folding sheet, assembly block or cutting die of the job currently selected.
You need the Folding Sheet/Assembly Block/Cutting Die Inspector to edit a folding sheet/assembly block/cutting die.
You open the inspector concerned by clicking that button in the workflow bar. You can also open the Folding Sheet/Assembly Block/Cutting Die Inspector using the context-sensitive menu.
You can also display the Page/1up Inspector using the context-sensitive menu if you selected a page/1up on a folding sheet/assembly block/cutting die.
A change in the inspectors window is also immediately seen in the graphic window.
You can display other folding sheets/assembly blocks in the job by double-clicking them in the Browser window or list window.
The "clip path" tool is enabled if a 1up is selected in a packaging job ("Packaging" work mode). See the chapter Packaging (Packaging Pro, Label Pro) for information about working with the "clip path" tool.
•Display of the folding sheet or assembly block with the option of showing front and back at the same time. See Tile Front / Back.
•Positioning of elements by dragging-and-dropping them from the Browser window or list window. More details can be found in Drag-and-Drop.
•Import of pages to different layers. See View Properties and Enable/Disable Layers .
•Editing a packaging job with the "clip path" tool. See the chapter Packaging (Packaging Pro, Label Pro) for details.
•Creation of "internal marks" for the job currently open. See Creating Internal Marks.
•Configuration of the graphic view as you like it and display of the units of measure for objects. See View Properties and Enable/Disable Layers .
•Selection of color layers. See Channel.
•Setting zero on the ruler
See Mouse and Keyboard Shortcuts in Graphic Window.
•Working with measure tools.
See Mouse and Keyboard Shortcuts in Graphic Window.
•Setting magnetic snap lines
See Mouse and Keyboard Shortcuts in Graphic Window.
Functionality Using the Context-sensitive Menu
The following functions are available when you display the context-sensitive menu in the "Folding Sheet/Assembly Block/Cutting Die" tab in the graphic window.
"Folding Sheet / Assembly Block / Cutting Die Inspector"
Display of the different inspectors. See Folding Sheet Inspector , Assembly Block Inspector or Cutting Die Inspector .
"Page/1up Inspector"
Displays the Page/1up Inspector in the inspectors window.
"Contents" step
Goes to the "Contents" workflow bar for further processing.
"Delete Page Assignment"
Deletes assignment of the selected page(s) or 1up(s) in the job. The pages or 1ups in the job no longer have any assigned content.
"Paste Pages from Clipboard"
The function is active only if a page/1up was copied to the clipboard beforehand in the "Contents" step. You can then paste it to any position you want.
"Clip Path (Packaging Only)"
You can select this function in the "Packaging" mode and in the "Montage" mode if the "Packaging" option is enabled. See Edit Clip Path.
"Assign Station Index..."
You can specify the order of the indices.
"Change Station Index and Article..."
This function makes it easy for you to rearrange the 1ups to match any changes made to a job.
Mark the 1ups you wish to change. The possible station indices display in a list box. You have two options here. Change the selected 1up(s) to an existing station number or select the last index in the list and use it to create a new station number.
The "Adjust Back Automatically" check box also gives you the option of assigning a station index automatically to the back as well. The station index of the back then always corresponds to that of the front plus 1.
"Swap Station Index..."
This function lets you swap a set index with another. In this process, all the indices of the set index are swapped with all the indices of the new index selected and vice versa.
"Marks"
"Edit Mark..."
You can open and edit a selected mark with the relevant editor for that mark.
For details, see the relevant marks editors in the Editors chapter or Working with marks - Introduction.
You can duplicate one or more selected marks. The "Duplicate Mark..." window opens where you can enter the following data:
- Number of copies you want to create
- Offset of the copies in horizontal direction (X)
- Offset of the copies in vertical direction (Y)
It's also possible to enter negative values.
"Delete Mark"
The mark you selected is deleted after you confirm an alert message.
"Graphic"
"Save as..."
You can save the current folding sheet/assembly block/cutting die as a graphic file in the Portable Network Graphics Format (.png).
"Print..."
You can output a copy of the current press sheet to a printer.
"Print All..."
You can output a copy of each press sheet in the job to a printer.
3D View
This function is no longer necessary as a result of migrating to the PDF 3D format (automatic 3D display). This requires Adobe Acrobat as of version 9 and that you have purchased a license for "Signa Station Packaging Pro".
"Assign Station Numbers..."
Can only be selected in the "Montage" and "Packaging" working modes. The function only works in conjunction with the "StationNumber" mark. See Step 1: Assigning the 'StationNumber' mark to the 1up and Step 2: Assigning the station numbers to learn how to use and handle this function.
Open Folding Sheet Animation
This displays the folding sheet animation of the active product part. See Folding Sheet Animation with Data Pages.
"Show PDF 3D"
Only available in the "Packaging" work mode. Starts Acrobat in a 3D view.
See Measured Data.
See Channel.
See Zoom.

See Front/Back.
View Properties and Enable/Disable Layers

See View Properties and Enable/Disable Layers .

See Marks Editor .

See Text mark.

See Creating an ink pickup bar.
Creating a cover mark and other internal marks

See Creating a cover mark and other internal marks .

Only in the "Packaging" mode if the "Packaging" option is enabled.
The cursor changes when you click this tool, and you can position the content of the 1up as required by clicking and moving it.
Define line type for the clip path

Only in the "Packaging" mode if the "Packaging" option is enabled. See the chapter Packaging (Packaging Pro, Label Pro) for details.
Define cover mark from line type for glue area

Only in the "Packaging" mode if the "Packaging" option is enabled. See the chapter Packaging (Packaging Pro, Label Pro) for details.

This tool allows you to edit the clipping path of a mark. Only the margin on the right, left, top, and bottom can be specified via the information for the "Clippath". However, a polygonal clipping path may be necessary, especially for packaging jobs. Using the "Feather" button in the graphics window, the corner points of the clipping path can be moved as required, additional points can be added or existing points can be deleted.
A detailed description of the "Feather" button, which is also used for clipping paths, can be found in the Packaging (Packaging Pro, Label Pro) chapter under "Feather"-button tool.

Note: If manually set marks with a polygonal clipping path are converted into automarks, the clipping path is adopted. A conversion is only possible for print sheet-related marks if an automark set is selected for the associated plate template.

See User-defined dimensions: .