Browser Window and Functionalities
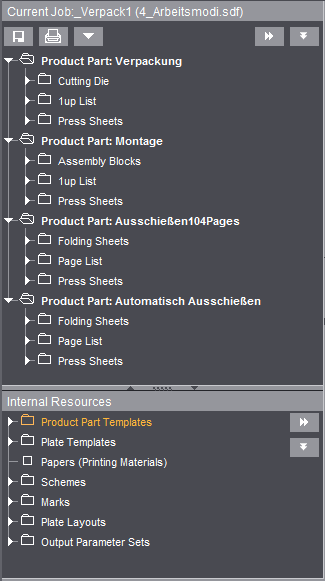
When you open a job with "File > Open" or "File > Open with Browser...", the structure of the active job displays in the Browser window, showing you the product parts and contents in it, for example, folding sheets. You can also view the "Internal Resources" found in the job. You can hide the window by clicking the "down arrow".
It is also possible for you to open several jobs. However, only one job at a time can be "active". The data of this job are shown in the steps and the list and graphic windows. When you open a job, this one is automatically the "active" one. Only the "active" job shown in the Browser window can be edited.
If a job has a number of product parts (bold type), the product part setting is taken from the workflow bar when you click a different product part.
Only the graphic view is refreshed when you click a product part if a global step for the job ("Job", "Contents" or "Output") is selected in the workflow bar. In this case, you can enable the "Product Part" step by double-clicking a product part and start editing.
A new job that is created also appears in the Browser window together with all its components.
To go to another open job, click the name of the job you want in the "Jobs & Resources" menu. A tick appears before the selected job that displays in the Browser window for editing (it is now the active job).

Note: If you want several jobs open at the same time, remember that each job needs memory. Always open only a manageable number of jobs so as not to overtax your computer capacity unnecessarily.
The window shows you the components of the job displayed in an easy-to-follow tree structure. You can also start many different actions with the implemented Context-sensitive Menu.
Product Parts View and Functionalities
The product parts of the open (active) job display in a clear tree structure at the top level in the Browser window.
Several jobs can be open at the same time but only the active job can be edited.
This also applies to a job that has several product parts. You must click the product part that you wish to edit with the mouse so that it becomes active.
You can also start many actions simply with the context menu.
The open job displays all its product parts, folding sheets, page lists and press sheets. Each of these items has its own tree structure that can be expanded by clicking the arrow before the structure. You can then see other details.
In the Browser window there are functions that affect the active job and those that affect the active product part. Exception: Working with drag-and-drop, see Drag-and-Drop.
You can enable functions relating to the job by displaying the context menu in a neutral part of the window and by clicking the buttons shown in the window.
Functions relating to the product part are enabled by displaying the context menu for a selected product part.
Functionalities Relating to the Job
In the Browser window there are functions that affect the active job and those that affect the active product part.

|
"Save", "Print", Other functions: You can save and print the currently selected job. You can use other job functions with the "down arrow" button: |

|
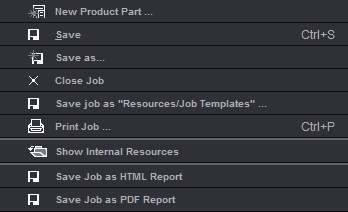
"Save job as "Resources/Job Templates"..." The active job in the Browser window is saved as the default template in "Resources/Job Templates". "Save Job as HTML Report" Generates a HTML report of the whole job as set in "File > Preferences > Reports". "Save Job as PDF Report" Generates a PDF report of the whole job as set in "File > Preferences > Reports". See "Save Job as PDF Report". |


|
Arrow buttons: You can use the down arrows to expand the folder structure of a job or selected product part and the right arrows to collapse it again. |
|
|
Display context menu in a neutral part of the window: 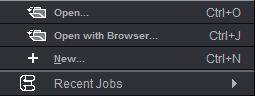
To open an existing job or create a new one. |
|
|
To change the active job: If several jobs are open, activate a different job by clicking the job name in the "Jobs & Resources" menu or using the shortcut "command key + Shift + number". The job then displays in all the windows and can be edited. |
This lets you create a PDF report covering several product parts. The "Save as PDF Report" dialog displays where you can set the name of the PDF and the report directory and in "Report Options" define settings for the report header, the import of image data, the footer and the page and paper sizes. After you click "OK", a report of the folding sheet list is created about all product parts.
Example: PDF report (4) with report caption (1). header (2), company logo (3), image data with previews (5) and footer (6).

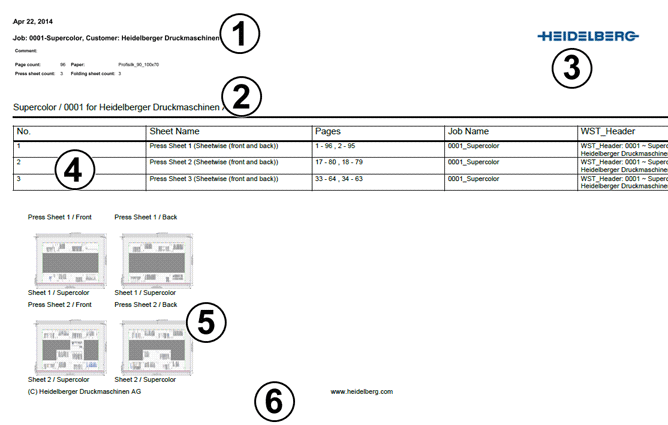
The number of columns in the PDF report and which ones display result from the settings in the list view, analog to the report settings from the list view. In other words, the columns shown in the list view are used for the report table. See Table setup (context-sensitive menu on the header) for details.
Functionalities Relating to Product Parts
In the Browser window there are functions that affect the active job and those that affect the active product part:
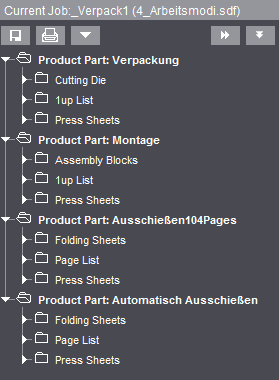
•View of the open (active) job with four product parts (bold type) and their components:

•A double click on folding sheets, press sheets or imported pages in the page list opens the relevant view in the graphic window and displays the respective inspector in the workspace so that you can edit them.
•The following functions are found in the context menu when a product part is selected (top level in tree structure):
·Save Product Part as "Resource/Template Product Parts" ...
The product part is saved as a template. All the data in the job are saved and filed to "Resources > Job Templates".
Exceptions: Imported pages, job number, job name, customer name and customer number.
You invoke the saved templates with the "Product Part > Product Part from Template" step and then selecting the relevant template.
·"Save Product Part as Default for Job Creation...".
The product part is saved as a default template for the workflow bar. The workflow bar starts with the data of the saved product part.
You will find the selected product part (marked by a green star, only after a restart of Signa Station) in "Jobs & Resources > Resources & Machines > Resources > Product Parts Templates". At this point, you can now reset this default to the standard template by displaying the context menu and selecting "Reset as Default for Job Creation" or you can set a different product part by selecting "Set as Default for Job Creation".
Invoke the saved template always when a new job is created ("File > New...").
·"Product Part in Reader's Spread / Product Part for Single 1up Proofs"
In an "imposition" job, a reader's spread can be generated from a ready, job-specific product part. This reader's spread then appears in the job structure as another product part with the extension "readersspread".
The reader's spread gives a true display of the product (leaflet, etc) on the screen (in the graphic window) that can be output to a printer (layout print).
It has no other functions.
In a packaging job, a 1up is generated from the product part. The 1up appears as another product part in the job structure. The 1up displays in the graphic window and can be output to a printer (layout print).
·"Make Product Part Version Cluster"
More details can be found in Working with a Version Cluster.
·"Duplicate Product Part"
The product part you selected is duplicated with all its components and filed in the job as another product part of the same name with "copy" added to it.
The product part you selected is deleted from the job.
·"Print All Press Sheets of the Product Part..."
Marks all press sheets of the currently selected product part and goes to the "Output" step to print them. See also Print Job ....
·"3D Collating Mark Visualization"
The collating marks of the product part you selected are shown in a three-dimensional view. See 3D Collating Mark Visualization .
·"3D Reader's Spread Visualization"
The product part you selected is shown in a three-dimensional view. The reader's spread shows you a true display of the product (leaflet, etc), allowing you to visually check the product part in a simple way. See 3D Reader's Spread Visualization with Data Pages .
•The following functions are found in the context menu when the press sheet is selected (second level in tree structure):
·"Press Sheet Inspector"
Displays the Press Sheet Inspector in the inspectors window.
·"Print Press Sheet..."
Prints the currently selected press sheet. The "Print Job ..." window displays.
·"Print All Press Sheets of the Product Part..."
Marks all press sheets of the currently selected product part and goes to the "Output" step to print them. See also Print Job ....
•The following functions are found in the context menu when a single press sheet is selected (third level in tree structure):
·"Press Sheet Inspector"
Displays the Press Sheet Inspector in the inspectors window.
·"Print Press Sheet..."
Prints the currently selected press sheet. The "Print Job ..." window displays.
·"Print All Press Sheets of the Product Part..."
Marks all press sheets of the currently selected product part and goes to the "Output" step to print them. See also Print Job ....
·"Create Plate Template from Press Sheet"
The current press sheet is saved without the folding sheet, folding scheme and content pages as a plate template in the "Plate Templates" resource. This function makes it easy for you to create your own plate templates.
·"Delete Press Sheet..."
Only possible in a gang job! You cannot delete the last press sheet.
Deletes the selected press sheet.
·"Delete Page Assignment"
Page assignment of the selected press sheet is deleted. The pages or 1ups in the job no longer have any assigned content.
·"Paste Pages from Clipboard"
The page(s) or 1ups from the clipboard are pasted onto the selected press sheet. The function is active only if a page was copied to the clipboard beforehand in the "Contents" step.
•The following functions are found in the context menu when a single page in the page list or a single 1up in the 1up list is selected (fourth level in tree structure):
·"Delete Page Assignment"
Deletes assignment of the selected page(s) or 1up(s) in the job. The pages or 1ups in the job no longer have any assigned content.
The function is active only if a page was copied to the clipboard beforehand in the "Contents" step. You can then paste it to any position you want.
You can also use this function in the graphic window in the "Page List" and "Press Sheet List" tabs after invoking the function in the context menu.
This function is really suitable for positioning certain pages/1ups several times. In the "Page List" tab in the graphic window, select several pages/1ups (command key and click) and paste the content of the clipboard on the selected pages/1ups using the context-sensitive menu.
·"Assign Blank Page" (add a blank page)
Can only be selected in the "Imposition" and "Automatic Imposition" work modes.
A blank page is pasted before the currently selected page. The page size defined in the scheme is used automatically. The subsequent pages with their contents shift back one page.
This method is used when, for example, blank pages that were not in the PDF document must be pasted to certain positions.
You can also use this function in the graphic window in the context menu in "Page List" >.
·"Delete Blank Page"
A selected blank page is deleted.
·"Show Page in Press Sheet"
The press sheet on which the marked page/1up is positioned is highlighted in the graphic window.