
The "Resources" tab is independent of the open job. You can use it, for example, as an archive for existing templates and resources and also for defaults when creating jobs.
Templates and resources are shown in a clear tree structure. You can create group folders for your own resources and templates using the context-sensitive menu.
You can rename, copy, cut, delete and lock resources.
You can rename, copy, cut, delete and lock templates. In addition, you can define templates as a default for use when creating jobs.
All the workstations can work with the same data sets if the default folders for saving resources and templates are filed on a server and assigned to the program. See also Default Folder.
Note: The "Standard" folder in the group folders is a read-only folder that contains shipped templates and resources that cannot be changed. Templates and resources are used only as templates and must be saved, if necessary, in user-specific group folders. See the procedure described below for creating custom resources.
Locked resources or groups are also read-only and can be edited only after they are unlocked, for which a password is needed depending on the Preferences.
The following procedure is recommended for creating your own resources:
1.Create your own plate template, for example:
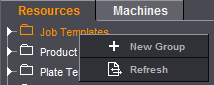
2.Select "Plate Templates" in the "Jobs & Resources" menu.
3.Mark the "Plate Template" folder and display the context-sensitive menu.
4.Select "New Group" in the context-sensitive menu and give it a name that you will confirm with the Enter key.
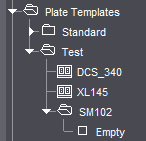
5.Open the "Standard" group folder.
6.Mark the "SM102" standard resource and display the context-sensitive menu.
7.Select "Copy Plate Template" in the context-sensitive menu.
8.Now mark the new group you created and display the context-sensitive menu.
9.Select "Paste Plate Template" in the context-sensitive menu.
10.The "SM102" plate template is pasted and you can now double-click it to edit and save it in the Plate Template Editor.
You trigger the functions in the "Resources" tab with the Context-sensitive Menu.
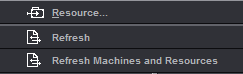
•To import resources
Display the context-sensitive menu in the "Resources" tab and select "Resource...".
Select the resource you want to import. Signa Station automatically recognizes the type of resource you selected and presents you with only those groups that are located in that path so that you can save the resource. Read the section named "To create a group folder" if you still haven't created one.
•Refresh
Updates the currently selected resources path if you are working in a network.
The system looks for new or deleted groups and resources in the currently selected path. If new or deleted groups/resources are detected, the number found is displayed and the first element in the list is named.
The resources are available afterwards.
•Refresh Machines and Resources
Updates all machine and resources path if you are working in a network.
The system looks for new or deleted groups and machines/resources globally in all paths. If new or deleted groups/resources/machines are detected, the number found is displayed and the first element in the list is named.
The resources/machines are available afterwards.
•A double click on existing resources opens the editor responsible for the resource.
•The following function is found in the context-sensitive menu when a group folder is selected (top level in tree structure):
To be able to create a new template or resource, you must first set up your own group folder where you can save it.
After you created a group folder, you can import a resource using the context menu in the "Resources" tab or save a resource from a standard folder to the new folder you created using Copy and Paste.
·Refresh
Updates the currently selected resources path if you are working in a network.
The system looks for new or deleted groups and resources in the currently selected path. If new or deleted groups/resources are detected, the number found is displayed and the first element in the list is named.
The resources are available afterwards.
•Create extended folder structure
You can create several layers in the hierarchy below the resource type (e.g. plate templates, platesetters).
You can create new folders with "New Group" in the context menu:
•The following functions are found in the context-sensitive menu when the folder is selected (second level in tree structure):
·"New Group"
A new group folder is created. Enter the name manually.
You can give the group folder a different name.
·"Delete Group"
The selected group folder is deleted. You can only delete empty group folders.
·"New resource..."
The appropriate editor displays so that you can create a new resource.
·"Paste resource" or "Paste Job Template, Paste Product Part Template"
A template or resource copied beforehand is pasted in the selected group folder.
This function is only enabled if a template or resource was copied and is to be added to a plausible level in the tree structure (you cannot copy a marks resource to a group folder for schemes resources).
In the case of a job template or product part template, you can paste a template copied from the read-only standard folder.
·"Import resource..."
You can import a Signa Station resource to one of your custom resource groups.
"Unpack"
The elements of the selected group are copied to the defined folder.
"Don't Unpack"
The elements of the selected group are copied to the defined folder.
A separate folder is created for each exported resource. A ".html" and a ".png" file are filed with the actual resource. The ".png" file displays a low-resolution image of the resource.
This function is for exporting schemes, for example, for use in MIS systems.
Only active with certain resources if "File > Preferences > Import > Use MDS" is not enabled but a server is defined for MDS use.
Copies local resources to an "MDS_Standard" folder.
·"Export group as CSV for Business Manager"
If you select a group of product part templates in the resources, you can export these product part templates as a csv file and use them for synchronization in Business Manager. A confirmation message opens when export is complete.
·"Lock/Unlock Group"
You can lock resource groups to prevent unwanted changes. All the resources in the group are set to "read-only". To edit locked resources, you must first unlock them. Locking a group affects only the resources found at that point in time in the group and not to the group itself. You can create new resources in the group or copy resources from other groups to this group. These resources are not locked.
To prevent unauthorized locking or unlocking, you can assign a password in the "Preferences" in the "Resources" tab. You are prompted to enter this password every time you lock or unlock resource groups or single resources.
See also the note on multiple selection in: "Lock/unlock resource"
•The following functions are found in the context-sensitive menu when the templates or resources are selected (third level in tree structure):
·"Rename resource/template"
You can type in a different name for a resource you created.
This does not apply to resources in the read-only "Standard" folder.
·"Edit resource"
Displays the editor responsible for the selected resource.
Also works by double-clicking the resource.
·"New resource"
Displays the relevant editor for creating a new resource.
·"Delete resource/template"
The selected resource/template is deleted.
·"Cut resource/template"
The selected resource/template is cut. This function is for moving resources.
·"Copy resource/template"
A selected resource/template is copied and afterwards can be added with "Paste resource/template", for example, to another folder.

Note: You can copy a "resource/template" in a read-only Standard folder and paste it then to a folder you created (that is not write-protected). In this folder, you can modify and save the "resource/template" as you want.
You can lock resource to prevent unwanted changes. The resources in the group are set to "read-only". To edit locked resources, you must first unlock them.
To prevent unauthorized locking or unlocking, you can assign a password in the "Preferences" in the "Resources" tab. You are prompted to enter this password every time you lock or unlock resource groups or single resources.

Note: Multiple selection is also possible when locking and unlocking resources and resource groups. If your selection only has resource groups, all resources in them will be locked or unlocked. If your selection is mixed, in other words, you selected resources and resource groups, then only the marked resources will be locked or unlocked.
Locking or unlocking resources makes it necessary to save the resources again and, as a result, saving the resources for job and product part templates can take more time. In this case or if more than 50 resources are locked or unlocked, a progress bar appears, showing you the currently handled resource.
You will find a shipped template for a standard job in the "Standard" folder in "Job Templates". The standard job is called "4711_Demo" and contains a job with eight pages for a flyer.
Create a folder as described in To create a group folder for your own custom job templates.
You can then save a currently open job to a folder you created.
•Different features for resources when you display the context-sensitive menu and the job template is marked:
·Set as Default for Job Creation
The job template is then always used automatically as the template when you create a new job in the workflow bar.
·Reset as Default for Job Creation
Only active if a default is set.
Resets the active default.
·Refresh product part templates in a job template ("Refresh Job Template")
In this process, all the product parts in the job template that are based on the product part template will be refreshed. In other words, the product part template is reloaded and assigned to the product part. This corresponds to manually loading the product part template within a job. Important: If the product part in the job was changed after the product part template was loaded, these changes will be lost after the refresh (is equivalent to manually exchanging the product part template in the "Product Part" step in the open job).
You will find shipped templates for standard product parts in the "Standard" folder in "Product Parts Templates". Standard product parts have unique names.
Create a folder as described in To create a group folder for your own product part templates. Then mark the product part name in the Browser window and select Save Product Part as "Resource/Template Product Parts" ... in the context menu. The product part from an open job is saved as a template.
Default product part templates
The following default product part templates are included in the shipment:
|
Name of the product part template |
Description |
|---|---|
|
1up-bleed |
1up template with bleed of 3 mm |
|
1up-CAD |
1up template with bleed of 3 mm and additional margin of 5 mm |
|
1up-nobleed |
1up template with bleed of 0 mm |
|
A3-TwoUp (Readers Spread) |
Reader's Spread Template |
|
AutoExpand-Cover-F16-F8-F4-Sorting |
Template with cover, F16, F8, F4 automatic sorting ON |
|
Book-104Pages |
Imposition template with 104 Pages! Applied schemes: 6 x 8up and 1 x 4up (2 copies) |
|
DoubleWeb-56Pages |
Template for a double-width web press |
|
Montage |
Template with normal and CAD 1ups |
|
Nested-Foldingsheet |
Template for nesting of folding sheets |
|
Packaging |
Packaging template |
|
Flyer-8Pages |
Template with 8 pages (flyer)! 4up, accordion fold, 2 copies |
Simulate product code assignment
There is a way of telling, which product part template(s) will be selected for a particular product code/delivery quantity.
Mark a folder in "Resources > Product Part Templates" and select "Simulate Product Code Assignment..." in the context menu.

Note: When you select the root folder, all product part templates except "Standard" are included. Otherwise, all product part templates in the selected folder and its subfolders will be included.
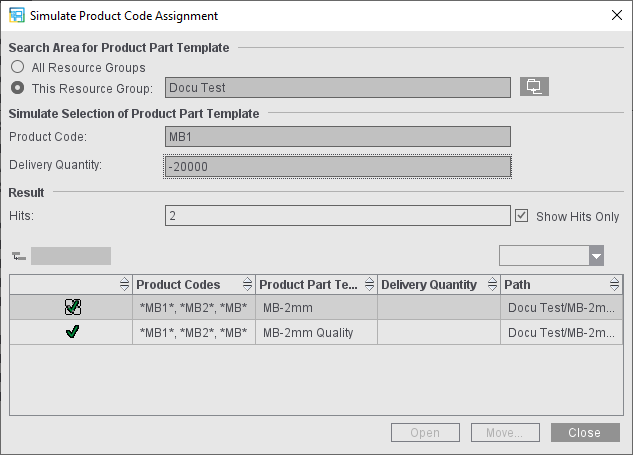
Search Area for Product Part Template
This is where you can restrict the search range to a resource group.
•"All Resource Groups": The search will be in all product part templates in all folders (except Standard).
•"This Resource Group": The search will be in all product part templates in the selected folder and its subfolders.
Simulate Selection of Product Part Template
This function lets you test, which of the product part templates selected above will be selected for a particular product code.
To do so, enter the product code in the "Product Code:" text box (no wildcards such as *). All product part templates display when the text box is empty.
When you specify the "Delivery Quantity", the search for a suitable product part template will also consider the delivery quantity (possible input: integers, no ranges). All delivery quantities are considered when the text box is empty.
When the "Product Code" box is empty, only the delivery quantity is used as a criterion (for administration only, a product code is always present in the workflow).
Result
The number of found items as well as all selected product part templates are shown in the table. With the option "Show Hits Only", you can restrict the table to only show the found product part templates.
Important: In the field, several product parts may apply to one product code. In keeping with the sort order of the product parts within the resources (alphabetical, first single resources, then subgroups), the product part that first meets the search criteria in this sort order is selected for production.
If several hits are found (green checkmark), the product part that will be used for production is marked by a crosshair.
"Open": The Product Part Template Editor for the first selected product part template opens.
"Move": You can move the selected product part template to another location.
Export group as CSV for Business Manager
If you select a group of product part templates in the resources, you can export these product part templates as a csv file via the context menu and use them for synchronization in Business Manager. For assistance with importing the data to Business Manager, please contact a Business Manager consultant.
You will find shipped templates for segments that can be used as a template for sheet optimization with segments in the "Standard" folder in the "Segment Templates" resource.
Working with segments requires that you license the "Ganging with Segments for Finishing" option in "Licensing > Gang & Sheet Optimizer". The segment templates do not display if this option is not checked.
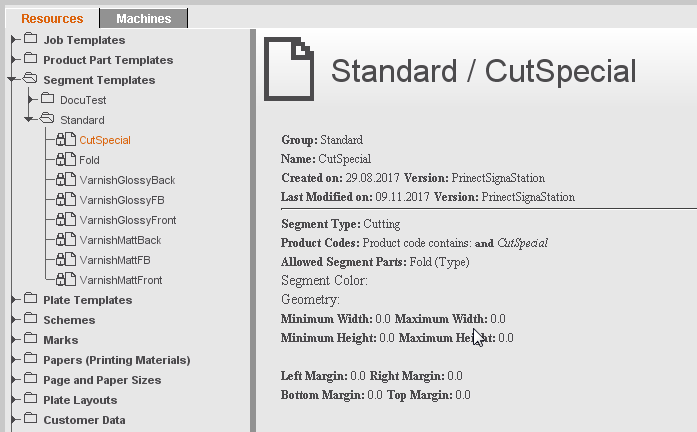
Create a folder as described in To create a group folder for your own custom segment resources. Mark the new folder, display the context menu and then select "New Segment Template...". The Segment Template Editor displays and you can now define your own segment templates.
Simulate Product Code Assignment
There is a way of telling which segment template(s) will be selected for a particular product code/delivery quantity.
Mark a folder in "Resources > Segment Templates" and select "Simulate Product Code Assignment..." in the context menu.

Note: When you select the root folder, all segment templates except "Standard" are included. Otherwise, all segment templates in the selected folder and its subfolders will be included.
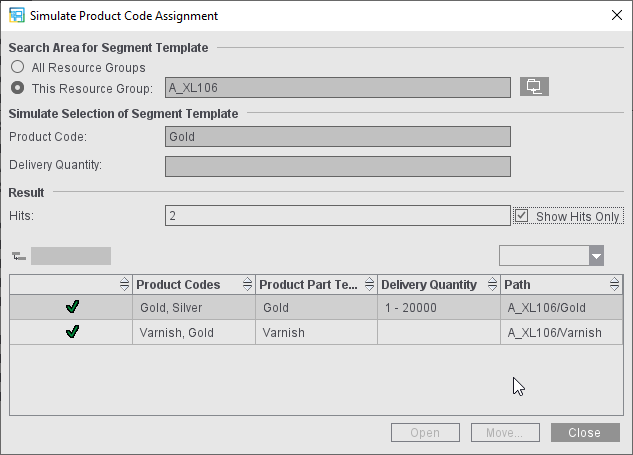
Search Area for Segment Template
This is where you can restrict the search range to a resource group.
•"All Resource Groups": A search is run in all segment templates in all folders (except Standard).
•"This Resource Group": A search is run in all segment templates in the selected folder and its subfolders.
Simulate Selection of Segment Template
This function lets you test which of the segment templates selected above will be selected for a particular product code.
To do so, enter the product code in the "Product Code:" text box (no wildcards such as *). All product part templates display when the text box is empty.
When you specify the "Delivery Quantity", the search for a suitable segment template will also consider the delivery quantity. If delivery quantities are not set in segment templates that are otherwise suitable, these templates also display as hits. All delivery quantities are considered when the text box is empty.
Possible inputs are:
•Open ranges, e.g. -1000 (up to 1000) or 1001 (no limits upwards)
•Closed ranges, e.g. 1000-2000
When the "Product Code" box is empty but a delivery quantity is set, only the delivery quantity is used as a criterion (for administration only, a product code is always present in the workflow).
Result
The number of found items as well as all selected segment templates are shown in the table. With the "Show Hits Only" option, you can restrict the table to only show the found segment templates.
Important: In the field, several segment templates may apply to one product code. In keeping with the sort order within the resources (alphabetical, first single resources, then subgroups), the segment templates are selected for production.
If several hits are found (green checkmarks), the segment template that will be used for production is marked by a crosshair.
"Open": The Segment Template Editor for the first selected template opens.
"Move": You can move the selected template to another location.
You will find shipped templates for standard plate templates in the "Standard" folder in the "Plate Templates" resource.
Create a folder as described in To create a group folder for your own custom plate template resources. Mark the new folder, display the context-sensitive menu and select "New Plate Template...". The Plate Template Editor displays and you can now define your own plate template.
You will find shipped templates for standard schemes in the "Standard" folder in the "Schemes" resource.
Create a folder as described in To create a group folder for your own custom scheme resources. Mark the new folder, display the context-sensitive menu and select "New Scheme...". The Folding Scheme Editor displays and you can now define your own scheme.
You also have the option of studying an existing scheme with the "Open Folding Sheet Animation" function. See also Folding Sheet Animation... .

Note: Special folding schemes that begin with L* or S* are available for the HEIDELBERG Stahlfolder folding machines TH/KH-82-P, TX96 with Pallet Feeder PFX. These folding schemes follow a set naming scheme (see Fold types L* and S*).
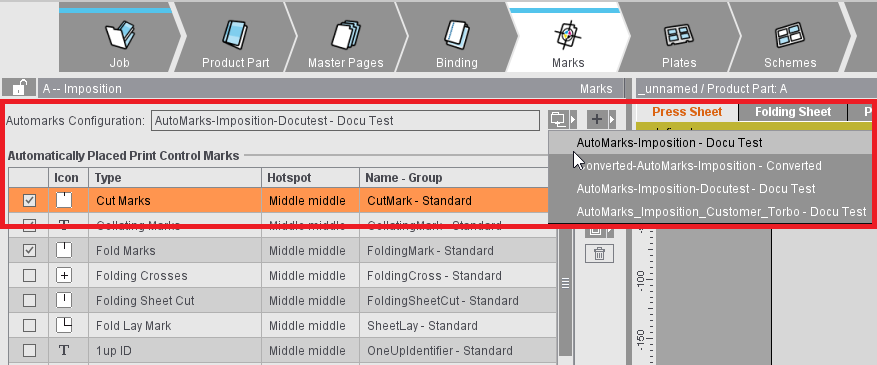
You can create different setups for the automatically placed print control marks that display in the "Marks" step in the job. You can do this for the three work modes, Imposition, Montage and Packaging.
Besides the settings from the "Standard" folder, you can create your own folders with custom settings. In this way, you do not have to define settings that deviate from the standard each time in the job.
Saving automarks sets has the following benefits:
•The specific settings for the individual marks, which were previously only possible in the job, can be stored as a predefined resource using the automarks sets.
•In the job, you only have to select the automarks set resource you want in "Automarks Set". Job-specific changes still continue to be possible.
•Such changes to the automarks set can be saved as a resource directly from the job and reused in later jobs.
•Because the automarks set is a separate resource, you do not have to create additional product part templates to save these sets.
•In the Preferences, three possible configurations for the "Imposition", "Montage" and "Packaging" work modes are not set by default in the "Resources" tab but only the resource you want, making changes easy to make.
The "Converted" folder contains the configurations that were generated automatically after the automarks sets were inserted as resources from the preceding defaults when Signa Station first started.
Use the "Automarks Set Editor" to create or edit automarks sets (see Automarks Set Editor) or save the setups of a job to the Resources.
You can find detailed information about automarks sets and rule-based processing in: Automarks
In the "Resources" tab in the Preferences, you define for each work mode which automarks configuration will be used when a new job is created. In the job itself, you can then select a different resource if needed or give the job specific settings.
Shipped marks are located in the "Marks" resource. You will find write-protected standard marks in the "Standard" folder. You can place these marks in an open job.
Create a folder as described in To create a group folder for your own custom marks resources. Mark the new folder, display the context-sensitive menu and select the appropriate marks editor. The following marks editors are available: Marks Editor , Text Marks Editor , Ink Pickup Bar Editor , Color Control Bar Editor , Color Control Bar Special Editor , Marks Import Editor , Marks Import Editor (Line Mark) , Combi Marks Editor , and Barcode Editor .
You can create your own marks or edit imported marks using these editors.
On the "Marks" folder level, you can also import existing marks practically automatically by displaying the context menu and selecting Marks Import Assistant . This function is very helpful when updating marks.
You will find text marks in the "Report" folder. You can place these marks in the list window for output of HTML and/or PDF files. See "Save Table as HTML Report ...".
This resource allows you to work with the MDS. See MDS (Master Data Store) .
You will find shipped templates for standard papers in the "Standard" folder in the "Papers (Printing Materials)" resource.
Create a folder as described in To create a group folder for your own custom paper resources. Mark the new folder, display the context-sensitive menu and select "New Paper". The Paper (Printing Material) Editor displays and you can now define your own papers (printing materials).
When working with the MDS, you are offered a slightly changed editor analog to the Printing Material Editor in Cockpit (see Paper (Printing Material) Editor).
You will find shipped templates for standard paper sizes in the "Standard" folder in the "Page and Paper Sizes" resource.
Create a folder as described in To create a group folder for your custom page and paper size resources. Mark the new folder, display the context-sensitive menu and select "New Format". The Format Editor displays and you can now define your own page and paper size.
You will find a shipped template for a standard plate layout in the "Standard" folder in the "Plate Layout" resource.
Create a folder as described in To create a group folder for your own custom plate layout resources. Mark the new folder, display the context-sensitive menu and select "New Plate Layout". The Plate Layout Editor displays and you can now define your own plate layouts.
This resource allows you to work with the MDS. See MDS (Master Data Store) .
You will find shipped sample customers in the "Standard" folder in the "Customer Data" resource. You can use these customers to create a test job.
Create a folder as described in To create a group folder for your own customer data. Mark the new folder, display the context-sensitive menu and select "New Customer Data". The Customer Data Editor displays and you can now define your own customer data.
You will find shipped templates for standard output setups in the "Standard" folder in the "Output Parameter Sets" resource.
Create a folder as described in To create a group folder for your own output parameter sets. Mark the new folder, display the context-sensitive menu and select "New Output Parameter Set". The Output Parameter Set Editor displays and you can now define your own output parameter sets.
You will find shipped templates for standard report headers in the "Standard" folder in the "Report Headers" resource.
Create a folder as described in To create a group folder for your own report header resources. Mark the new folder, display the context-sensitive menu and select "New Report Header". The Report Templates Editor displays and you can now define your own report headers.
You will find shipped templates with setups for standard sheet optimization in the "Standard" folder in the "Sheet Optimization Setup" resource.
Create a folder as described in To create a group folder for your own optimization setup. Mark the new folder, display the context-sensitive menu and select "New Sheet Optimization Setup...". The Sheet Optimization Setup Editor opens. This editor lets you define and save your own parameters of sheet optimization.
The tasks define the automated processing of gang jobs with the Signa Station Server.
In time-controlled automated processing, the set gang pool is scanned for certain criteria (e.g. paper, delivery date) and if paper utilization is satisfactory and production costs are low, the Signa Station Gang Server automatically creates a gang run form.
The tasks can run time-controlled as a follow-up task of a task that was already completed or can be started manually in the "Planned Gang Jobs" dialog. In the "Planned Gang Jobs" dialog, you also define "Current Task Parameter Group". In other words, you can create different groups of tasks and through the group control which tasks will be used for planning gang jobs.
Further information:
•Creating and editing tasks: Ganging Optimization Task Editor
In the "Job Import from Gang Pool" window, various filters with different criteria define which individual jobs to be subjected to ganging appear in the dialog. For example, the filters can be used to filter the gang pool by certain printing materials or by delivery quantities.
Further information:
•Creating and editing filters: Filter Editor