The file selection dialog displays when you select this function in "File" in Signa Station. Two variations of the dialog are possible. The second variant "Open with Browser..." is described in Open with Browser... .
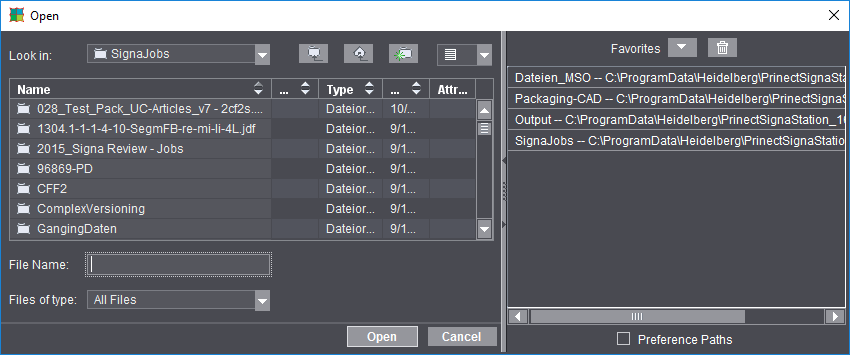
The following dialog displays if you wish to open a job:

Note: To view the Favorites, the window must have a certain minimum width. When the window is sufficiently wide, you can size the Favorites pane within certain restrictions by moving the splitter with the mouse. To view or hide the browser list or the Favorites alternately, click the arrows in the splitter.
Enable "Preference Paths" at the bottom of Favorites to be able to select your key folders automatically.
You can then select and open a job. You can use the buttons to look in folders, create a new folder or change to a different folder level.
You can open one or more job files for processing. You then have all the tools you need to change the job.
You can open Signa Station files as of version 1.0 (*.sdf), converted Signastation version 9 files (*.sg9), JDF files (*.jdf) and ZIP files (*.zip).
Click the arrow on the right to define your favorite folders:
Save the folder path to your favorites
The "Open" dialog gives you the option of saving folder paths to your favorites.
This functionality is very useful and time-saving. You no longer have to spend time browsing to paths where the files you need are located.
Enable "Preference Paths" at the bottom of Favorites to be able to select your key folders automatically. Proceed as follows if you wish to define other folders:
Procedure
1.Open the arrow on the right of your window.
2.You can browse to any other path on the left of the dialog and save it by clicking the "Favorites" button. You can open the paths with a double click.
3.You can delete paths you no longer need by selecting a path and then clicking the "trashcan" button.
The file selection dialog displays as the job browser when you select this function in "File" in Signa Station or as the CAD browser when you display it with ."Create new assembly block from CAD 1up" in the Assembly Block Inspector.
The "Browser" shows you much more details about the files you will open that the normal "Open" dialog. You can set a wide range of sorting criteria, e.g. by "work mode". See the screenshot below for an example:
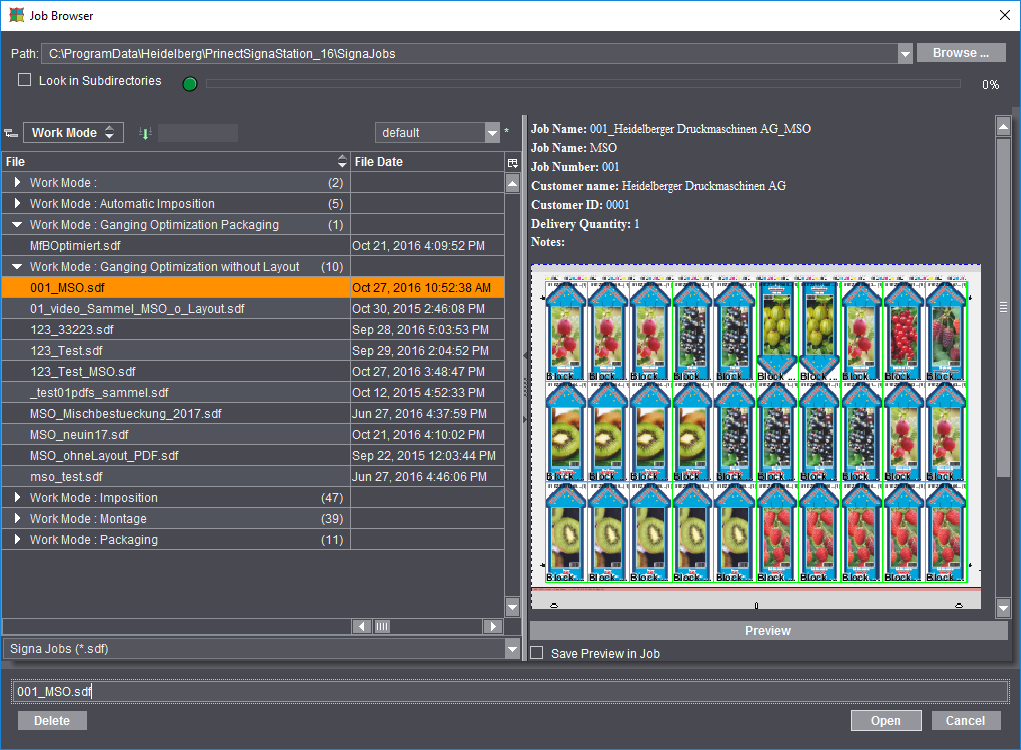
You can open one or more files for editing. The "Browser" shows the existing files in detail and assists you when looking for a certain file.
You can delete existing files by selecting the job and clicking "Delete".
In the Job Browser, you can open Signa Station files as of version 1.0 (*.sdf), converted Signastation version 9 files (*.sg9), JDF files (*.jdf) and ZIP files (*.zip).
Working with the 'Job Browser'
You can sort (group) jobs by properties (parameters). See the description below for details.
You can set which properties will be shown as follows:
1.Right-click the parameter list shown in "bold".
2.Select "Customize...". A list of suitable properties displays. You can show or hide the properties you want by clicking the box in front of the property.
3.Confirm the dialog with "OK".
To give a clearer structure to a long list of files, you can group the list based on the properties of the files:
1.The properties display in bold in the top table column in the list.
2.To group the list by a property, click the appropriate column header and, holding down the left mouse button, drag-and-drop it onto the icon named "Group" above the list.
3.In this way, all the files that have the same properties as the selected column are grouped.
4.The group displays in the table as a popup list and the parameter on which grouping is based displays in the box beside the group icon. The grouped list has a small arrow.
5.You can expand the group when you click this icon. In the screenshot below, grouping was by "work mode". All the jobs in the various modes display separately:
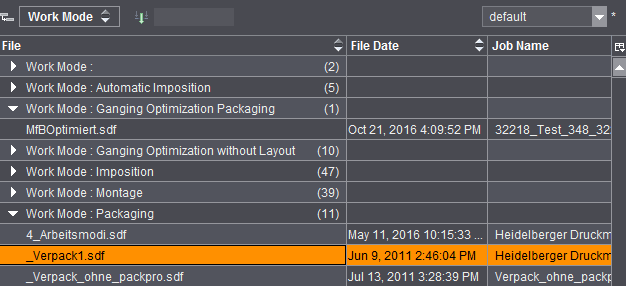

Note: In the column headers you can sort the groups in ascending and descending order. To do this, click the small up and down arrows beside the parameter groups.
6.Now you can select another parameter to continue grouping the list. To do this, select the next column header and drag-and-drop it to the group icon. This new parameter becomes the new main group level.
7.The group hierarchy also displays in the boxes beside the group icon. The top group level is always at the far left. You can create other group levels if required.
8.If you should discover that a selected group level is no longer needed, then you can undo the group step-by-step. To do this, mark any cell that displays beside the group icon and drag-and-drop it back to the column headers. The order of the hierarchy levels doesn't matter in this case.
These parameters are ungrouped and the single parameter values display again as table columns. In this way, you can undo the entire group.
Select "File > New" or click the "New" button to start creating a new job using the workflow bar. See Basics of the Workflow Bar.

Prerequisite: Is active only when no job is open.
The resources in Signa Station have a certain interdependency. When a resource is refreshed, all resources containing the refreshed resource must be refreshed as well. To facilitate this, you can run the "Resource Refresh Assistant".
The dependent resources are then checked for topicality in all resources (a progress bar appears during this process). After resource checking, the Resource Refresh Assistant opens where you can control how dependent resources are refreshed.
See Resource Refresh Assistant .
You can create new resources that are filed in the Browser window in the relevant folder in "Resources".
You cannot file new resources in the Standard folder as this folder is read-only and holds only the shipped resources.
To be able to create a new resource, you must first set up your own group folder in the Browser window where you can save your own resources. See Resources .
Creation of a new product part template with the help of the Product Part Template Editor.
Creation of a new plate template with the help of the Plate Template Editor .
Creation of a new scheme with the help of the Folding Scheme Editor .
Marks Editor
Creation of a new mark with the help of the Marks Editor .
Text Marks Editor
Creation of a new text mark with the help of the Text Marks Editor .
Ink pickup bar
Creation of a new ink pickup bar with the help of the Ink Pickup Bar Editor .
Color control bar
Creation of a new color control bar with the help of the Color Control Bar Editor .
Special color control bar
Creation of a new special color control bar with the help of the Color Control Bar Special Editor .
Marks Import
Import of different PDF type marks with the help of the Marks Import Editor .
Marks Import (Line Mark)
Import of line marks (without comments about colors) with the help of the Marks Import Editor .
Combi mark
Creation of a combi mark with the help of the Combi Marks Editor .
Barcode mark
Creation of a barcode mark with the help of the Barcode Editor .
Creation of paper data with the help of the Paper (Printing Material) Editor.
Creation of page sizes with the help of the Format Editor .
Creation of plate layouts with the help of the Plate Layout Editor .
Creation of customer data with the help of the Customer Data Editor .
Creation of output parameters with the help of the Output Parameter Set Editor .
Creation of a new report header with the help of the Report Templates Editor.
New Sheet Optimization Setup...
Creation of a new sheet optimization setup with the help of the Sheet Optimization Setup Editor .
You can set up imagesetters and presses.
You cannot file new machines in the Standard folder as this folder is read-only and holds only the shipped machines. You must create your own machine folder in the Browser window if you wish to create a new machine. See Machines .
Creation of a setup for filmsetters with the help of the Filmsetter and Platesetter Editor .
Creation of a setup for platesetters with the help of the Filmsetter and Platesetter Editor .
Creation of a setup for sheetfed presses with the help of the Sheetfed Press Editor .
Creation of a setup for digital presses with the help of the Digital Press Editor .
Creation of a setup for web presses with the help of the Web Press Editor .
Can only be used when a job is open.
The "Documents..." menu item allows you to import PostScript or PDF files.
The PostScript or PDF files appear in the "Contents" step. You can now assign these pages to the open job by dragging-and-dropping them.
You can reload a job (zipped) that was exported from Signa Station without having to "unpack" it beforehand.
This function facilitates the exchange of jobs.
The "JDF..." menu item allows you to import JDF files.
If the JDF file is compatible, it will be displayed like a Signa Station job.

Prerequisite: Can only be used when no job is open.
You can re-import Signa Station resources that were exported with "File > Export > Export Signa Resources...", for example, to other workstations.
The files are imported as ZIPs.
The "Marks Import Assistant" does away with the need to open and save every single mark to be imported or updated, something that had to be done so far.
This makes a mostly automated import of marks possible, for example, after updates. The update of Dipco marks is the main function of the Assistant.
The "Marks Import Assistant" performs the following four functions based on user input:
•Add new marks
•Update marks
•Remove marks
•AutoRefresh marks
You can open the "Marks Import Assistant" directly from the main menu with "File > Import > Marks Import Assistant".
If you are in one of the inspectors, you can open the "Marks Import Assistant" from the "Marks Resources" tab by selecting the "Marks" resource and displaying the context-sensitive menu.
A Browser window first opens where the directory of the marks you wish to import or update is selected.
The following statuses are possible after an update or import. These are located on the right side of the table (target marks) of Signa Station:

|
The mark is new and is added after you confirm the window with "OK". |

|
The mark version is more recent than the existing one and is updated after you confirm the window with "OK". |

|
The mark version is identical and remains unchanged after you confirm the window. The name of the mark is listed again in the "Source" column. |

|
The mark version is older than the existing one and is reset to the older version after you confirm this. |

|
The mark was marked with the "Remove" button and is deleted irretrievably after you confirm the window with "OK". |

|
A step is run in the folder when the window closes. |

|
The mark is write-protected, meaning it can't be updated. |
To import new marks or to refresh older Dipco marks, a list of folders and files displays on the left side of the table.
You can use the "Filter" list box to restrict or extend the format you want.
In addition, you can set two self-explanatory options. "Automatic Only on Selected Groups in Signa" (this can save computing time) and "AutoRefresh Combi Marks after Save" (if marks inside the combi mark have changed).
AutoRefresh marks with "Automatic"
•The button is always active.
•All the Dipco marks in the source and target directories are refreshed when you click "Automatic".
•The refreshed marks are marked by the appropriate status. At this point, you can still use "Cancel" or "Reset".
•The changes are applied only when you close the window with "Apply".
•You can set the features that will be applied to "Do not adopt" in the "Source" column as shown in the graphic below:
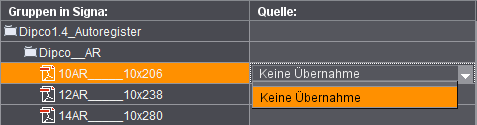
This lets you exclude single marks manually and deliberately from an update.
Add new marks with "New"
•Single or multiple selection of marks in the left list (Source) enables the button.
•Select the mark you wish to import and click "New".
You can create a new group (folder) or, if "Use Parent Folder as Group" is checked, you can automatically use the relevant folder in the target.
•The marks with their status display on the right side of the table when you confirm with "OK".
Add marks with "Apply"
•The button is active if a mark is selected both on the left (source) and the right (target). The target mark is updated by the source mark.
Remove marks with "Remove", "Undo Remove"
•The "Remove" button is active if a mark is selected on the right (target). The "Undo Remove" button is active if a mark's status is "remove" (red cross) on the right (target).
•The mark you wish to remove is marked by a red cross and is deleted irretrievably after you confirm the window with "Apply".
•You can reset a mark with a red cross to its old status with "Undo Remove".
The "Resource / Machine..." menu item allows you to import resources or machine data sets to your own environment.
You can select the resources or machine data sets. The Signa Station automatically recognizes the selected resource or machine and suggests a folder in the file structure. The file is then copied to this folder.
Paper or Customer Resource by CSV ...

Prerequisite: No MDS may be enabled.
The "Paper or Customer Resource by CSV..." menu item lets you import paper or customer data from a configuration file (*.ini) and data file (*.txt) of, for example, a paper manufacturer to your own environment. (CSV stands for "comma separated values").
The procedure is as follows if you have two such files:
1.Select a configuration file.
Resource Type:
This shows the resource type you will import ("Customer Data" or "Papers (Printing Materials").
Supplier, Version:
This information will be shown if it is in the configuration file.
2.Select the data file that matches the configuration file. The data sets (in the rows) and their parameters (in the columns) are described in the data file.
Filter:
You can and should use the filter function in most cases to restrict the number of data sets you will import by entering parts of the group name and names of the resources. Many of the data files have thousands of entries but not all of them are needed. For example, the import of 5000 paper data sets would slow down the Signa Station unnecessarily.
3.Start the import.
If more than 100 data sets are found, a message displays asking whether you really wish to import them.
The data sets are imported automatically to the appropriate resources folders if you confirm with "Yes". Resources with the same name are overwritten.
After the import, a message shows you the number of resources that were imported.
Creating a configuration and data file
We will now describe how you can create your own configuration and data files:
Required format:
In general, the data you wish to import (only paper or customer data) should be available as a table. You can view this file with Excel, for example. One data set (either a paper or customer data set) is described per row. The various parameters are described in the columns (e.g. height and width of a paper).
You can then export this data to a text file. It is important that the single column entries are separated by a defined delimiter, e.g. a comma, minus sign or a tab. The file extension is not important. Export can be to all text formats, e.g. "*.csv" or "*.txt".
There is no standardized type of table. Every table type as described above can always be imported to Signa Station. You need a configuration file, however, to be able to map existing columns to matching terms in Signa Station. The configuration file defines the attributes from the data file with which the resource names or group names are created.
The following two sections (Main, Mapping) must be defined in the configuration file.
Below is an example of a configuration file for papers supplied by the company Schneider und Söhne:
[Main]
ImportObject=Papers
Company=Schneidersöhne
ProducerVersion=
Version=1.0
# Default Unit for Thickness: µm
# Possible values: micrometer[µm | um], millimeter[mm], centimeter[cm], inch[inch], point[pt]
ThicknessUnits=mm
Units=mm
UnitsAll=mm,pt,Inch
CellDivider=Tab
Note on CellDivider: For csv files, can be a ',' or ';' (attention: The contents must not have these characters.)
Header=True
Fields=24
Record=ArtNo, oldArtNo, CommGroup, PapGrammage, ArtName, Add-onName, FormatWidth, FormatHeight, LR,Color, Unit, Scale1Quantity, Scale1Price, Scale2Quantity, Scale2Price, Scale3Quantity, Scale3Price, Scale4Quantity, Scale4Price, QuantityUnit, QuantityCode, Grade, PatternBook, MatGroup, LeNo, Saturation
[MAPPING]
Name=ArtName,ArtNo
Note on Name: Can be made up of n columns.
Group=CommGroup
GroupTip=Can be made up of n columns.
Width=FormatWidth
Height=FormatHeight
Thickness=
Grade=
Grammage=PapGrammage
The "Preferences..." menu item allows you to import existing preferences, for example, from other computers in the network environment to your own.
The open and active job is filed together with the imported PDF files and the job file (.jdf) in a folder that is given the job name.
This function is for archiving jobs.
The open and active job including all its elements (i.e. imported PDF files, resources and machine data sets that were used, log files, preferences and the job file (.jdf)) is filed in a folder that is given the job name.
This function is primarily intended for servicing. If a job encounters problems, all the parameters needed for an analysis of the job are exported to a folder. This folder can then be sent directly to the service point in charge.
You can now export resources to exchange them. You write the resources on your computer to a compressed ZIP file. You then select "File > Import > Import Signa Resources..." to import the resources to another computer.
This item shows you the last, inactive jobs. When you select a job, it opens at once and is active for editing.
You can set the number of jobs that will display in this item in "File > Preferences > General". The default setting is "4".
Save the changes you made to a currently open job with "File > Save".
Give your job file a new name when you save it with "File > Save as".
The folder in which you opened the job is suggested as the file location.

Caution: The file names you can assign can be quite long but make sure not to exceed the restrictions of the operating system you use (Windows: 234 characters including file type, Mac OS X: 255 characters).
Data exchange in the network can also mean that you cannot fully utilize the naming feature that Signa Station offers. For data transfer with AppleTalk, names are restricted to 31 characters.
The open job closes after an alert message whether you want to save the job or not. The job disappears from the Browser window.
The open and active job is reverted to the version it had when last saved. Any changes made in the meantime are lost.
The function is only enabled if changes were made after the saved version.
To output a job or product part, a print dialog displays where you can define the print setup.
Select an output parameter set. You can customize this with "Edit".
The press sheet list shows you the press sheets in the job.
If you work with an interactive workflow, you can now enable press sheets for viewing. Enable "Allow Selection for View".
In addition, in the interactive workflow it is now possible to save a JDF to submit it to the Prepress Manager.
You can find more details about the topic of printing in the Output.
More details can be found in Print job with the Print Assistant.
In the Preferences, you can set parameters that simplify working with Signa Station.
You can save, cancel or reset your settings at any time in the dialog.
The following tabs are available for your settings:
Exits the Signa Station program.