
How do I establish a connection to the Prinect CP2000 Center?
Before the Prinect Integration Manager/Prinect Pressroom Manager can send job data to the press, a connection must be established. This means you must define on each "side" which machine is involved. This is done via the "Workplace ID" and the "Device name".
Note: This manual describes how to connect a Prinect CP2000 Center press online. A complete overview of connection variants can be found in Connecting Machines.
1.You must create a new CDM device in the Prinect Integration Manager/Prinect Pressroom Manager via the "CDM" (Central Device Manager).
Example: Creating a "XL105-8P" press in the Prinect Integration Manager/Prinect Pressroom Manager
2.Configure the corresponding data storage unit on the Prinect CP2000 Center
3.Synchronization of the PDC configuration with the press
Example: Creating a "XL105-8P" press in the Prinect Integration Manager/Prinect Pressroom Manager
1.Start the Prinect Cockpit.
2.Open the "Administration > Settings > System" menu and select the computer on which the Prinect Integration Manager/Prinect Pressroom Manager was installed.
3.Select the engine "CDM".
4.Right-click to display the context-sensitive menu and select "Add device".
The device assistant appears.
Device assistant - General

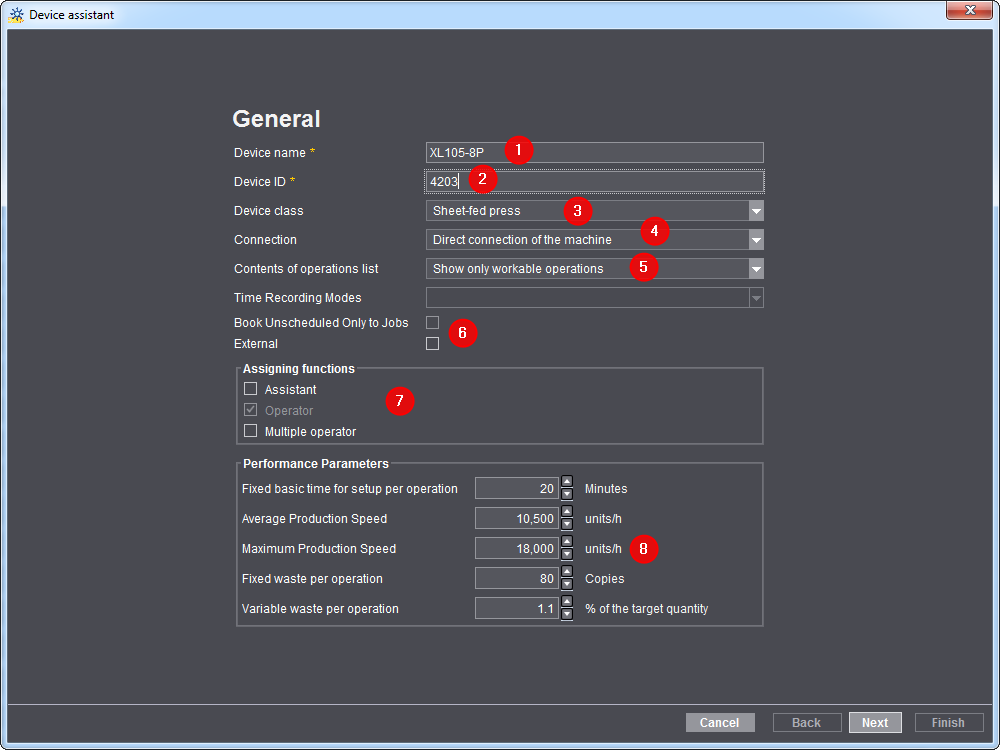
5.Under "Device name", enter the designation for the press you wish to connect (1). In our example this is "XL105-8P".
·You must later enter this designation as the device designation for the "WP_Name1" attribute on the Prinect CP2000 Center side.
·The designation of the workplace/machine in the Prinect workflow must be unique. You may use no more than 30 characters. This designation identifies the press for users in the entire Prinect workflow (in the Scheduler and in Analyze Point, for example).
6.Enter a device ID (2). In our example this is "4203".
·The device ID may only contain the characters [a-z], [A-Z], [0-9].
·If the device ID has already been assigned, a corresponding message appears and you have to enter a new one.
·The device ID serves for unique assignment of the machine in your Prinect workflow. The device ID must be checked against the Management Information System (MIS).
7.In the "Device class" list box, select the "Sheet-fed press" list item (3).
8.Select the "Direct connection of the machine" list entry in the "Connection" list box (4).
9.Select the desired item from the "Contents of operations list" list box (5).
In this example: "Show workable and scheduled operations". You can find a detailed description of the effects of the selection in General.
10.Disable the option "External" (6).
11.Next you must define the user roles (7). This means you define who can log in to the machine. The "Operator" function is activated by default and cannot be deactivated.
Activate the "Assistant" function if assistants work on the machine in addition to the operator.
Enable "Multiple Operator" if someone is working on several machines at the same time. This is generally not the case for presses. A multiple operator is mainly used for finishing machines.
You can find a detailed description of the roles in General.
12.You do not need to change anything in the "Performance parameters" section (8). Standard values from the Master Data Store are entered here, depending on the selected device class. The standard values entered here are only used as a template for calculating production times in a newly created operation. The calculated production times are then taken into account when scheduling the operation in the scheduler. In a Prinect workflow with a Management Information System (MIS), the production time are provided by MIS.
The "Performance parameters" are also important for the Planning Assistant. If no MIS data are available, these values are used to calculate how long an operation will take. For details about the Planning Assistant see Planning Assistant.
Maximum production speed:
The speed specified here is used in Analyze Point to calculate the speed index.See Speed Index.
13.Click "Next".

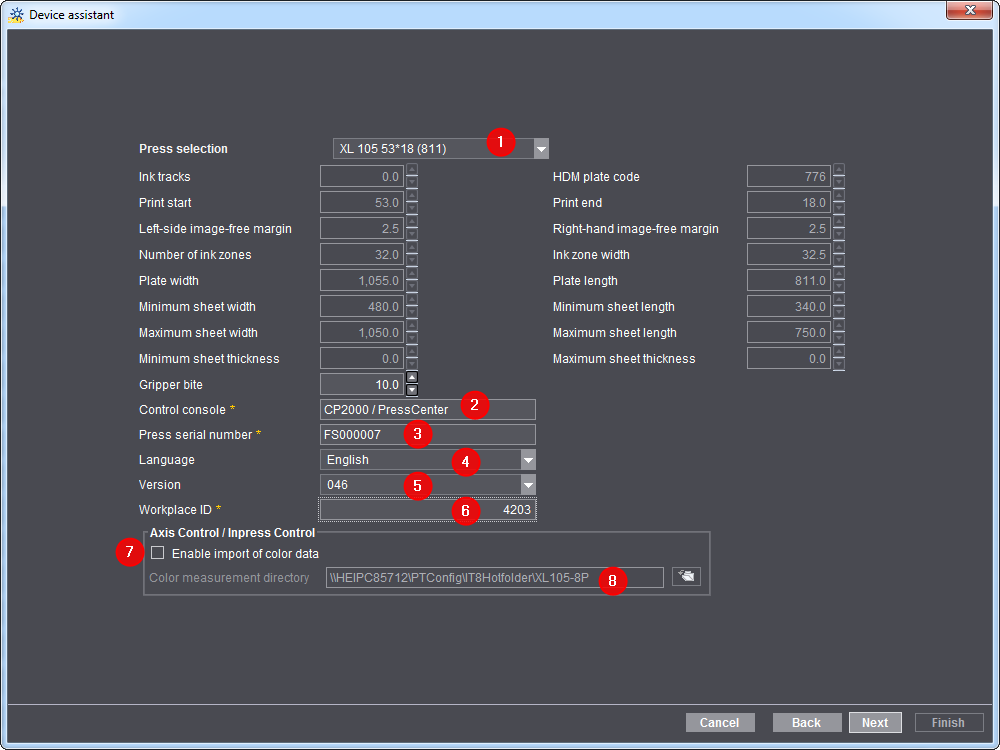
14.Select the press you wish to connect (1).
15.Select the "CP2000/PressCenter" item in the "Control console" section (2).
16.Enter the actual machine number of the machine in the "Machine number" input field (3).
The machine number is needed to be able to evaluate the color data in Analyze Point.
You must first read the press serial number from the press control station.
17.In the "Language" list box select the language that is installed on the printing press (Prinect CP2000 Center) (4).
The language selection is important for the automatic generation of the export XML file. This XML file contains all operations (PDC messages) and staff data assigned to the printing press and is later imported on the Prinect CP2000 Center. The operations (PDC messages) are displayed on Prinect CP2000 Center in the language you set here.
18.In the "Version" section, define the Prinect CP2000 Center version installed on your printing press (5).
19.Enter a number (workplace number) in the "Workplace ID" section (6).
This is the unique ID number for the workplace in your Prinect workflow. The number must have no more than 6 characters and be made up solely of figures.
You must later enter this "Workplace ID" in the "WP_Id1" attribute at the Prinect CP2000 Center end as well.
20.In the "Axis Control/Inpress Control/Inspection Control" section, enable the option "Enable import of color data" (7).
You must activate the option only if you have connected a Prinect Axis Control I to the press.
21.Then enter the color measurement directory (8).
A separate color measurement directory must be defined for each press with a Prinect Axis Control I. The color data generated by the Prinect Axis Control I (IT8 file) is then saved in this color measurement directory. The directory "\\<Prinect Manager server name>\\PTConfig\IT8Hotfolder\<device name>" is always defined by default.
You then have to configure the color data export on the control station of Prinect CP2000 Center.
22.Click "Next".
Then define the number of printing units.
Here you can "model" a copy of your printing press. This model is important, as it is used to calculate how many passes are needed on the printing press for jobs when they arrive. For example, if you have an 8-color press without perfector and wish to print a 4/4 job, you will need two passes. With a perfector you would only need one pass.
23.Use the arrow buttons to set the number of printing units that your selected machine has.
24.Click "OK".
You then have to define the printing unit types (1) by clicking the relevant circles (black dot appears in the circle).

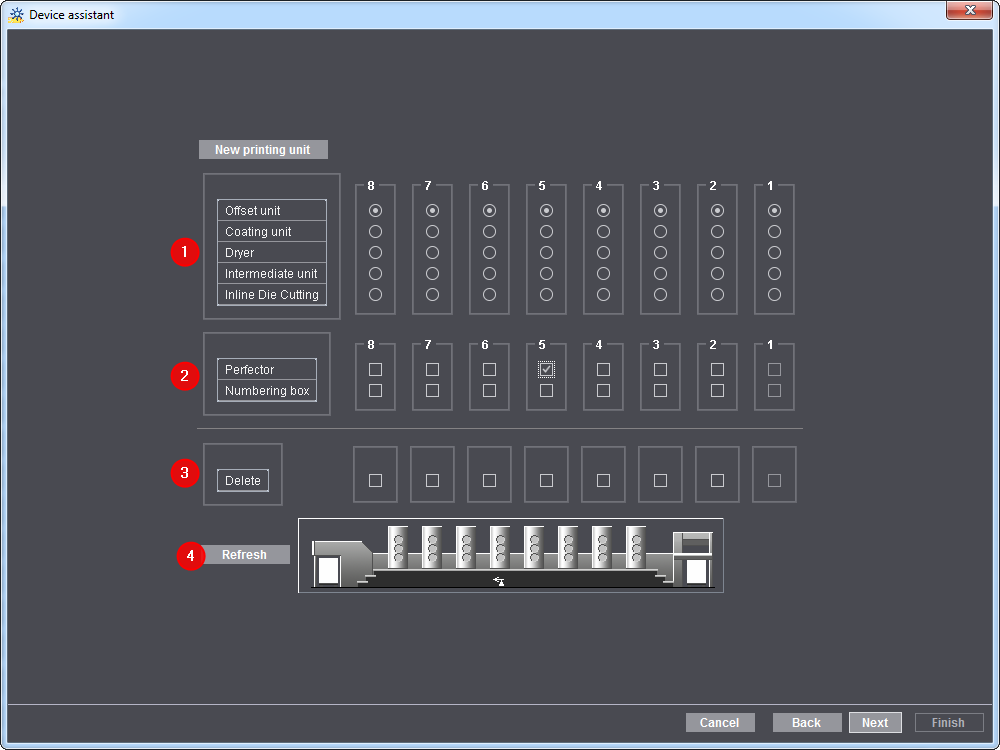
25.Specify whether the printing unit is fitted with a perfector and/or a numbering box (2). Click on the appropriate box here.
26.To delete a printing unit, you must click the corresponding printing unit (checkmark in box) in the "Delete" section (3).
27.Then click "Refresh" (4). The highlighted printing unit is deleted.
28.Click "Next" (6).
Device Assistant - Assigning operation groups
As the next step, assign the desired operation groups (cost groups) to the device. This means that you define which operations (PDC messages) can be recorded for this device.

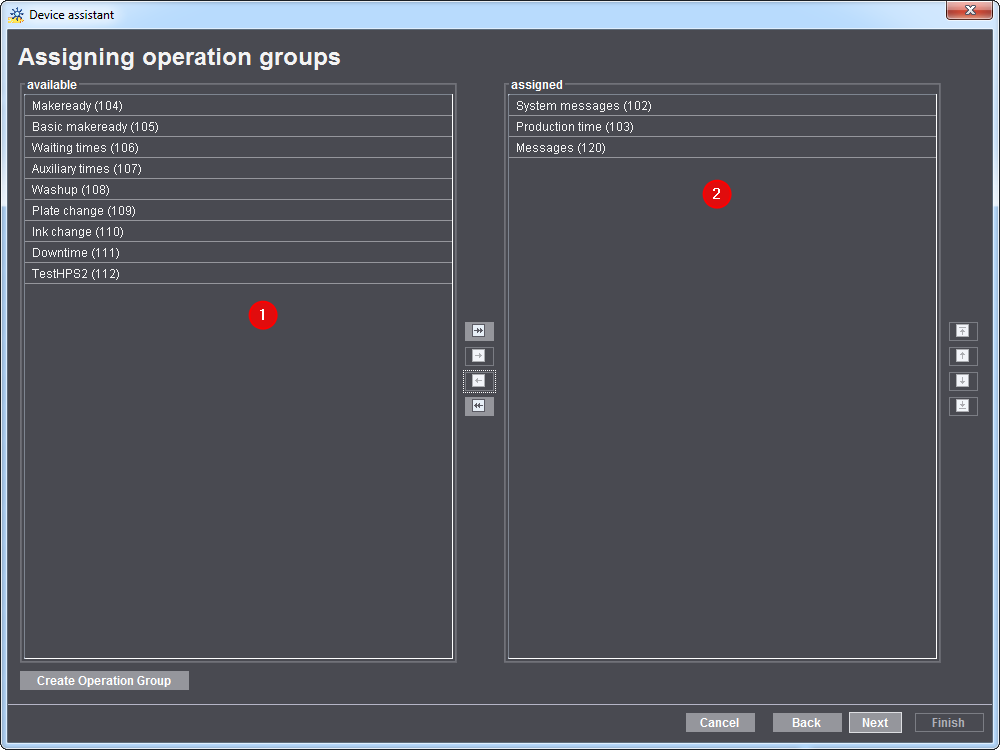

Note: Depending on the previously selected device class, some operation groups are already assigned by default (2).
29.Assign necessary operation groups (cost groups) to the machine.
This means that you have to add the required operation groups from the "Available" (1) section to the "Assigned" (2) section. Or you move operation groups which are not required from the "Assigned" section to the "Available" section.
All operation groups that have already been created in the master data store and have been assigned at least one operation (PDC message) are displayed. You can find a detailed description in Operations (PDC Messages).
30.Click "Next".
Device Assistant - Assigning operations
As the next step, you define which messages the operator and, if previously active, the assistant and the multiple operator can process. To do this, select the corresponding function and then define the desired operations (PDC messages) for each operation group (cost type group).

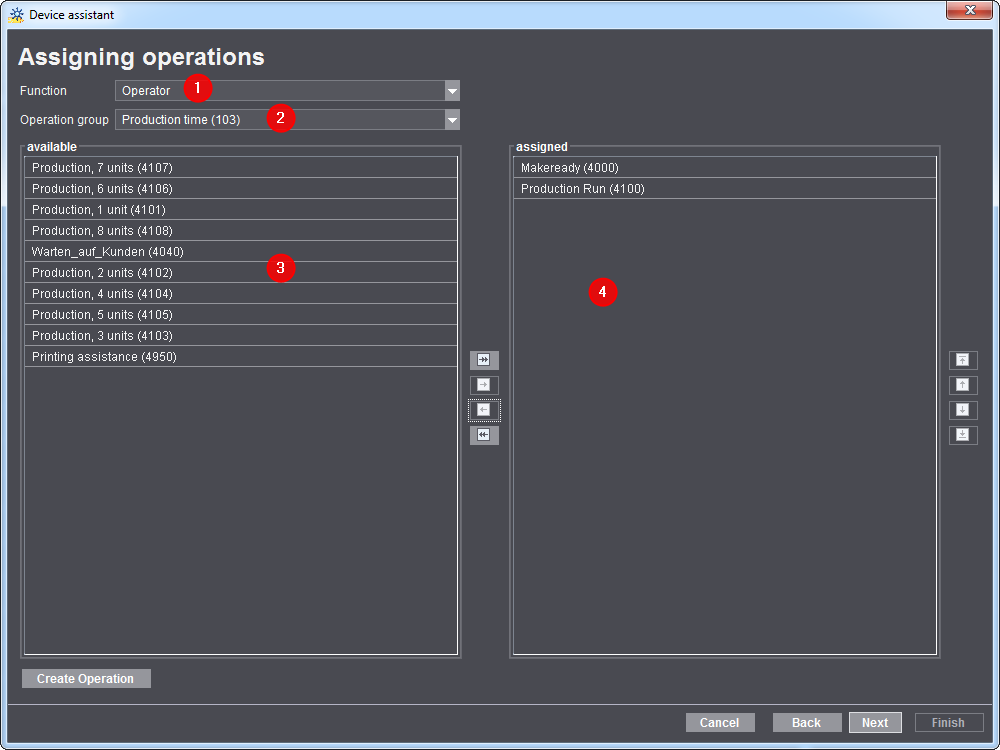
31.Select the "Operator" in the "Role" section (1).
32.Select an operation group (cost type group) (2).
All previously assigned operations (PDC messages) for the selected cost group (operation group) are now displayed in the "Assigned" section (4).
33.Now you must add the required operations from the "Available" section (3) to the "Assigned" section (4). Or you move operations which are not required from the "Assigned" section to the "Available" section.

Note: An operation may only be assigned to one operation group.

Note: If you define more than 12 operations for each operation group, a message appears indicating that the Prinect CP2000 Center can display a maximum of 12 operations. You can then either confirm this message or reduce the number of operations to the maximum of 12.
34.Repeat the steps until you have assigned all the necessary operations to each role and operation group.
35.Click "Next".
Device Assistant - Assigning User Groups
Next, you must assign the "operator" and, if previously active, the "assistant" and the "Multiple operator" one or more user groups. Every user group contains users who were previously created and assigned to this user this user group. All users in this user group can then login to this device as an operator or assistant on the machine/Data Terminal.
See How do I create a new user account? to find out how to create a new user and how to assign him/her to a user group.

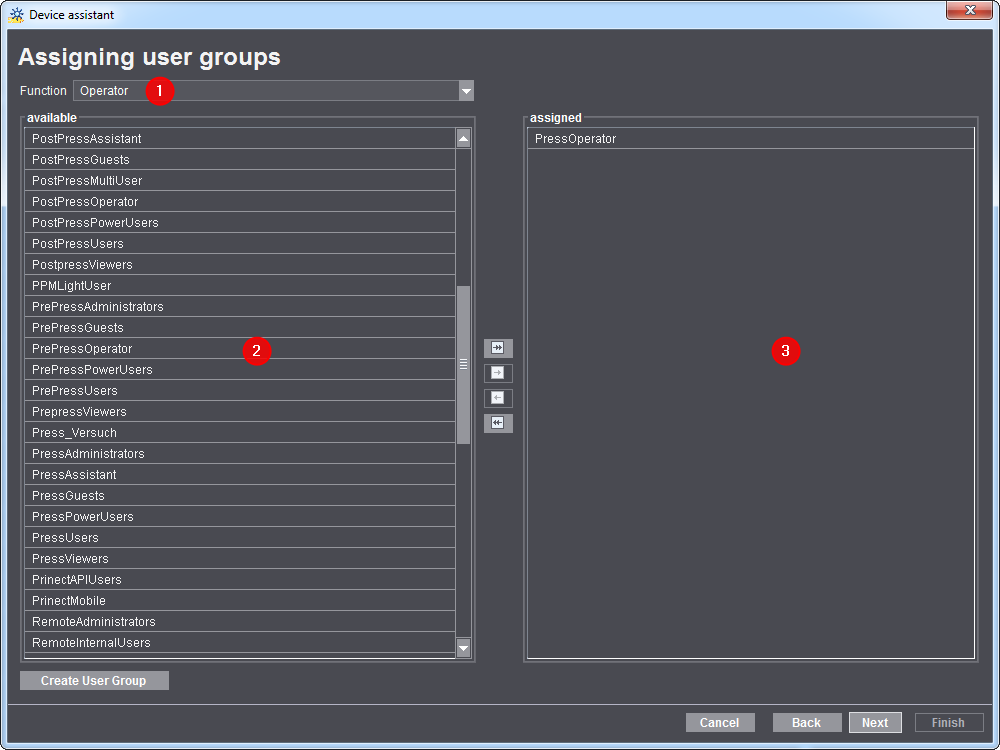
36.Select the "Operator" in the "Role" section (1).
37.Now add the relevant user group from the "Available" section (2) to the "Assigned" section (3). Or you move operation groups which are not required from the "Assigned" section to the "Available" section.

Note: At least one user group must be assigned.
38.Repeat the user group assignment for the "Assistant" and "Multiple operator" roles.
39.Click "Next".
Device Assistant - Creating a Variant
You can now define different variants for the device. One variant is already always predefined by default. In Setting up variants you can find a detailed description of how to create variants and what impacts they can have.
For a press, you can define, for example, a variant with "Printing unit" and a second variant with "Printing unit" and "Perfector". This lets you have feedback from the press whether printing is straight printing or perfecting.

Proceed as follows to set up a variant:
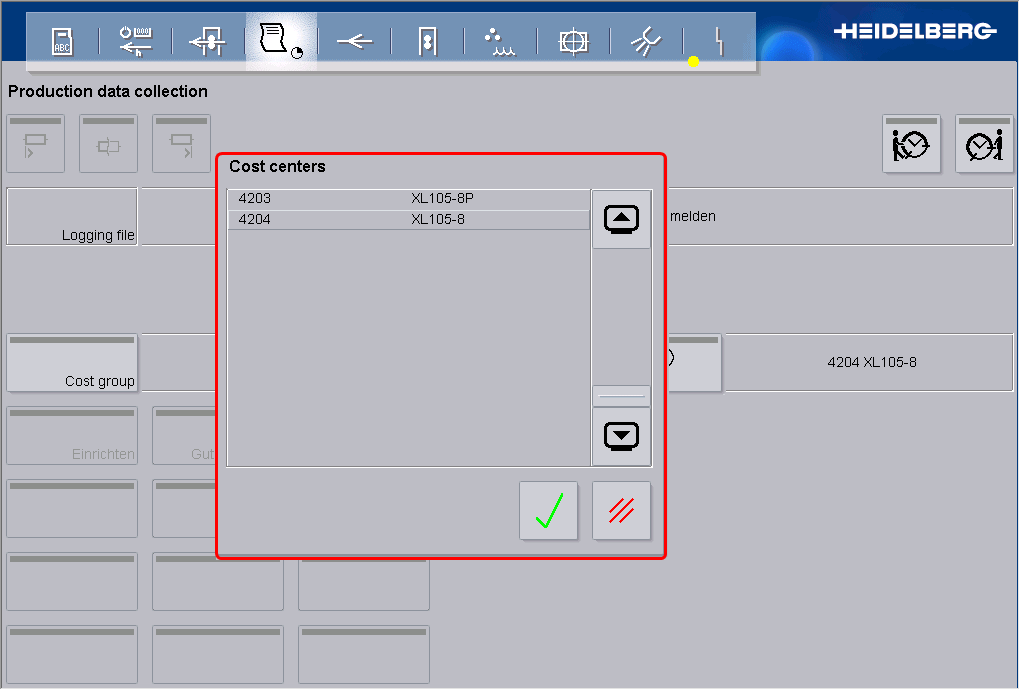
1.Type the name of the variant in "Name" (1).
2.Select in "Cost Center" (2) the cost center for the variant that was set up in the Device Assistant (see Defining a new cost center).
If there is no matching cost center, you can create one with the "Create Cost Center" button. Generally, you should create the cost centers in the Device Assistant.
3.Select the modules you need in "available modules" (3). Add these to "selected modules" (4) using the arrow buttons.
If the required module is not available, you can set it up in the Device Assistant, section "Modules" (see Modules).
4.Click "Assign variant" to display the variant in the lower part of the window (5).
In the Prinect CP2000 Center, you must select a variant or a cost center before you start a job. Only then can the job start.

Device Assistant - Summary
A summary of the device parameters is then displayed. Here you can check again whether the device has been configured correctly. If you would like to make changes, use the "Back" button to return to the corresponding dialog window.
1.If necessary, activate the option "Enable Extended Job Ticket".
You can find a detailed description in Enable Extended Job Ticket.
2.If necessary, activate the option "Enable Pallet Sheet".
You can find a detailed description in Creating a plate set sheet.
3.Click "Finished".
The new device XL105-8P is now created.
However, you may still have to adapt the sequence created automatically for this press and the automatically created PPF import configuration on the Prinect Integration Manager/Prinect Pressroom Manager so that the job data can be sent from the Prinect Integration Manager/Prinect Pressroom Manager to the press. In the case of a JDF-PPF workflow you need to define a JDF import configuration in addition.
Now only the other "side" is missing (Prinect CP2000 Center).