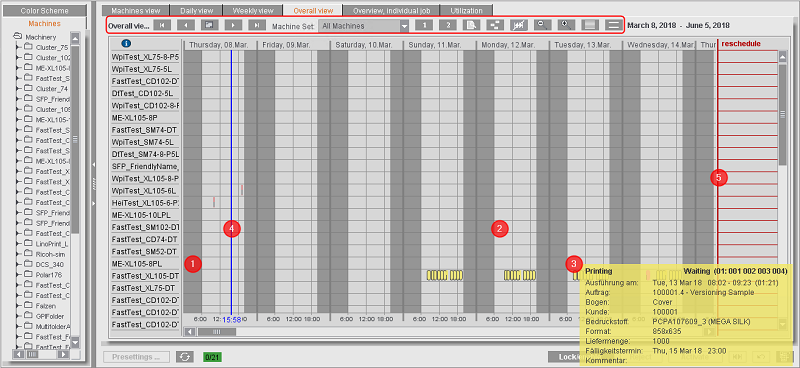
The Planning Board (Gantt Chart)
The planning board shows various views of the current scheduling states in different tabs. The following views are available:
•"Overview, individual job" tab
In a Gantt chart the overall view shows the scheduled operations and any new plannable operations for all machines enabled for scheduling. You can customize the period shown (generally several days). In the overall view, you can schedule operations using drag-and-drop (see Manual Scheduling with Drag-and-Drop).

The days display as column headers in the top part of the planning board (Gantt chart).
•The background color of the Gantt chart indicates the following:
·dark gray (1): time off work; these times cannot be scheduled
·light gray (2): production times; these times can be scheduled
•Scheduled operations display as horizontal bars in the machine rows (3). A tooltip with details about the operation displays when you let the mouse cursor hover over an operation bar for a while (see "Tooltips" Tab).
•The vertical "blue" line (4) indicates the current time (real-time line).
•The "red" line (5) represents the due date, i.e. the date on which the finished products must be ready for dispatch.
Display of overlapping operations
Video Tutorial: You can view more on this topic in the following video:
Prinect Scheduler - Easier to find overlapping operations
In the overall view, you can hide or view overlapping operations. When enabled, overlapping operations are marked with yellow arrows.
Representation of predecessor operations
The columns display the predecessor and the successor as follows:
•Status (only in the Predecessor column)
·Red: No operations have been started
·Yellow: At least one operation has been started
·Green: All operations are finished
•Number of operations
•Type of operation
•Total processing time of operations.
Note: All the elements in the toolbar have tooltips.
Navigation buttons
The first group of buttons is for navigation in the planning board:

•(1) Go back one week
•(2) Go back one day
•(3) Calendar to select certain days
•(4) Go forward one day
•(5) Go forward one week
"Machine Set" list box
You can select a machine set, i.e. a group of machines, in the "Machine Set" list box. Then only the machines in the selected machine set display in the planning board. The following machine sets are available by default:
•All machines
•CTP machines (platesetters of the Integration/Prepress Manager)
•Presses (Pressroom Manager)
•Postpress machines (Postpress Manager)
•Digital presses (Integration/Prepress Manager)
You can create other machine sets in the presettings (see Sets for Collectively Visible Machines).
Buttons for setting the view and for a search
In the second group of buttons, you will find functions for adapting the section displayed or for editing the height of a row in the planning board.

•(1) Button "1": today (zoomed appropriately)
•(2) Button "2": the present day and tomorrow (appropriately zoomed)
•(3) Displays all the operations of a job (see Show all operations of a job)
•(4) Displays the process chain of the selected operation (see Show process chain of the selected job)
•(5) Switch to show or hide the marks for overlapping operations
•(6), (7) Zoom out/zoom in
•(8), (9) Minimize line height / Increase line height
Note: The easiest way to zoom in a area in the planning board is to hold down the mouse button and draw a bounding box around the relevant operations (bars). In this case, you must always begin in the date header of the planning board. The selected area will be zoomed in as soon as you let go of the mouse button.
•(8), (9) Make height of row bigger / smaller in the planning board
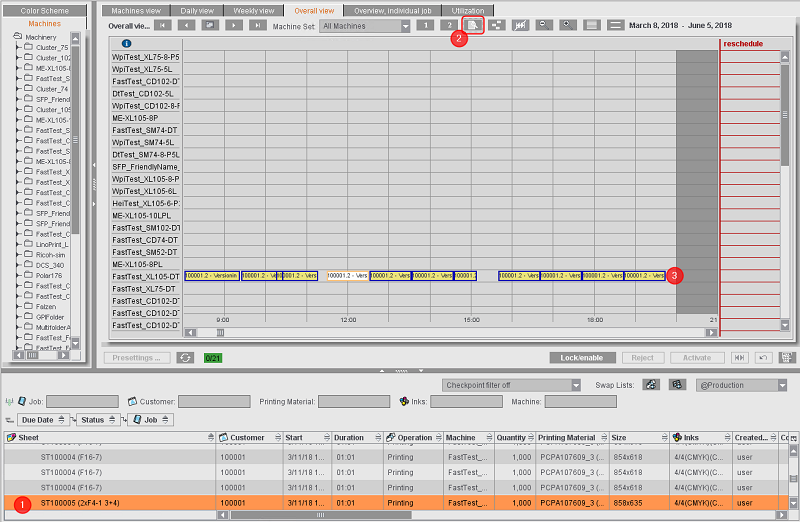
Use this function to find all the processing times scheduled for an operation in the planning board and to view them in the appropriate zoom.
1.Mark the job or operation in the job list (1).
2.Click the "Shows complete job (adjusted zoom)" button (2).
3.In the planning board, the scheduled times (bars) relating to the selected job are now highlighted "white" (3). The planning board is automatically scaled up so that you can see all the scheduled times of the selected job at the same time.
Note: You can also use this function to find the operation related to a "schedule bar" selected in the planning board in the list of operations. This function helps you find more detailed information about a scheduled job in the list of operations.
Show process chain of the selected job
With this function, you can view all operations of a job and their process chain at a glance.

1.Mark the job or operation in the job list (1).
2.Click the "Show/hide process chain of the selected job" button (2).
3.In the planning board, the scheduled times (bars) relating to the selected job are now linked by green lines (3). The lines no longer display when you use the button again.
This function is a fast way for you to identify critical operations in particular that are highlighted red because of an alarm.
Other functions using the mouse or keyboard
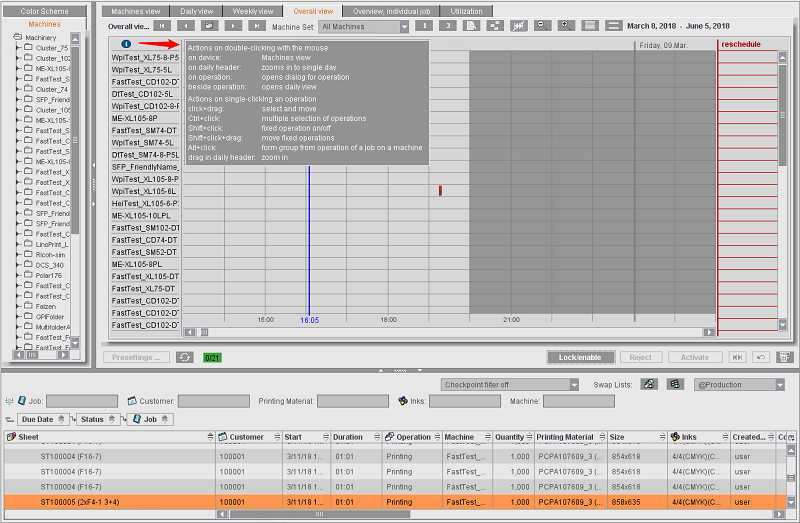
Information tooltip
A tooltip window displays when you let the mouse cursor hover for a while on top of the Info icon ("green i") on the left above the planning board. This window shows you information about functions that you can trigger with the mouse or keyboard.
|
Double click with the mouse |
|
|
on a device: |
opens the weekly view |
|
on a day header: |
zooms in the single day |
|
on an operation: |
opens the dialog for an operation |
|
beside an operation: |
opens the day view |
|
Actions following a single click on an operation |
|
|
Click + drag: |
Select and move |
|
Ctrl + click: |
Multiple selection of operations |
|
Shift + click: |
Fix operation On/Off |
|
Shift + click + drag: |
Move fixed operations |
|
Alt + click: |
Form group from operation of a job/machine |
|
Drag in day header: |
Zoomed in view |
Context-sensitive menu in "Overall view" tab
Prerequisite: You can use "Change shift schedule" and "Machine Reservation" in the context menu only if the system is enabled for scheduling with the "Lock/enable" button (see "Lock/enable" button (5)).
The context menu contains the following items:
•Change shift schedule (see "Change shift schedule" dialog)
•Machine Reservation (see "Machine Reservation" dialog)
•Print preview
"Print preview" in the context-sensitive menu lets you check the overall view as a print preview on the screen and print it to a connected page printer.
"Change shift schedule" dialog
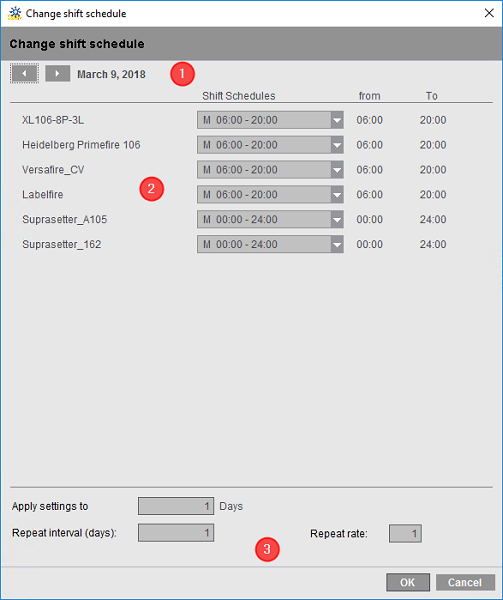
Shift schedules are defined in the Presettings (see "Shift Schedules" Section). This is where you define employee shift schedules that in turn are the basis for machine shift schedules.
You can edit single machine shift schedules that deviate from the Presettings in this dialog.
•In the topmost part of the dialog (1) you can set the date for which you wish to edit the shift schedule.
•You can select a predefined machine shift schedule separately for each machine in the middle part (2).
•In the lower part (3) you can set whether and how often these edited shift schedules will apply, possibly even repeatedly.
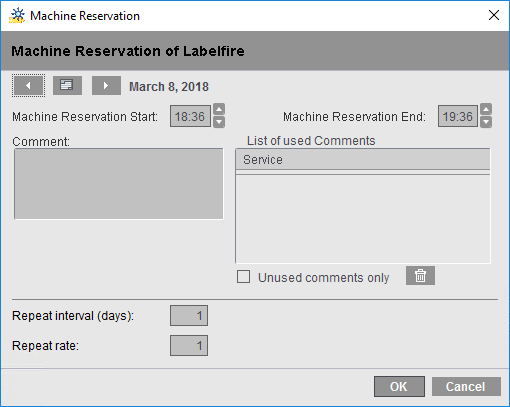
You can reserve certain machines for a defined period in this dialog. The machine is "occupied" for the reserved period and cannot be scheduled for other jobs. Reservations are designed to keep periods free that will not be used for production, e.g. for servicing (see also Reserve machines).
Reservation is set for the machine the mouse cursor was positioned on when the context-sensitive menu was invoked. The machine identifier displays in the caption bar of the dialog.
•In the topmost part of the dialog you can set the date for which you wish to edit the shift schedule.
•In the "Machine Reservation Start" and "Machine Reservation End" boxes, you set the period in which the machine will be reserved on the selected day.
•You can enter a comment in "Comment", for example, to explain why the reservation was planned.
•The "List of used Comments" lists all the comments assigned to date. Click an item in this list to display the selected comment in the "Comment" box. Any existing comment will be overwritten.
•Only comments that were not yet used as annotations for machine reservation display when "Unused comments only" is checked.
•Click the "Delete selected unused comments" button to delete a selected item from the "List of used Comments".
•In the lower part of the dialog, you can set up repeats for the reservation if required.
A reserved machine is highlighted in the planning board by a special operation, "Machine Reservation".

A tooltip window displays, showing you the comment and reservation period when you let the mouse cursor hover over the reservation bar.
Remove reservation
You can remove (delete) a reservation by marking the operation bar in the planning board and selecting "Finish operation" in the context-sensitive menu.